Wednesday, February 27, 2019

Tim Holtz Addicts of Facebook; #THA_FEB....A 2nd Chance 2012 Valentine

 It totally rocks to see all the GREAT craftiness going on in the THA (Tim Holtz Addicts) Facebook page! If you are not in the group, and you love all things Tim Holtz...you SHOULD be! Recap: in early January, the GAs of the page announced a rehash of "The 12 Tags of" and each month, any member can do their take on the chosen Tim Tag previously done during his 10 year stint of Tags. While I did not participate during those first 5 years, I did join in on the fun of seeing all the takes on Tim's Tags posted on his Blog back then. The second 5 years were monthly Tags through the year; which I felt was easier for me to join in on than doing 10 Tags over just Christmas when things seem to pile up and time is so short. And, I WON a few of those monthly contests, too!

    The Tag chosen for this month's take just happens to have been my VERY FIRST Tag- ever! And since then- February 2012- I, and my Craft Studio, have both come a loooong way, baby! From having very few items and not even a Big Shot Machine yet... I can't believe how much I've added, and used, since then. I really have learned so much more about textures, colors and shading, and definitely about adding depth to 2-dimensional paper crafts, lighting, and balance, than I ever knew before doing that first Tag. To say it all helped me become a better Photographer is the least of it! I've come far, far, far away from that lady who had to ask "HOW did you get that to look the way it does?" to a picky crafter who must do things to the letter & not be satisfied until the last detail is good to go. It certainly has helped me overcome my housework OCD, if nothing else! lol

                             Let's take a look back, before we move on...


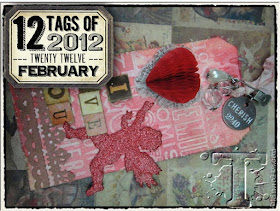
Tim Holtz's original inspiration included Paint Resist Technique.
This is what we are challenged to use on our own take of this Tag.

WOW. Can you say "Plain Jane"??
I'd just gotten a new Big Shot machine with all the accessories, plates, platforms, & my
very first TH Alterations Die: Tag and Bookplates. Since then, I've used the heck outta
that die! But it's still going strong and a few other people I know also had to have that die.
My second was the TH Strip Die Filmstrip. And I managed to also find a larger Sizzix die
of filmstrip even though it had already retired by then. Film and cameras are my 'thing'.
As for TH stamps and odds/ends...I had almost nil. 
Plus: Older Daughter Ashley was not in this since she hadn't met older Son Brian yet.
So many things have changed since then; most for the BEST!

So let's move on now... UPDATED TH!!!

To get started, I usually pull out anything that remotely relates to the theme I am thinking of.
That means going through stamp sets, embossing folders, IdeaOlogy...
just holding these things in my hand can get to me brain-storming
"What can I do with THIS?"
With the TH Paint Resist Technique...
Tim used both a set of stamps AND a matching embossing folder.
So my first thoughts had to come together within anything that matched under this rule.
Tim has recently released several "new" old things, just putting a new twist on some
old faves. I happen to still love the old ones, but am happy to say
I also have some of the updated items, so I was aiming for
not just a "re-do" but an updated re-do.

As usual during the brain-storming sessions...my 3 desks are often FULLY LOADED.

One of the first things to do was take care of the tiniest part- an IdeaOlogy Vial.
I used a TH Vial Label on both sides, added a Remnant Rub cut from one of the tiny texts,
then shaded in some TH Distress Oxide in Vintage Photo after filling
the vial with some double-sided pink/purple scrappy cut with a shaped puncher.
Glossy Accents made sure the cork topper won't come out.

Then; on to play INKY HANDS!
One lady in the THA group took her TH Faceted Heart Die to a whole new level:
she made a bust out of the heart in black and added some black tulle for the dress 
below the bust. WOWZA!! I was VERY impressed at that GENIOUS idea!
So, this became my match of a Gentleman for her Lady. :)

Here's what I ended up with after stamping with Distress Paint in Antique Linen
with Regular Distress Ink in Victorian Velvet on the left.
On the right- the same Antique Linen DP with Distress Oxide Ink in Black Soot. 

A better pic of the same.

Tim had a matching hearts Valentine stamp and embossing folder set for that original Tag.
I decided to use my 3D Mechanics Embossing Folder!
Then I added some depth to the color by using Distress Reg Ink in Fired Brick,
with a touch of Vintage Photo Oxide on the corners.
Then used my TH Marker Spritzer with some Black Soot Distress Marker
for some splatters all over for the last touch.

I used matboard - 1 layer- to cut the cherub from my retired-but-new-to-me 
TH Alterations Bigz Die Love Struck. This die was new back when Tim made his Tag.
(I still have 3/4 package that will likely last me past this year even using it on 
almost every project so far. An Amazon bargain! Tim's Alterations Bigz Dies work
like a DREAM with this stuff!)
You'll see I didn't sand the backside down- no need to.
But I did ink it up (Distress Oxide Antique Linen) as a tiny bit of her will show on the
backside of the Tag. (Yes, this cherub here, is a girl.)

The front of our girl was more detailed in not just Distress Oxide Antique Linen Ink,
but given a coat of Glossy Accents and Distress Rock Candy Glitter,
Then her edges got Distress Oxide Ink in Vintage Photo.
You can see the color scheme coming together already.

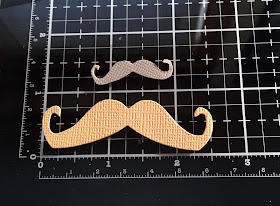
Now, I'm going to share my trick on how to SHRINK a Tim Holtz DIE !!


1- Choose the piece you wish to make smaller. In this case; I need a 'stache
for my Gentleman, so I used my TH Movers&Shapers Die Set and the TH Baseplate.
The paper you choose to die cut isn't important, but it needs to show up DARKER
than WHITE copy paper. Otherwise, you will end up copying out a ton of 
black ink soaking on a sheet coming out of your printer.
So I used a scrap of TH Coordinations. You can use plain colored cardstock.

2- Note the mustache die cut is temp taped (Scotch pink Glider Tape is excellent for this)
to the regular sheet of copy paper (shown lower left corner), and I have 
chosen "copy" on my free-standing Canon printer/copier/scanner.
We have 2 printers in our walk-thru office- the other is hooked to my desktop setup.
3- Here's where you 'play around' until you find the size you want.
But if you're pretty good at figuring your percentages, like I can do, or if
you're up to trying a few....I usually start out at 50%. 
4- Print.

5- Now all you need is the actual paper you wanted to use for the die cut.
temp tape the smaller piece to the chosen paper, cardstock, or material...
6- Cut around with your TH Tonic Scissors, using the copied piece on top as your cutting guide.

And there ya go!!
I now have an original piece I began with from the TH Die itself...
plus the TINIEST of 'staches for my Gentleman!!


Here's my final "2nd Chance Valentine Tag" take...

The FRONTSIDE...

...and the BACKSIDE!


A few closeup shots will help you see the details better...


That 'stache!! It's the perfect size for this Gentleman, now!
The new TH Alterations Thinlit Die Faceted Heart is an awesome die set!
(Attached to the base Tag with 2 Long Fasteners.)
There's this size, and a smaller die as well.

There's the updated Cherub from the TH Alterations Die Love Struck.
Back on Tim's 2012 version, he used TH Tissue Tape for a 'lace' backing on the
(very same Love Struck Die) heart cut. Instead of using the Tissue Tape on the
Gentleman, I chose to use it on the Cherub for her to carry her LOVE potion.
This is TH Tissue Tape "Symphony"- which I still have another full roll of,
as well as a few other retired rolls. LOVE TH Tissue Tape !!!
I also still use my TH Tissue Tape Dispenser.

Some TH IdeaOlogy that is retired is still out there...and I have it, too!
I love holding these things and playing with them while thinking over what to do with
these cool embellishments. I've seen Tim wire up his TH IdeaOlogy Arrows,
and I LOVE copying that !!

Here's an updated item I use often: TH IdeaOlogy Quote Chips.
In this case, I added some Black Soot Distress Crayon all around the sides of the Chip.
Adding some background layers for the Tag front itself:
Middle- plain manila cardstock torn a bit with the TH Tonic Paper Distresser,
then inked around with Distress Oxide Ink in Vintage Photo.
Very Bottom Layer (used as the Backside of the Tag as well) is a square of the
TH Seasonal Stack- which I've had about 8 years plus. I felt
it made a very fitting backing for this take.

The backside not only uses the old TH paperie, but I also used a square of 
Paper Stash Classic Kraft for die cutting with my TH Alterations Thinlits Stencil Numbers Set.
Some shorter IdeaOlogy Mini Fasteners look great with their tiny phillips screw heads.
The Classic Kraft also gave me the same red that I used on the Faceted Heart-
 for my first use of the TH Pocket Frame Thinlit Set.
Some numbers from TH Metallic Stickers, Silver Alpha shows how 
the number 14 plays a part in our lives.

This tiny wired heart and set of wedding rings are the only non-TH items 
that just came out of my 'everything stash'. Hobby Lobby sells the ring sets
from their wedding line. I purchased several of these for gift tags on occasions.
No Tim Tag is complete without something at the top like that
very beloved TH Crinkle Ribbon....which I need to order more of!


For the sake of following the rules of the THA FB page,
here's a full list of TH items I used on this month's Tag...

Alterations Dies & Embossers:

     Movers and Shapers Die Sets:   Mini Mustache and Pointed Finger
Bigz Dies:   Love Stuck
 Thinlit Sets:   Faceted Heart
                      Pocket Frame
                           Stencil Numbers
                       Tag Collection 
3D Impressionlits:   Mechanical      

Stamp Sets:  Dapper

Paperie:   

  Metallic Stickers: Silver Alpha
Paper Stash Classic Kraft
Paper Stash; Seasonal (retired)
Quote Chips
Remnant Rubs, Words
Tissue Tape, Symphony
Vial Labels

Distress Products:

Regular Distress Ink Pads: Fired Brick
                                                   Victorian Velvet
Oxide Ink Pads: Antique Linen
                     Black Soot
                          Vintage Photo
     Markers:   Black Soot
Glitter: Clear Rock Candy
Crayon: Black Soot (Set 03)
Paint: Antique Linen

IdeaOlogy:

Adornments: Arrows
Assemblage; Mini Vials
Crinkle Ribbon
Heirloom Roses: Halloween
Long Fasteners
Mini Fasteners
Philosophy Tags

Other Tim Holtz Signature Tools used:

Blender Tools and Blender Foam Rectangles and Mini Rounds
Craft Pick
Craft Mat (by Ranger)
Distress Marker Spritzer
Distress Refresher
Glass Media Mat
Glossy Accents (by Ranger)
Paper Distressor
Scissors (Tonic)
Shears (Tonic)


This one was a FUN Challenge & it's rare to get a 'Do-Over" for anything!
I hope you've enjoyed taking a look and getting some inspiration from this post.
More than anything else, I'd like you to have a SMILE over it,
and look forward to more THA crafting!
Come on over and see the awesome talent blooming!
Until then...

BE SAFE &
HAPPY BLOGGING!


Tuesday, February 26, 2019

Frilly and Funkie Challenge #4 Let Me Count The Ways..."But the Greatest of These"

February has been a tough month for our entire family. Snow in MinneSNOWta has kept the younger couple kids snowbound (the state is used to heavy snow winters and rarely closes down, but this winter has had relentless storms) until the roads could be seen enough to get them opened back up. A couple of years ago, the ChiefHubby and I headed NW out to Montana (the younger set went out that way to Yellowstone on their own just before that), and we were shocked to find towns that had only 3 or 4 roads total that lead into or out of them. Complete with crossing guard arms that came down and blocked anyone from leaving the towns. We were told it just "wasn't done" because when a snowstorm began; staying in a town meant life or death. Homes out of town are all pretty faaaaaar out. For the life of me; I have no idea why anyone likes to live where it snows like that. I am a perpetual Summer Child, who was unfortunate to have been born in a state where extremes of hot and cold are the norm- sometimes within 24 hours. *ugh* And all that snow and cold brings another kind of COLD- the Flu kind. So while the Younger set was dealing with c-c-c-cold, down here, the rest of the family was dealing with c-c-c-croup! How it came to us was the usual way; someone who had it got close to ME. I have a very weak immune system that was discovered about the time I began going completely deaf at the age of 11, thanks to Rheumatic Fever. So when a germ is floating around....like a flea looks for a dog; germs hook onto ME. From there, while I died a slow, painful, and rather loud death, the germ managed to somehow pass to our older set of kids- though we had no physical contact other than they used our family room while I sequestered myself away in my deathbedroom. (They are awaiting birth of Baby Girl in March, so they hired people to come clean the house since they hadn't had that chance yet since they got moved in when Wittle Peanut was coming along.) And THEN; February took advantage of the WCF (Wind Chill Factor) and made having this illness WORSE...by passing it to my Grandson. That was my last straw. Meemaw Bear is still down with resulting infection (URI) from this crappy croup, but ...DO. NOT. TOUCH. MY. BABIES. Grrrrrrrr!!!!
        While getting this was not the first illness to be concerned with, tomorrow begins the real party- at the hospital getting some tests done to find out what the real problem is. We'll know more later, so I won't speculate nor go into any details. Just suffice it to say that getting this entry out on time has been PURE CHALLENGE. But it felt good to finally get in there last night and play!
So, on we go.....


On a trip to Hobby Lobby, I picked these up thinking I might use them for this somehow...

And then, a plan developed....and kept DEVELOPING while I couldn't get the plan MOVING
because I was so sick. I finally DID get a bit of the first part done last week.
This set of pics is from that.

After adding a layer of gesso to each; the matboard, (the matboard for the background of the Tag to use as a base since most of my plan was going to be layers of paper that needed a stiff background),
the cross wood piece, and the cardboard chip anchor....I began adding paint to the cross and modpodged real BIBLE pages to the anchor. I LOVE old books- and keep an old Dictionary on hand and also a very old torn BIBLE- just for this very purpose to use all those cool aged pages!

At first, I was going to use the new TH Faceted Heart Die as the cut for this project.
But, I also had another project going (next post after this) and was using my new-to-me TH Love Struck Die. I hadn't gotten to use it much at all, so I thought this would actually work better.
After layering 3x matboard, then front and back cuts of TH Coordinations Kraft Paper;
I tidyed up the sides with some Ranger Texture Paste and then
used a TH Distress Crayon in Picket Fence all around it. 
This helped it look as if I'd purchased this piece already done- but it's an original TIM SHAPE!!

Here's where the easy part came in that I've done for all my years working on school walls, projects for the kids and Teachers, or just for the fun of making my own thing: getting online and finding some free art pages to print out and use. I double up on the paper if it's just plain printer paper (I purchase a variety of weights and colors for this). I also use specialty papers: resume, wedding invitation, and other textures/weights. I use only Canon printers that use multiple ink tanks. 
So my options for what I want in a workable paper, are limitless.
HOWEVER: my very favorite paper to use above all: Tim Holtz's line of paper stacks, stashes, and esp GRUNGEPAPER!! Plus- no matter how you slice it- there's just NO reproducing 
Tim's Paper Dolls. If you're looking to 'save money' trying to do that; my advice: FORGET IT.
They just cannot be duplicated and get the same result as manufactured.
The TH Wallpaper made my first layer- another "must have" paperie!
I adhered it to both sides and then gave it a 'white washing' with Picket Fence Distress Paint.

Now, my fave part of this begins; distress inking and tearing,
then re-inking and tear again!


THE END RESULTS...

Front side of Tag shows the many layers I wanted built up for this...
only three layers make up the pocket itself.
The rest show up on the edges or down through the middle of the pocket.

Of course; a BACKSIDE!
Both sides show the edges of the TH Picket-Fenced Wallpaper....
grunged up with a bit of TH Oxides in Antique Linen and Vintage Photo- 
the same colors used to ink up the torn papers.


CLOSEUPS...


I absolutely love how the text shows up through the mod-podge- 
with TH Distress Inks in Chipped Sapphire and Faded Blue Jeans tinting the edges of "HOPE".

The "LOVE" turned out nicer by using the TH Alterations Love Struck heart because
the faceted Heart was much bulkier. This one tucked inside perfectly!

A couple of TH IdeaOlogy Index Clips holds the main word down on top,
while an updated TH Story Stick tells this 
"These 3 remain; Faith, Hope, Love, and the Greatest of these is LOVE."
is a 24/7 belief of mine.

The backside needed a bit of IdeaOlogy, too, so three Mirrored Hearts connected together 
with Jump Rings, are held in place with a Wire Pin.
You'll note very closeup: the holes of the middle heart were drilled diagonally-
just to break up the straightness going on with all the chaos of the wording 
in all directions.  

My favorite points of this Tag:
1) the colors and the texts going on,
2) the layers upon layers!
3) how I had to keep a mantra going over and over ; "Keep it SIMPLE."

It's all packaged up and ready for gifting to someone who teaches for our Wittle Peanut-
and she happens to be a Bestie. He'll give it to her Wednesday Night !
These are the 3 things that are the simple parts of what JESUS has given each of us-freely-
and she teaches kids on Sundays as well as Wednesday evenings. 
Her generosity in life speaks these 3 things loudly and clearly
as she shares with each person who crosses her path in life.
Oh yeah- and we have a lot of fun together, too....
while searching Pinterest for some ideas on how to open up a pocket like this,
and...well... you know PINTEREST... I ended up in blue things; 
Tags, stains, stamps, inks, you name it.
 I was very taken with the mermaid Tags that were shades of blue... 
and the seashells that made me take a deep breath and close my eyes, 
begging for that sunny beach! I must've been on that app a bit too long.
 Later that night- blame it on the meds-
I dreamed we were back on another cruise with all our other Besties, & she
was making us serve other people with little cakes we baked.
She comes out of the Galley with a new hair-do and wanted to know
what we all thought of it as she showed it off...
I didn't have the heart to tell her that she was the spitting image of
an Oompa-Loompa with blue coiffed hair that also had 
several shiney blue Christmas décor balls hanging in it.
Flu drugs, man. Drugs.


I'll give a huge SHOUTOUT here to those who started Following my blog: THANKS!!
I have no idea why I didn't put that up before, other than thinking "why would anyone want to
follow MY blog?" and then one day, I took a look at the stats....WOW!
So, I am happy not to be the only one who likes to peek in on certain blogs
because they are simply PHENOMENALLY talented Crafters posting on those!
You cannot imagine how humbled I am to think of anyone wanting to see MY art.
I give GOD the glory for that gift!
And, another SHOUTOUT for the SWEET COMMENTS!!!
It's push for the inspiration muse!
I will try my best to keep up in the coming months, but only ONE knows
what tomorrow may bring. I'll just take this next two weeks as it comes and see what's what.

Here's where I must remind you readers to take a trip on over to
where you'll see tons of other AMAZING craft talent!
Please feel free to join in, or even head over to the Sponsor's Store;
where you'll find just about all of Tim Holtz's line of products- and much, much more!

I'm pulling a late-nightery to get this post- as well as the next- both up.
So, see ya 'round, and meanwhile...

Stay Safe
&
HAPPY BLOGGING!!


Tuesday, February 12, 2019

Frilly and Funkie Challenge #4; Winter Blues....SNOW DAY!


    Winter Blues….seems like every year; it happens. That time period between New Year's Day in January, and Spring Break in March, is a time when we'd all like to just pull the covers over our heads and hibernate until Spring. I honestly think that's why some Genius thought to put Valentine's Day in there; to lift us up out of those "winter doldrums". Since well back in High School, my Speech and Drama Teacher (who was a fave of mine) took an entire class day to talk to us young teens (16 to 18 yr olds together in an advanced class) about this very subject. It seems that right about this time of year, most of us don't get much sunlight. That can have a huge effect on our bodies, and in turn, on our mental health. Depression is REAL; I know this for a fact, and unfortunately, several diseases also contribute to this depression by messing with the chemicals in our brains, and  Rheumatoid Arthritis is one of those. I had my "onset" of RA after major surgery in 2005, and while I have done a type of "chemo therapy" (weekly shots and immunity-killing tablets) to help keep my "moderately severe" RA in check, since that time....lemme tell ya: it SUCKS. Add to that: getting a bad cold, or a disjointed hip- both of which happened this past week- is like living by dying. That kinda set  the pace for some bad news that came about one of my Besties...
         Cancer. Just the word brings feelings of helplessness and fear that - GOD willing - not everyone will face in their lifetimes. I did. But I was blessed that something else came up and in the process of taking care of that problem, it was caught very early- well before it could even get to a Stage 1. But the complications that came with....Oh. My. LORD. It's sorta funny now when I think of the irony of praying "GOD, please change me in the way you see fit, so I am molded into the person You meant for me to be- more wonderfully and fearfully made!" And, of course, I meant it. Careful whatcha pray for...by the end of the 3rd YEAR after that major surgery, another surgery for complications from the 1st one, RA onset, and dealing with more heart problems. I was 39 when all that piled onto me. I actually begged The Big Guy to please go mold someone ELSE for a bit! But time passes, and we muddle through as best we can. At some point; we look back and see that we made it ok- not 'great'- but we're still here. (HE won't allow more than we can handle- remember?)  
And then; this past winter, one of my group of Besties started having a few noticeable problems. She hoped to put it off till the first of the year- after the Holidays. The rest of us (esp the ones having been through this awful journey) hoped she would rethink that. She didn't have much choice, and,....here
we are: she's finished her surgical part of getting rid of the offending cancer pieces, but the news from pathology was not what we all had hoped for; Stage 4. 
           Now, before you read any further; this is NOT going to be a 'depressing' post. In fact; it's the opposite! And that's where I got my take on this Frilly&Funkie Challenge. I usually get in on uploading my project within those last -literally-seconds of the deadlines. Mostly because of my OCD on perfection. It used to be cleaning house. Oh yeah, I really enjoyed it! Nowadays, I've transferred that OCD to my craft studio and while my home is neat and tidy...if you visit me here; you're on your own with the Dust Bunnies. But, I began this as I was having my own ills, and then meeting up with our Besties; the bomb dropped. And the depression and helpless feelings set in. I know very well- as a deaf person- how it feels like the entire world just keeps spinning as if everything is fine. But it's not 'fine' because my world has stopped cold. And no one notices. So I figured that my Bestie needed to be uplifted with a gift; a gift that has a lot of meaning behind it!
                I first made an extra Tag while doing that last Challenge- Vintage Valentines. I sent it to her upon her release to home after the surgery. But I felt like this "Winter Blues" somehow fit better than just a simple Tag. So, let's check it out...


I have no idea what has come over me this year: I DETEST SNOW; normally.
But Tim came out with so many delicious bits of eye candy...what a fun year it's been!
I had just put all of it away- with a huge *sigh* when this Challenge came up.
Joy! Get it all back out again! lol

I have NEVER done this before- this is my first ever canvas project.
Oh, well, yeah...you'll find one up on my shelf of "inspirations" that is gessoed
and then painted a taupe color. Otherwise- it's completely blank. 
It's on the same shelf with all my years of photo work and represents a 'work in progress'.
It's for me to imagine what could go onto that canvas.
So the gesso job here was pretty easy. lol!
I did both sides with 2 coats for good measure.

Then came the die cutting. And cutting. And cutting.
I think I actually had over 75 cuts of the TH Alterations Layered Snowflake.
I embossed those and also put a few together in layers for some thickness and difference.
I used Glossy Accents to dot glue them down as I layered them all around the canvas INSIDE.
You'll note here that I also did several of the Sizzix Snowflake as well- doing a bit of 
the same layering of the cuts and then layering those onto the canvas.

And then another good coat of gesso...
layering more flakes...
gesso...
flake layer...
gesso...
until I had the look I was satisfied with.
It took awhile, but the effect is WORTH IT!!

The "FRONT" so far...
then it was time to do all the same steps for the BACKSIDE.

Oh my!! LOOK at that texture!!!
Tip: this took 'circles' in both directions (clockwise and counter) in order
for the gesso to get all around inside those dips as the last layer dried and then
I did one final coat to make sure it was all covered.
Then I put it on the fireplace mantel in the Family Room- the dry air from the gas logs
helped dry the entire canvas completely... while I did other things... like hibernated. :0

I really like using TH products almost exclusively, but Picket Fence was 'too white"
and Antique Linen was "too tan", so I dug through my 'other paint' drawer and
found a brand new bottle of this: "Magnolia White"...perfect!

Strangely, I figured out that this step needed to be done AFTER that coat of paint.
You'll see why in a couple more steps.

The "Wint3er BLUES" blew in!
TH Distress Inks: Chipped Sapphire, Faded Blue Jeans, and Salty Ocean.
I thought it best to stick to just a FEW blues. And added some other shades of...
TH Distress Oxides in Iced Spruce and Antique Linen for some dept.
Picket Fence and Antique Linen DID come in handy for highlighting!
I blended, layered, scrubbed, and generally LOVED-TALKED those inks into that canvas!!
I'll admit to also letting out a bucket of tears during this stage.
The frustration of having both our Daughters going through some ills and 
Winter Blues added to my tears over my Bestie's situation.
Here's also where all that stuff in the previous sentence was covered in PRAYERS!!

Which is what I got here: snowflake highlights.
And here's where I added a layer of Ranger Texture Paste onto the lower half of the
canvas to make the 'ground'. After it dried, I repainted over it with more of the same craft paint.
I will also say that while I hate glitter- and the glitter everywhere like sand coming back with you from vacation- I actually added a good sprinkling of TH Distress Glitter in Rock Candy (the only glitter I own!!) … oh dear...in EVERY COLOR LAYER.

Since I wanted my Bestie to see BOTH sides- or choose her side according to how
she's feeling that day... I needed a base for it to stand up.
That good old sturdy matboard came in handy again. I cut one sheet in half and stacked it.

I used an un-favorite paper for a covering- this is just the FIRST layer of covering;
it smooths out the sanded down sides to match as 'one piece' better.
I closed this backing entirely.

Got the ChiefHubby to pick me up some small flathead screws...

… and marked a line that was about one third of the way across.
I knew I'd have extra weight on one side, BUT at the same time, the canvas is
heavier on it's normal "front" (my BACKSIDE).
I'm pretty good at eye-balling this kind of thing. Probably due to sailing a sailboat;
it's all about balance and pull. The line just helped me make sure the bottom of the canvas
was smack in the middle, so no screws would pop out of the wood.
Here; you see the FIRST layer of papering with a SECOND covering that.
I made sure I chose the right GOOD paper for that outer covering.

And then, some inking of the same Distress Chipped Sapphire
(remember to heat all these inks in between)
then a sealing coat of TH Collage Medium.

Last touch- sanding down a few of those TH IdeaOlogy Alpha Parts Snowflakes
and Icicles which then got pasted onto the BACKSIDE with TH Ranger Stickles
in Rock Candy. And another little tracing of it on the top of these!

Before we hit the Final Photos and Closeups...
Check out this AWESOME EFFECT on the TH Alterations Die Winter Wonder!!
I trimmed him down after sending him through on a sandwhich with matboard- twice.
Then, I also die cut some TH Frosted and trimmed it up against the other two.
Sanded that all down and cut some 'arms' that looked like old branches grabbed from 
a pine tree nearby. Then I was thinking "Hmm...how do I adhere all three layers together??
*shrug* I practically own stock in Glossy Accents since I buy it so much, so..."
I stuck the arms in between the two matboard layers, then squished that
TH Frosted onto the top, and the COOLEST EFFECT happened: it looked like
the 'snow' had melted from warmer hands that smoothed and smoothed until
the snow was so packed, it became a glistening icey covering.
I don't know about YOU and what YOU did with YOUR KIDS...
But MINE got the whole snowman deal: sprayed colors and all!
We made Barney and a scary regular dinosaur one year when they were first old
enough to go out for a long period of time. ChiefHubby got home and said
"I think the neighbors are gonna complain about the MONSTERS out there you guys built!"
Hey... go get ur own snow, and play in ur own yard, bud.

Here's a bit closer...
In all- I didn't 'grunge' much on this project. Not much shading on cut pieces so they
look 'fresh'. Some shading on the TH Paper Dolls- of course!


Here's the Final Results:

The BACKSIDE comes first;
it represents the "storm" of a winter snowstorm.
If you've ever driven in what is called a "whiteout", then you'll understand this storm.
The dark clouds darken out the sun so it seems as if daylight is suddenly evening.
Then the snow comes; flurries that are light and pretty. But soon they start coming
down in almost 'chunks' of huge flakes made of both ice and snow.
Now, you're driving much slower because you're following the sideline.
Suddenly; you can't see ANYTHING but blinding snow that looks as if it's both
white AND black- because the snowfall is so thick that all light is blocked out.
NOW...
you're frightened. And terribly so.

And then the morning comes.
School gets canceled from a foot- or more- of snow.
What happens then?
The GOOD TIMES are made from that very same awful, cold, rotten, scary snow.
You wake up to a picture out of Norman Rockwell!
In this project, I put TH Paper Dolls in that would 'match' my Bestie's 3 Sons- the oldest is married, has one little girl holding the pink scarf for the unfinished snowman (she's just a bit older than our Grandson, Cole) and ANOTHER on the way (holding the name of their creation) !
(No, it's a rarity: they're not giving away gender till birth.)
The middle Son is currently a College Boy- same Alma Mater to be as his older Brother.
The youngest will graduate HS this Spring and head off for the Fall Semester to his
Mom and Dad's old Alma Mater.
I chose TWO washi tape borders (non- TH) because used in tandem, they
hold the last part of my message:
While I rest in the fact that I believe The LORD is in control of everything,
I also know that sometimes he allows things to happen that are for HIS Glory 
and our good. Even when it feels otherwise. So I am just going to keep
lifting her up to HIM in prayers, hope, and love.
Because if there is one thing I learned in those 5 long, painful years. it's that
LIVING is a heck of a LOT harder than dying.
It's what we have to go through in order to keep on living that is the tough part.
But, I see GOOD in her future! I hold out that BLESSED HOPE
that she will have many, many more photos to take of the coming years!
That's why that blank filmstrip washi tape was perfect.
And the blue hearts on the side fill the other frames of the filmstrip: always in our hearts,
even when she feels like the entire world has passed her by.
The snowman is like many here that happen, in that the fun of snow itself ends up
in an abandoned snowman who still needs clothes items. This is usually where Mom/Grandma always comes in... we gather what is needed and hand it out to them, unless...
unless the rest of the family who built the guy are all having too much fun
in other snow activities. Then Mom/Grandma feel sorry for the poor chilly guy and
go out and finish making him look respectable enough for her yard.
Here's for many more years of finishing work still left to do!!!

The Closeups:


TH Crinkle Ribbon in same Inks cover the entire outside edges.


Please forgive those hated glue gun strings. I'll be sure to swipe those next time.


TH Decorative Deer...with glue gun strings... *sigh*


If you didn't get here via The Frilly and Funkie Challenge Blog 
please head on over to the page and see all the other projects.
I guarantee you'll get a smile out of these if you even remotely like crafts!
If you're inclined to join us; you are WELCOME TO!
The Funkie Junkie Boutique sponsors each Challenge with prizes,
and you'll find lots of great deals on there-
in fact, I was recently able to refill all my ink pads (which is why the
colors are so bright once again) at a fraction of the cost I would normally pay online!

Here's a SHOUTOUT to all who took the time to check out my last project-
FFChallenge #3. While I was happy- and VERY HONORED- to be chosen into
the Top 3 Picks (earning another Badge), the weather and my own ills have
not allowed me to get them out in time for Valentine's Day to our 
younger set of kids up in Red Wing, MN. I hope to rectify that before the weekend arrives.
I am in constant AWE of all the Crafters out there who possess such GENIUS !!
It really humbles me to think of all the things we learn from one another.
And now... back to hibernation. : )

Stay Safe &
HAPPY BLOGGING!