Happy Spring to everyone! I'm the newest on the Design Team, but many of you know me as just Lyla from A Chief's Wife's Heart's A' Fire blog. I'm excited to bring today's Saturday Showcase to you; the first of this kind of thing for me, ever! I've talked over with The Funkie Junkie Boutique owner, Linda Coughlin, and she was super helpful to me with choosing which products to showcase. I've had my eye on the Prima Marketing Paper for some time now, and while I am a total Tim Holtz buff, I'm in love with the colors of PM's "Peach Tea" set. Wouldn't you know it; Tim debuts his newest Distress color, Saltwater Taffy, and it matches the PM Peach Tea Paper Collection, Flowers, and SIIC (Say It In Crystals)! So I decided to combine all four and mix it all up with one of Tim's newer Thinlits from Chapter 1. Read on and find out what I did with these...
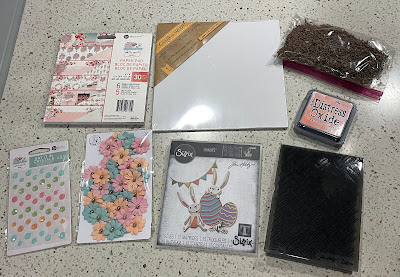
This is what I began with. I'd ordered the three PM Peach Tea items, along with
Tim Holtz's Bunny Games and that YUMMY Saltwater Taffy knowing it was going to go
on this simple canvas board (you can get them at Dollar Tree).
I picked up that baggie of trimmings from our recent building,
and when I saw Tim's 3D Embossing Folder peeking at me from my Craft bag...
I hit on exactly what I wanted to do!
Don't let the lighting fool ya: this Peach Tea Paper from Prima Marketing is
soooooo delish looking: rich, yet pastels.
I was pleasantly surprised to find that many of my Distress Inks/Oxides matched perfectly!
There is a spot-on match with Oxides: the brand new Saltwater Taffy, Salvaged Patina, Kitcsh Flamingo, Antique Linen,and Vintage Photo. I thought regular Salty Ocean looked good
for some blue pop, but ended up changing it out for the more pasteled Speckled Egg Oxide.
I also thought Squeezed Lemonade looked good on this paper pad, as well.
I ended up using only 3 out of all of these.
As a paper to work with, Prima Marketing made this double-sided pad
to be a very sturdy paper! That's what really pleased me the most, it's the value as
well as the color and usability.
Here, you can see the canvas panel being covered with my FAVE sheet choice of the pad.
This worn look is going to be a spectacular backdrop for those little bunnies!
Here, you can see I decided to take the boards of the paper in another direction at the bottom.
Go ahead- pinch the photo and see how that upper 2 sheets matched up spot on!
THAT's paper I can deal with! I used only 2 of the 6x6 sheets to cover this 8x8 panel
with enough scraps (a couple shown above) leftover to use at the end.
So Prima matches up their ends here and that is more value for me.
A little line of not matching was ME. I started to freehand cut and changed to the knife.
Don't worry- it won't be seen anyway. I did edge the bottom two with Antique Linen Oxide.
Grab some stash cardstock (I keep a ton of black, browns, and whites to use in between layers
or for stiffening help, etc) in brownish-tanish... can I make a basket freehand cutting?
Let's see...
This is where Tim's 3D Embossing Folder Intertwine came in...
I DRY embossed it.
I was looking for it to be like a RATTY type of basket. I wanted the texture,
and I wasn't going to get ratty if I spritzed water.
Another thing I didn't want; no coloring. Just this plain color and sanding was planned.
Again- don't worry about the line. I'll have filling for this basket a 'plenty!
I ended up needing a backside for this.
The dry embossing went great and I had little holes in there (you can see up on the basket middle)
but to keep glue from coming through, I was going to need to tape this all up and
use my Glossy Accents at the end.
If I'm going to make a basket...it's going to LOOK like a real basket.
So here's some top edging. Just roll that piece and then roll it again- with tape to hold it.
Here's the backside- it's all holding together and ready for the panel.
I made a larger pattern first (right side) and then cut it more exact from another sheet of the stash.
Embossing needed it to be in 2 pieces to get it through my Big Shot, so I have a space. ;)
Here's that plastic "wood" shaving. It was soooo soft and stayed together.
I was grabbing it off the ground before the guys could ruin it by cutting more junk into it!
And now...heeeeeeere's the HARES!
The Peach Tea Paper Collection and the Saltwater Taffy are just SOOO PERFECT TOGETHER,
but add the TH Bunny Games....I'm talking CUTE, here!
I'm showing this (terribly lit) photo larger to show you how TINY these bunnies are.
But, that's exactly what makes them so stinkin' CUTE!
And- biggest surprise for this Crafter (for those of you who know I have severe RA for half my life)
was to find this cute set not so many pieces! The eggs in the set were SUPER SIMPLE;
just 2 dies each for a large egg and a small egg.
The only thing I can say that this TH Bunny Games Die Set won't do well- reverse.
I know even some of the Colorized dies can "reverse", but when I tried to do so with this...
You can see above here- the bunny just 'lost' his... roundness/puffiness. NOT cute.
You could sand it down, but my plan was still going to work just fine going the same direction.
Cracking eggs was never EASIER!
Simply make the egg with the 2 cuts (glue together), and make another full cut, but don't glue it.
Hold the -now 2 pieces- together as you cut zig-zagged all the way through.
Put the unglued (inside will be white, so the extra cut is white) zz'd pieces
slightly jutted out of the glued set zz'd pieces. You now have an open egg.
You can even just glue all around the outer edges, so you make a pocket in each half.
(I have an idea going for using that.)
Now- those Prima Marketing Peach Tea SIIC (Say It In Crystals).
This is my first time using these, and I am LOVING how ROUNDED they are!
Fully rounded out but look faceted and sweetly matching all the same colors
as the Paper Collection!
I even did a pink/blue/pink/blue painstakingly perfectionist I am. lol
The color is closer here- a bit washed out to me. But for thinking "Spring"...
I couldn't have chosen a better color scheme for this project!
(THANK YOU, LINDA!!)
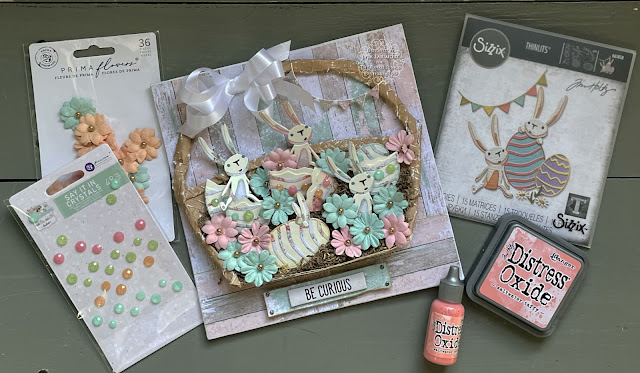
Here's everything I used- some of my stuff is VERY old now.
I've linked the important stuff at the bottom.
PLEASE CHECK OUT THIS PAPER THEME!!
The Distress Inks I've used will show you the colors much better than I can on a blogpost.
ARE YOU READY?
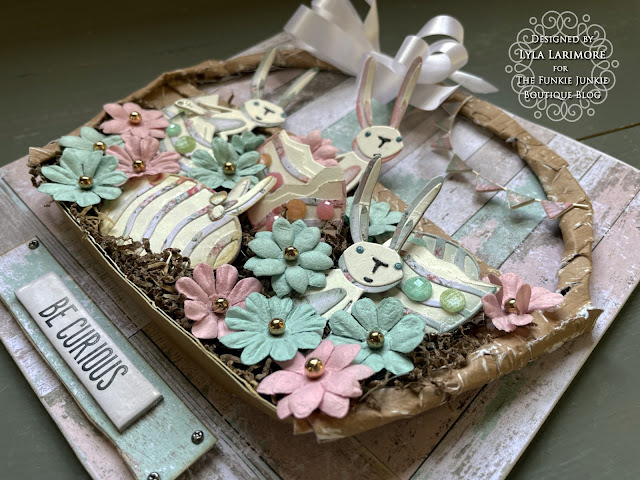
Here's the resulting project:
I certainly am: our fourth Grandchild is due August 27th and I am so excited!
Boy, or Girl won't matter to this Memaw...just a healthy HAPPY Baby is all I ask.
Tim's Bunnies have black for eyes and 1 eye is a tiny bit smaller than the other (on both bunnies).
But not this Memaw's Grandbabies- so far, all 3 have huge BlueBlue eyes.
Princess (the only girl so far) has purple flecks in hers.
So these bunnies got 2 larger dotted eyes in blue (from stash trash).
That leftover paper became another "board" that got some Tim Holtz IdeaOlogy;
Mini Fasteners and a Quote Chip Theories (edged with Distress Crayon Picket Fence).
See the baby bunny - no particular color on this one... just plain Peach Tea Paper
with shadowing in TH Distress Oxide Antique Linen for a bit of depth.
Bunny paws are trying to break the shell, but the ears are already popping out!
There couldn't have been a better (in all ways a paper can be better!) paper to use for thisparticular project. And the Spring feeling it gives makes me think of all the baby blue/pink
that will be distracting me all through the summer.
I don't think they want to know what it will be, but no matter:
this Memaw LOVES her new Wittle GrandBunny!
I had fun doing this project, and it helped that all of it seemed to just match itself!
I hope you'll be inspired to try a few of the Prima Marketing Paperie- especially Peach Tea!
Have a super Saturday!
Here's a few links to help you find what you need: Linda is stocked and ready for orders!
Prima Marketing Peach Tea 6x6 Double Sided Paper Pad
Prima Marketing Peach Tea Flowers; Perfect Day
Prima Marketing Peach Tea SIIC (Say It In Crystals
Sizzix Chapter 1 Tim Holtz Thinlits Die Set Bunny Games
Ranger Tim Holtz Distress Oxide Saltwater Taffy Ink Pad
Ranger Tim Holtz Distress Oxide Ink Pad Antique Linen
Ranger Tim Holtz Distress Oxide Ink Pad Speckled Egg
Ranger Inkssentials Ink Blending Tool w 2 Foams
Tim Holtz Tonic Studios Kushgrip 7 In Scissors
Tim Holtz 3D Textured Impresslits Embossing Folder
Ranger Inkssentials Glossy Accents
Ranger Tim Holtz Distress Crayon Picket Fence
Tim Holtz IdeaOlogy Mini Fasteners
Until next time...
Stay Safe &
HAPPY BLOGGING!!


No comments:
Post a Comment