This is why we adore all those Tim Holtz Alterations Dies: they can be used in so many ways to make so many different things! This second set of gifts were actually thought of after another original make for my PreK Sunday School kids. I had the chance to make a first set as 'practice' makes and then figure out a better way for assembly with this set. All the gluey mess, cranking out die cuts, folding each piece (double-layered business heavy white cardstock), and hand cutting windows drawn out in pencil... was worth the effort when I hit the button for the tea light inside!
I'll get right down to the details on this one....
I started with the Tiny Houses TH Alterations Die that I had been wanting since it came out!
A generous ChiefHubby let me order the die along with
the TH Alterations Die Village House Additions, for my birthday back in October.
I came up with an idea for our Sunday School young kids...
I put 8 of these together for the kids to add their own photos inside fussy-cut doors,
along with a printed out invitation of our Christmas week Services.
This one's my Grandbaby Princess...
The kids enjoyed coloring the churches (whatever floats their little artistic boats is fine)!
First was Modpodge between 2 sheets of plain heavy white cardstock (found in WalMart and used as a base for almost all my projects with huge staying firm power!). Then embossing all of it in one direction so it all meets the same way- using Tim Holtz's 3D Impresslits Lumber Folder.
Yeah, it's a LOT of cranking on the Big Shot, and I should have used my Vagabond,
but most of the cutting and embossing was done while we were away CAMPING in October.
That's how early I got these going because there were 15 in the makes.
Cutting the windows,
WHY doesn't anyone have a SMALL RECTANGLE HAND PUNCH
that can fit anywhere on the page no matter how large or small you're using?!?!
I simply put the smaller of the 2 Tiny Houses on top of the larger, and drew the edge where to cut.
And here's that other TH Alterations Die, Village Additions.
I could have gone with the TH Alterations Die Brownstone House
(which I still want to add to my already-owned TH Village House),
but I'd used the Village House last year to make the Nativity sets
(click here if you missed that),
and wanted a church to look larger than the little 'stable' if they were set side by side.
This front entry way gave these churches a bit more 'pizzaz' than the ones made for my PreK Class.
Beginning the put together phase...
… and cutting off the tips of the tea lights so they fit into the 'steeple'.
I found that my floral wire cutters cut those tips off very easily- just hold the
tea light up to a kitchen or studio light in order to see where the bulb is and
snip off the excess plastic 'flame' tips.
Here, you can see the cut tip in the lower left corner.
the tea light now fits nicely, and is a good strong kind that lets out a lot more light.
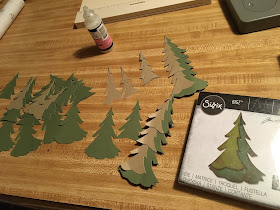
The new TH Layered Pine Die- using TH Coordinations Corestock paperie-
and no inking...actually made it look simple and realistic up against the old church.
You can find the fencing in the "fairy garden" section of craft stores.
This is from Hobby Lobby. I also picked up the smaller wooden white fence as well.
Coloring a bit onto the rooftops.
And here's what came out of it all...
And...that's a wrap for The Funkie Junkie Boutique Challenge Blog for year 2019!
HUGE THANKS to The Funkie Junkie Boutique for SPONSORING all the FUN!
And especially to the TFJBChallenge Blog Design Team for coming up
with some awesomely talented inspiration for us all; you gals ROCK!!!
Very special THANKS to all of you who took the time to check in
and see the new makes, read the stories, and share in a laugh with me throughout
this year. I look forward to 2020 and hope you'll ride along with me again.
I have a couple more crafty surprises to add to my blog that I came up with
myself- just for the fun of this Christmas.
So, I hope you'll check back in over the Holidays and see what's posted
as I get the two projects finished. They're simple and easy, and CUTE!
Until then;
Be Safe, &
HAPPY BLOGGING!!


What a clever way to combine the dies to make these wonderful churches! They look so beautiful together with the trees and especially lit up! Gutsy move to trim your candles! Love these, Lyla! Thank you for joining us a second time in our It's the Holidays challenge at The Funkie Junkie Boutique blog! Merry Christmas! Sara Emily
ReplyDeleteThese are so sweet and a wonderful gift to your Sunday School kids to treasure. When I saw them it reminded of a little country church that my Brother got married in 50 years ago. Thanks for joining us at The Funkie Junkie Boutique Blog.
ReplyDeleteHugs!
Cec
What a wonderful project for the kids! I really love these adorable little churches, the lights really make them extra special and the tree of course! Thanks for joining in our challenge at The Funkie Junkie Boutique.
ReplyDeleteAwww you made an entire village of Christmas happiness! Thanks for joining us for our challenge at the Funkie Junkie Boutique Blog. Hugs from Ginny at Polly's Paper Studio!
ReplyDelete