Year 2013 & Year 2014 2

Year 2013 & Year 2014 2
Showing posts with label Book Boxes. Show all posts

Friday, January 28, 2022

More "Icy and Cold" inspirational makes that fit in with The Funkie Junkie Boutique Challenge #2... Stories of Christmases Past!


W
hile it's not 'icy' here on the Emerald Coast of Florida, and it's definitely not as cold as it is in Indiana or New York , where all of our kids and Grandbabies are, it's... brisk... most days. If the rain stops and the sun comes out, it warms up during the daylight hours. Once that sun sinks below the tree line; it's time to head inside or freeze your petunias off. The afternoon of this typing, I headed down to the ocean to get some Bum Time in on the beaches. I spent a good 3 hours in the warm afternoon doing a bit of everything- sitting, photographing, walking, and dipping in at the waterline. It felt really good to be out after the past 3 weeks of cold. 

    Last October, I was busy as Guest Designer for Simon Says Stamp and also 1 GD spot for The Funkie Junkie Boutique Challenge Blog; Fall Gratitude. I took a full month off from anything else just afterward, and spent some time catching up on little things- quite literally! Last year, before we headed home to Indiana from Florida, I'd finally caved and purchased a doll house that had been for sale in a favorite shop here. It took 3 visits over a year and a half to make me say "Ok, if it's still there this time, it's sold to me," and I followed through. It was simple and cute, & just right for 1-3 year olds, of which we had 3 Grands in that bracket. I sent away for simple furniture suitable for the Melissa & Doug dolls and a second set also, just to match what WE all looked like. And yes, I have a couple set aside to match up the newest addition coming in August. They all 3 loved it! I would find the dolls situated in rooms of the house that gave us huge laughs at how cute their little minds think. Memaw and Papaw were often playing with the 3 while the Mommies and Daddies would be hidden in the ChiefHubby's desk drawers. There's a bed for each of us, yet I never did find a toilet yet. I still cannot figure out why Princess always takes the bathtub and sticks it into the barn next to the house- hidden up in the rafters. Fast-forward to this past October, when they put in a white bottle brush Christmas tree; the now 4 yr old Peanut comes to tell me in his serious voice "Memaw, we need PRESENTS under our tree in there," and thus began a 3 week stint of me making little things.... books, boxes. gift bags, etc. Just before we left, I stopped to peek in at the dolls and the scene was: Memaw, Papaw, and all 3 Grandkids were all upstairs in bed. Their 2 sets of parents were all sitting together down in the living room with the 3 tiny "The Christmas Story" replica books I made. The Christmas Tree had all the presents shoved wherever they could fit. And the dog and cat were fed and in bed also. Yep; these kids know the drill.


    Now that you know the background story, it'll be easier to see why I ended up making so many "littles". I needed practice at it once I learned how to do it. I've always LOVED miniatures, so it wasn't very hard to figure it all out. It's just a tad bit rough to do with hands that have RA (Rheumatoid Arthritis). There are a lot of ways to make little books, but I wanted REAL books that you could open and actually read the story. So my computer and printer came into use, along with a few bottles of Glossy Accents. But, it's fun and I'm going to keep on with it. Meanwhile, here's what I had hoped to get posted over Christmas, yet didn't. And then The Funkie Junkie's "Icy and Cold" Challenge came up and it just seems to fit right in.


Making any kind of miniatures is really pretty easy. It's a matter of scale on a good printing
program (I have several I use for my photography), and good printer (I use Canon Pixma and go through a new one about every other year now), cardstock or glossy paper, sharp scissors, 
and glue....LOTS of a good glue. A good scoring board helps for folding.
I've been making miniatures since I was a kid and I made all my own dollhouses.
The things that are out there these days (World's Smallest Toys)... we would have
killed to have back then! I'm still a collector of littles, and it's probably
why I am so stuck on Tim Holtz IdeaOlogy!

I had to make a set of 3 for the doll house. Peanut made sure Baby Jamie got 'pwesants' too. :)
But next year; I'm going to actually FILL them. They all wanted to open the glued-shut
boxes to see what was inside. I'll stick in some of those tiny new toys and surprise them.


I was going to just used paper mache boxes and cover them with Tim paper 
or some kind of paint/inks, but I found these right off and really liked the outside...

... and how the picture is framed to just the right size I wanted to cut my windows.

And I really loved the inside- it already looked like wallpaper. 
It could have been a tad bit smaller print, but the color shade matched spot on.


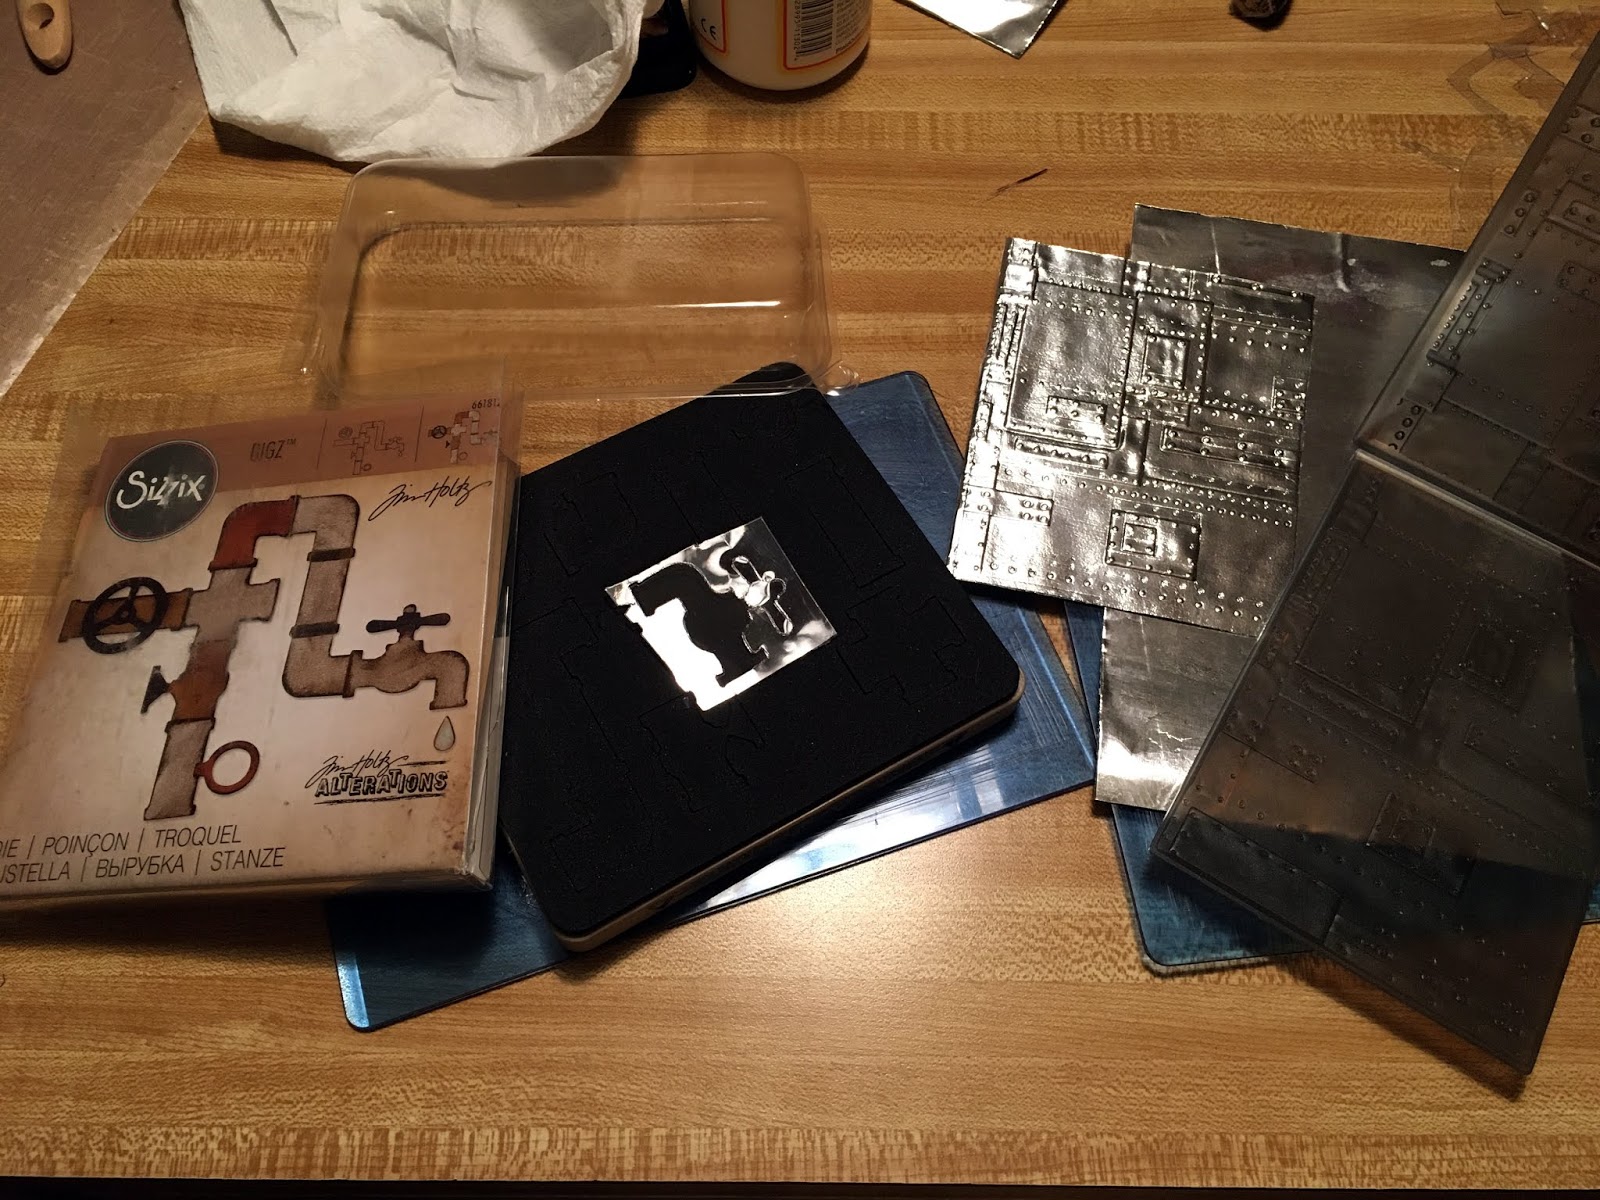
I'm holding clear plastic in my hand- just out of the trash.
This TH Alterations Die is the old Bigz Window Box.
I still love all my TH Bigz Dies; they cut through so many thicker
materials like this matboard.


Some TH Tissue Tape helped keep the inside cardboard where it was supposed to stay.
Each window has the plastic under the frame- on both sides of the cardboard.
I love doing that- go all out to make it look double pane.
For the line that shows in betwee the two cuts of windows: use your
TH Distress Crayon in Picket Fence (or matching color to material used) and rub it in.

Yeah, I like making my own things with the Etcetera,
and each package comes with plenty of leftover pieces to cut yourself.


I used this TH Paperie on both sides of my shelves and Distress Crayon in Vintage Photo
all around the edges. It looked like painted boards when finished. just like a real shelf.

I dug out a TH Seasonal stack of leftovers from waaaaay back,
and it was a perfect fit for the new TH Curio Frames to make a picture hanging.

Ahh, another problem I had...
Got all the way down to Florida with a special bottle brush tree I'd found a month before
up in MinneSNOWta (our very last trip before the kids moved to Upstate New York) 
somehow DISAPPEARED from my crafting table here. I can only surmise that the bag
fell into the trash and went out the door with.
I was in love with that tree since it was hard to find the perfect size at the time 
I found the boxes on sale during Thanksgiving. And it came from MinneSNOWta.
OoooooooKaaaaaay. A fast find at WalMart came up with this one.
And I actually ended up liking THIS ONE better!

I sewed up the stockings and it brought back memories of making my own
saddles and tack for my Brenda Breyer horses, and clothes for all my dolls.

I took one of the lanterns and carefully pulled it apart. It was easier than I thought it would be.
I cut it as evenly halved as I could and then sanded the rest of it all smooth.
You'll note that the clear piece in the middle did crack a bit, but otherwise stayed together.
This is a knock off lantern because I wasn't ready to 'waste' one
of my Tim Holtz lanterns- in case it didn't work.
Originally, I wanted it to light up with a TH Light Set, but I left several of them at home
in Indiana and didn't have any more at the time.
I later, did order a set of Tim's Light Sets from The Funkie Junkie Boutique and they
arrived quickly- within a few days- but I'd already moved on to another project by then.


These are like the sets I grew up with.
So did Tim Holtz! :)


I made these different and "signed" the Christmas cards since
they needed to look like they'd come from many other friends/family.

The set of cards needed to look like a real set...copies of the same cards and envelopes.
Yes, the cards do slip into the tiny envelopes.

All they need is some grunging up with TH Distress Oxide Ink in Vintage Photo
and Ground Espresso. 


BOOK ONE


BOOK ONE is about vintage Christmas- before (getting all the boxes out)
and afterward (carefully packing it all back up for next year).
And the gifts under the tree that we carefully wrap 
after finding just the right thing that we hope will bring a smile to a loved one's face.
It's warm inside, but fits the description of "Icy and Cold" out there!


Inside the books are real pages. The Christmas Carol is a much smaller one 
The Family Album actually has album pages, and Family Tree/Marriage Certificates inside.

These little roughed-up skates are from the TH Movers and Shapers Mini Dies (retired).

The fireplace mantle was made from the TH 3D Impress Folder Brick.
It was supposed to be made with the newer TH Thinlits Fireplace...
but I put the wrong address for shipping and our Son texted to say
it got to Indiana ok. Of course. *sigh*


                                                                   BOOK 2


BOOK TWO has all the usual holiday fare on the shelves.
But we tend to overlook the most important thing....the smallest of all.

Fits the description of "Icy and Cold" out there!


This Book 2 was all about how we get caught up
in all the decorating.
We tend to forget what we're celebrating: CHRISTmas- the birth of JESUS.


Thanks for coming back in and allowing me to share this make with you!
WELCOME! to my new Followers !
And a HUGE "THANK YOU!" for all the SWEET comments!

I hope you'll join in on this

Enter your choice of craft that 'speaks icy or cold to you'-
whatever comes to your mind with colors, embellishments, etc,
and YOU could be chosen as a Top Pick!
For one randomly drawn Winner, there's a $25 Gift Certificate Sponsored by

Until next time...

Stay Safe & Warm!
HAPPY BLOGGING!!


Tuesday, November 5, 2019

The Funkie Junkie Boutique Challenge #23; It Looks Real!........The Book of Experiments


    November has blown in with gusty winds spreading the falling leaves faster than I can keep up with. So far, anyway; what Leaf Battles I have fought in the past few weeks, I have won. But the Leaf War is not yet over for 2019. We've succeeded in getting everything winterized and put away, except for the camper moved out to the new overhead storage. A bit of trouble getting it installed (they finally showed up last week) and they  actually set it up in the dark! Next day sunlight revealed that they really CAN do that with their eyes closed. But don't try that on your own, folks, lol! A bit of adjustments to the bottom anchor boards and then it will be ready. In the meantime; I'll be up on the roof, getting the last of the leaves blown off, and reciting "I'm king of a hill..." That children's poem always comes to my mind up there. In another few years, we plan on putting up a metal roof. I can't see walking on that in my socks the way I do this tar-shingle roofing. Unless I want to crack my back...the hard way. This house has been ours since 1987, and we have probably redone every single bit of it- at least once- to get it where it is now. I absolutely LOVE my home, and while no house is ever going to be perfect, I can honestly say that this house is perfect for us. We still have things we want to redo, like the roof, but I dare anyone to say they are satisfied with the way their house is. Because it's then you will find something that needs to be fixed. The "Dream Home" is what you make yours to be. So this one is mine!
           The theme for this Challenge on The Funkie Junkie Boutique Challenge Blog put me in the mood for a mix of old and new. You see; this appears to be "The Year of Replacements" for us. You all know what that means if you own your home; things are going to wear out or break down with use, and need to be replaced. No matter how well you take care of things, it's just going to HAPPEN. And, more often than not; it comes one after the other in rapid succession. I think  it started with the little spare AC in the master bedroom. Some years back, our central air puttered out and we replaced it. But after that, we built on the large Family Room, as our boys were getting bigger and we needed a bit more common living space. We didn't plan to do things in that order, but the AC had gone out before we were ready to build on, and at the time we weren't sure we were even staying in this house... or purchase a larger home? So, unbeknownst to us then; that AC was too small and eventually wore down to non-use. We had our hands full getting both boys through very expensive High School years and then, getting them into college/out on their own. Installing two window ACs made more sense at that time, and we decided to wait until putting on a metal roof,; we'd get all the ducts rechecked/worked on all at once. We learned that re-siding a house, new windows/doors installed....can be very messy. Especially when your house is "The Neighborhood House".
   That all brings me back to the REPLACEMENTS.... after that 'small AC problem; easily fixed; boom; good to go', then it was the weed whacker. With mowing and trimming this much land, a light-duty weed whacker is a no-go here. So it was get a new heavy-duty tool. Thanks, Amazon! I'd already had a replacement mower the year before. I LOVE that little "Gumpmobile" that does look just like Forrest Gump's red mower. It mulches anything and everything in its path. And it can actually take off on you. (Happened to a few of us-including my Older Kids' other Mom- from whom it came!)
But after this second belt broke, in the middle of summer (it was no easy feat to replace the first one- 2 different belts on it) , no less...*sigh*….it was time to go ahead and get a new one. AGAIN. Yes, we have had several brand new mowers in the 32 years here. And yes, we DO mow THAT MUCH! So the ChiefHubby went shopping and got little old me a zero-turn Cub Cadet in a "very purty yellow". Mowing now takes half the time it ever did before (normal is 4 hours), and my RA thanks him so very much! Not to go to waste; the Gumpmobile, and its new belt, is already promised to a guy who needs it. We are so BLESSED to be able to afford all we have, so we always GIVE to others without cost. Okaaaaay. After that, it was several little things around the house. Small, but replacements nonetheless.
      With a lot of thoughts going this path all through this year so far...shall we knock on wood, here?.....I decided to make something that I've wanted to try for ages. It involves - just like a real home- a mixture of old and new. I also took note of a few other Designers' inspirational makes to help me blend my idea together. So here we go!

                                        Is this BOOK real?


Not really! And it was fun to make!


Yes, I doubled the paper, and coated the inside with ModPodge 
to keep the layers stuck together.

Painting the box first, then adding my makes all on top of that paint.
The paint serves as a base.

Crumple. Smooth out. Ink up. Heat. Repeat... till satisfied.

Here's where I thought I was stuck;
I wanted to put my usual coat of Distress Collage in Vintage Photo...
until I opened up the bottle to find what was left at the bottom- all dried up and useless.
Then, I had a thought: Distress Rock Candy Crackle will just ADD more tiny wrinkles!
After it dried, I gave it another coat of Vintage Photo Distress Ink, then
finally (after the binding was added) coated the entire thing with Multi-Medium Matte.
I've made faux leather before, and a book, as well, but pure & simple INSPIRATION
got me going on this choice... 
THANK YOU for the inspiration, TFJBCB Design Team Member, Jenny Marples!


Is this KEY real?

The Bookmark string is coated hemp (purchased like that).
I grunged it up by simply running it roughly through my hands- at the very last-
when I had all that grungy, messy ink all over!
Hey, that was the EASIEST distress job I've ever done!

Nope! Just some stacked TH Grungeboard with TH Distress Inks and a heat tool.
The matching "LOCK" on the front of the BOOK was made the same way.


How about the BLACK CAST IRON?
Or the WOODEN SIGN?
Or the VOLTAGE...
Is any of that REAL?


NOPE! But, creating it to LOOK real, was REAL(ly) FUN!

I also used the TH Alterations Movers & Shapers Dies: Base Tray and Mini Labels.


The TH Alterations Voltage Die is brand new and this was my first chance to use it.
I had a little help- you can see in the background- from ZOE HILLMAN's take on it.
THANK YOU, ZOE!!!

The Voltage base at the bottom was a mix of all these products!
Talk about messy FUN!!


Most of my die cuts were all thick mat boards. Then stacked up in 3 layers.
If you look closely at the finished project; you can see how '3D' it looks from this thick layering!
The WOODEN SIGN was made the same way, but with thinner cardstock,
then run through the Big Shot with TH 3D Impresslits Folder Lumber


The best way to make the 'cast iron' is to really cover the item with Black Soot Distress Paint,
then 'sift' it through PLAIN EMBOSSING POWDER.
(Tim's Distress Powders won't give a smooth look, and I like using his for rust and grungy looks.)


I added Ranger Texture Paste all around with a bit of water on my fingers, 
shaped it rounded to match the stacked walls on the outside- to smooth the sides-
then sanded it down and added the rest of the paint as a second coat.


The Professor would need water piped in to cool those gears...

I just LOVE that TH 3d Impresslits Folder: FOUNDRY!!
This was my first chance to reeeeeally make a larger thing with it.

Trash plastic becomes treasure plastic!!

Water in the Lab needs a tank:
one for holding and constantly filtering/cooling the water, and a holding tank as well.
Painting a mixture of Alcohol Ink with Glossy Accents gives a fast-drying medium
as well as coloring!

This was the first attempt at piping and trying to make it look rounded.
I cut 3 of each piece to layer them, but only one had the "WATER"
colored onto it. They were all three held together with Glossy Accents without the Alcohol Ink.
PVC piping does come in clear for laboratories! 

I tried shaping the FIRST BATCH with heat to round it out.

Nixed the above set, and made this new set the same way, but leaving it flat this time.

Making the light fixture/fan was just simple stamping with the Stamp Platform and
The Professor (CMS373) Stamp Set.


While this book was a large project, I've wanted to do this for a long time.
Not just a works on a Tag, but the whole 3D shebang!
I think it turned out pretty good, too.

THANKS!! for all the sweet comments, and for the app. 1,600 folks who peeked
in on my blog last month! WOW; I was blown away!

for always having what someone needs, and at nice prices!
TFJB is the Sponsor for these amazingly fun Challenges,
so try one out and see what you can do, too!

Until next time, folks...
Be Safe &
HAPPY BLOGGING!