Year 2013 & Year 2014 2

Year 2013 & Year 2014 2
Showing posts with label July 4th. Show all posts

Tuesday, June 28, 2022

The Funkie Junkie Boutique Challenge #13; Stencil Mania... "Sweet Land of Liberty- of Thee We EAT!"


    T
he July 4th holiday is already upon us and that means all my kids and Grandbabies will be here for that first week. I'm going to really enjoy that time with them, but there's so much to get done before they get here. That includes a sweet night at an "America" concert!! ChiefHubby scored four tix so we could also take our set of Besties who have their 38th Anniversary just a couple weeks before our own 38th (we were married by the same Preacher in the same church as well). I'm very excited since their biggest hit, Sister Golden Hair, is one of my all-time faves! Yeah; I'm firmly a Beatles girl practically from birth, but those 70s hits are some of the bests I remember hearing. This is gonna be COOL! Frame me as a hippie and that's fine by me.

    With the last half of June, came the activity I've done since I was a little girl: picking wild black raspberries. I started out picking them with my Grandma (whom I share a middle name with) and picked them the years I lived out here in this same area well before I met the ChiefHubby and purchase of our home here. Our boys grew up picking them also. Our area is the "wild black raspberry capitol of the world" with so many bushes that regrow each year along all the roadways and in most of the tree lines. There's been years where I had 8 or 9 gallons of them in our large freezer- waiting to be jam or jelly, but mostly baked into hot, yummy pies for holding a scoop of ice cream on top of. I'll be making one for the kids on Saturday for a family cookout. I've always made at least one for our Besties camping on one of the 3 summer holidays, but not for this Monday. Baking one pie means a 5-inch-deep pan that is 13x9 and takes 4 crusts and 1 full gallon bag of berries (the bags hold more than a gallon, actually). It's a bit of work, but it's sooooooo good! We traded out our big family freezer for a chest that is for 2 older people, so my 8 or 9 gallons picked is now more like 2 or 3. The season lasts for about 3 weeks in a good year, and I pick every day since they ripen so quickly. At the peak, you'll start picking at one end and by the time you've gotten to the other end, the starting end has already ripe for picking again. The Grandbabies all love picking with me, but their picking is more like "one for me, (*munch-munch-munch*) two for me, three for me....gimmie yours, Memaw....etc," If I want to freeze any at all, I simply have to go pick ALONE, lol! It warms my heart that all three LOVE berries and picking them with Memaw, just like I did with my Grandma.


   We're at another new challenge over at The Funkie Junkie Boutique Challenge Blog, and this one is a real challenge for me, Stencil Mania! Of course, you all know I've said before about how hard it is for me to figure out the how and where to use stencils. With this challenge, Teri's asking us to use at least THREE stencils...yikes! So, I plunged in and just did it. I think the color scheme is what helped me: Americana, with a little boost from the Professor! Let's start the scroll...


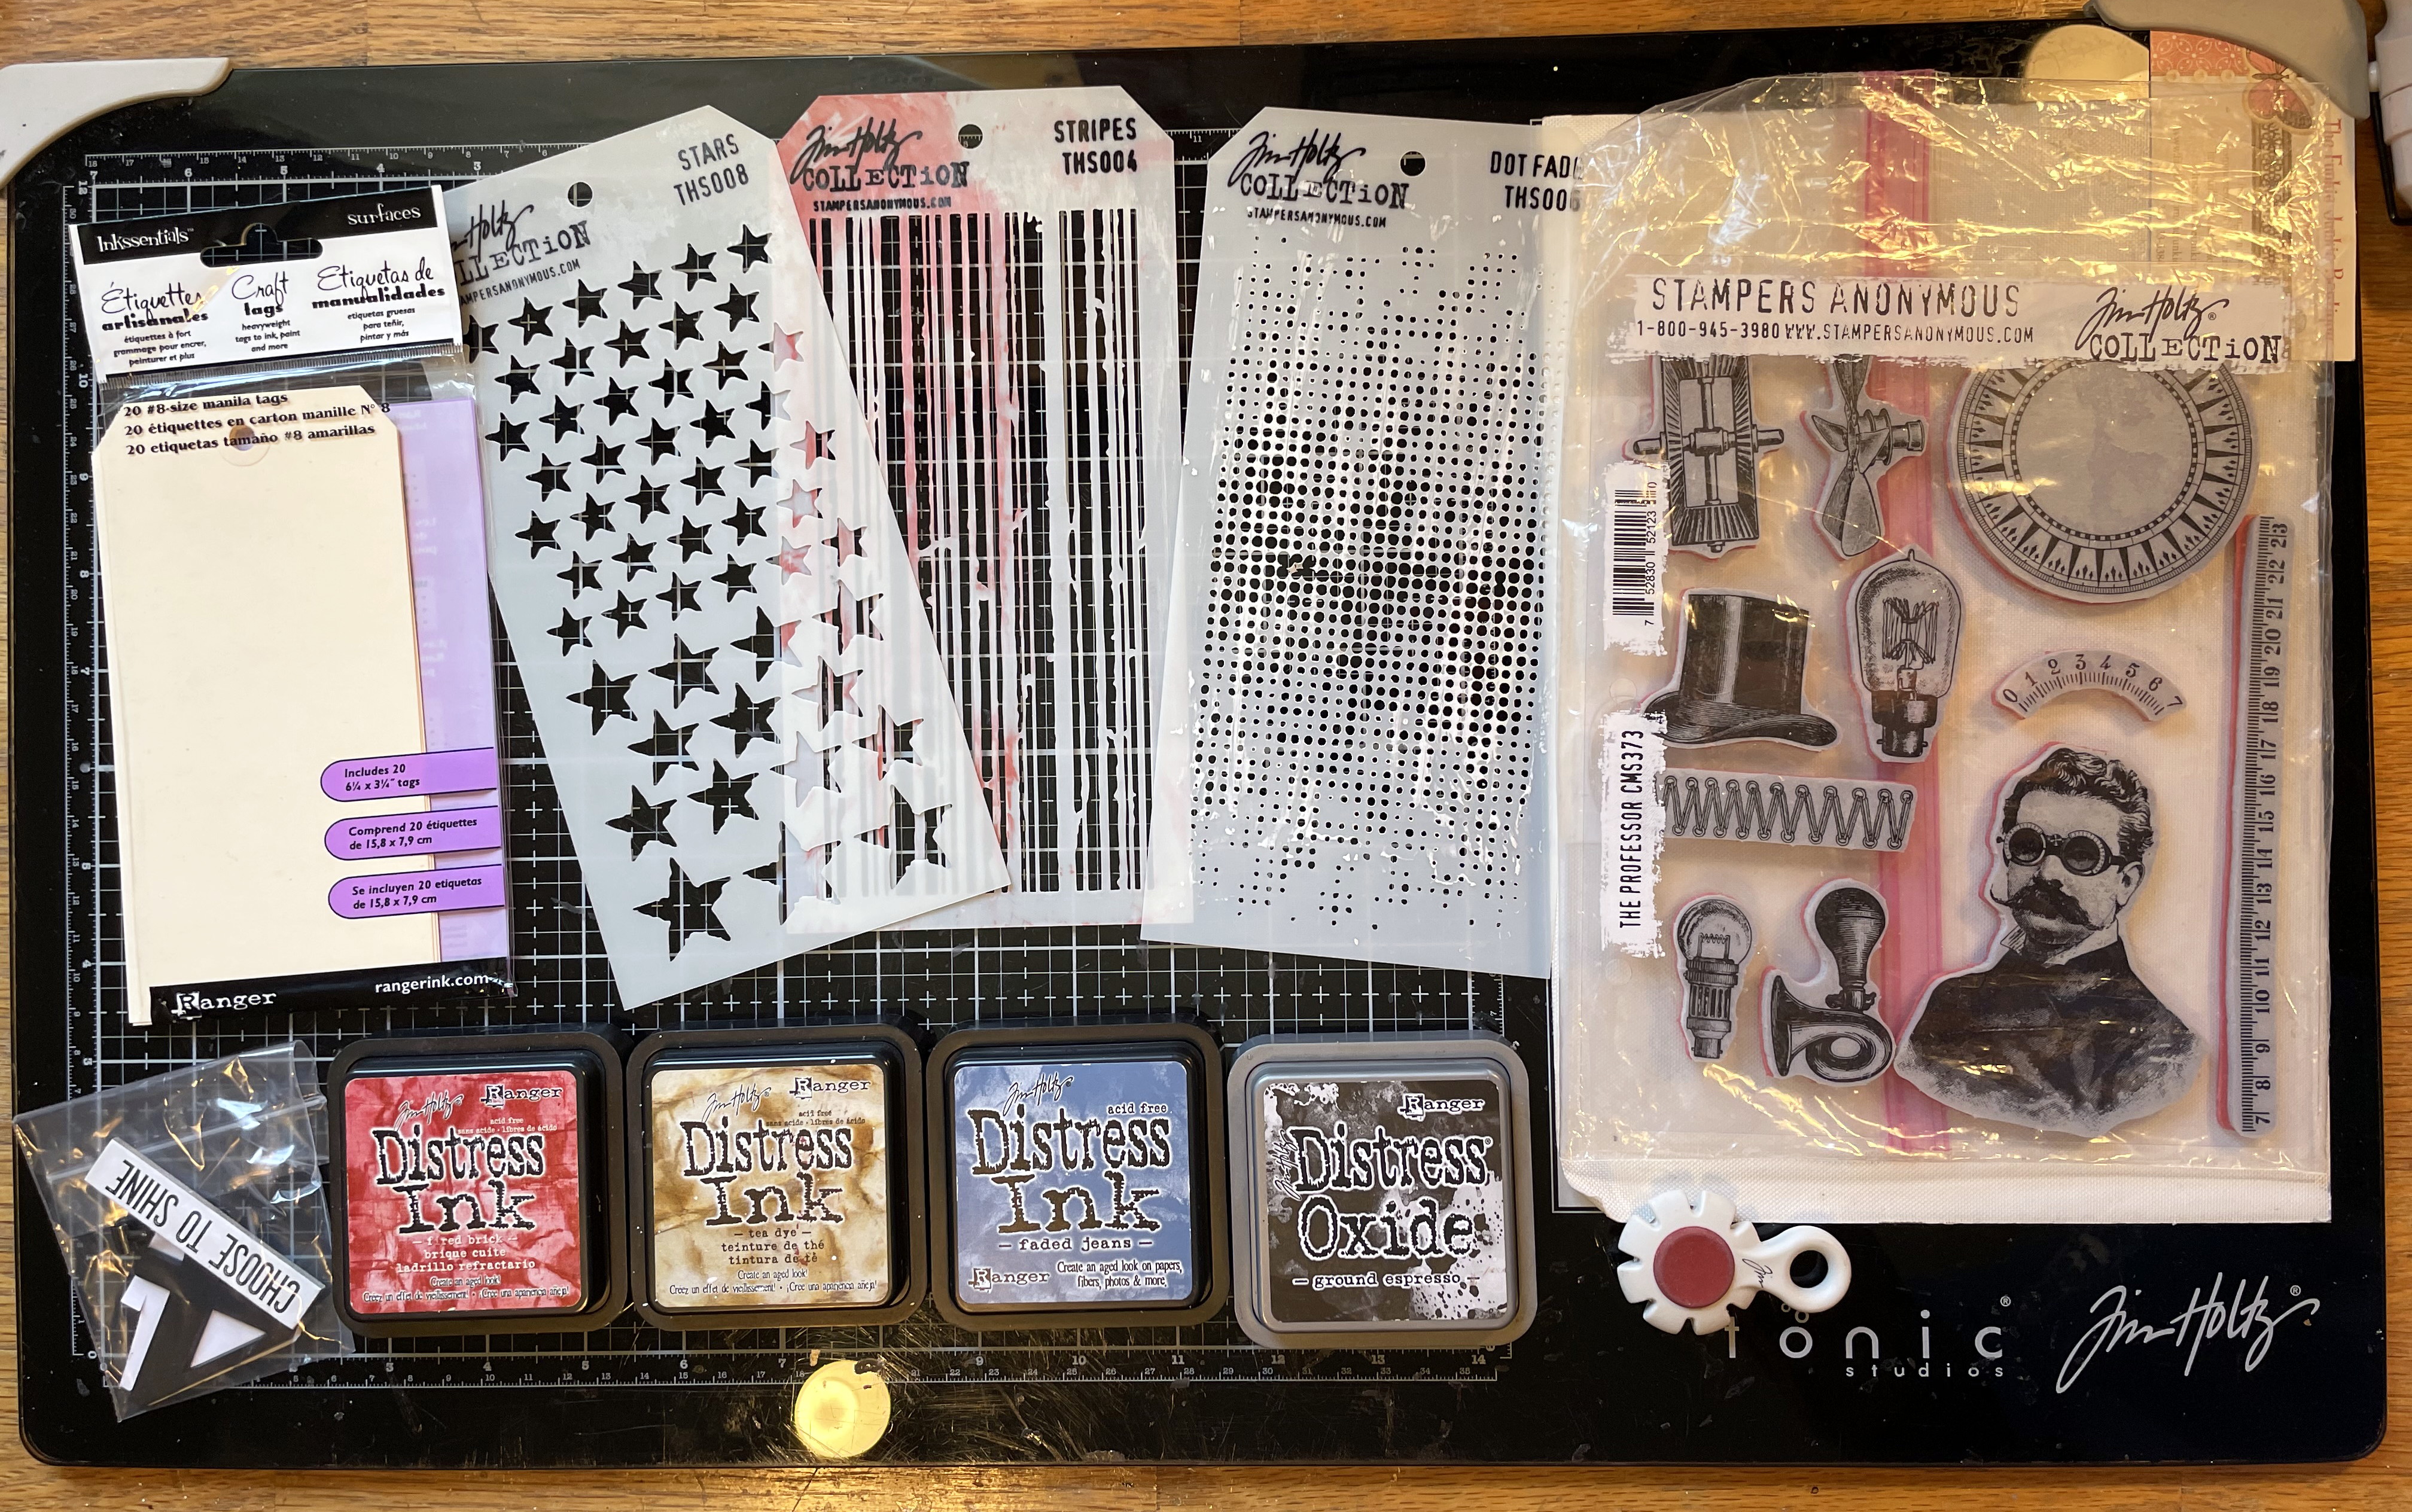
I started out with these things I wanted to use.

I opened my Tea Dye Distress Ink Pad to find it a bit dry.
Time to reink all of the pads.
I always buy new pads with their coordinating reinker- never run out in the middle of crafting!
While I had the Tea Dye out, I decided to use it to make "splooshes".
Place larger dots of ink around the glass mat and spritz with water.
Then take your tag and make sure it goes face down all at the same time.
Gently tap and quickly pick up all at once, repeating until entire tag is covered.
Heat dry, spritz again with water directly onto tag.
Heat dry.

This is the result. Those "splooshes" are kinda like fireworks- the ones that
go "poof.......BOOM!!!!" leaving smoke in their wake.
We always have fun with those; I can feel the "poof" take offs and they all
hold their ears for the "BOOM!!", lol!

I needed a mask, so this piece of trash will do.

Two techniques used with this TH Stars Stencil:
1) plain old blended directly onto the stencil, then hold down and roll over it with pressure.

I use a floor press- used for putting in wood floors- it helps me get firmly onto the tag.

The 2nd technique with the Stars:
Use blending tool to add ink to stencil, but this time spritz water onto the stencil.
Line up the stars exactly along the first time you stenciled- right on top of that.
Gently rub with your fingers for pressure this time.
You don't want the watered ink to run everywhere- just a few nice "splotches".
You can see the difference between the two; the left has only the first technique,
but the right tag has the added splotches to give a bit of depth to the blue.

Switch out the mask now- you want the stars covered up after you did the heat dry.
Technique 3 is easy- simply tape down the Stripes Stencil horozonally,
and rub the ink in with a Blending Tool, careful not to move the Stencil.
Tim now has Grip Sheets that work well for this, but I'm an old-school girl. :)

You get the idea here, now.


To add his hat without making his hair show through it and mess up the perfect stamping,
I cut tape along the hat edge...

...taped the top of his head before I inked him up,
and stamped the Professor where I wanted him...

...then added his hat where I wanted it.
No overlapping lines.

Now that the stamp is on;
I was free to do the 3rd technique with the 3rd Dot Fade Stencil as well.
Just a few random dots with the Distress Oxide Ground Espresso.

 Just click on the items listed below for the link to take you to the product!


Ranger Archival #0 Ink Pad - Jet BlackRanger Archival Ink Cleaner INKRanger Tim Holtz Distress Ink Pad - Faded JeansRanger Tim Holtz Distress Ink Pad - Fired BrickRanger Tim Holtz Distress Oxide Pad - Ground EspressoRanger Tim Holtz Distress Ink Reinker Faded JeansRanger Tim Holtz Distress Ink Reinker Fired BrickRanger Tim Holtz Distress Ink Reinker Tea DyeRanger Tim Holtz Distress Paint - Black SootRanger Tim Holtz Metallic Distress Paint - Antiqued BronzeRanger Tim Holtz Distress Paint - Salvaged PatinaRanger Tim Holtz Distress Paint - Walnut StainRanger Tim Holtz Distress Crayons - Set #3Tim Holtz Tonic Studios Kushgrip Snip w/Non-Stick Blade & Cap 7"-SmallTim Holtz Tonic Studios Black Thread Cutter/Paper DistresserRanger Inkssentials Glossy AccentsRanger Inkssentials Ink Blending Tool + 2 Blending FoamsStampers Anonymous Tim Holtz Layering Stencil - Dot FadeStampers Anonymous Tim Holtz Layering Stencil - StripesStampers Anonymous Tim Holtz Layering Stencil - StarsTim Holtz Idea-ology Countdown BradsTim Holtz Idea-ology Ephemera Snippets, Number StripsTim Holtz Idea-ology Hardware HeadsTim Holtz Idea-ology Long FastenersTim Holtz Idea-ology Remnant Rub ToolTim Holtz Idea-ology Remnant Rubs, EccentricTim Holtz Idea-ology Tiny ClipsTim Holtz IdeaOlogy Adornments- StarsTim Holtz Distress Heavystock #8 Tags


This was definitely the first time it's hit on me to use both the Star and Stripes TH Stencils 
together like this- although I've had them both for years now.

Added some rustiness to this very old American holiday.
The Professor is decked out in atomic goggles so he can watch the fireworks.

So much rusty goodness and texture can be put into anything using IdeaOlogy !!

BACKSIDE

Blackberries are abundant around here as well, but I don't like them as much.
As for the BACKSIDE of my Tag... I'm loving all the IdeaOlogy!!


THANKS! for all the kind comments on my projects,
and for those who are passing them along to others for sharing!!
I really hope you'll take inspiration from this and join in on the fun for


Sponsored by:


I'll put this out there because I know it's been a bit tough for everyone.
It seems that we've had this "sudden onset" of inflation 
with costs becoming almost rediculous in the stores- for just about everything,
but especially for gasoline and groceries.
I've felt the crunch as well, and while I'm still pretty comfortable,
I've cut back on some things so we can stay in that same zone.
It's not so for many, many people. My heart keeps hope and I keep up my prayers for these.
Especially those who find themselves facing dire needs,
and the animal shelters also (I just had an emergency myself- again- with strays dropped out).
Being summer, it makes it hard when we'd normally be traveling more.
Whatever has come about (or whomever has brought it about)
please know that you can simply get out your older crafting items and still play along!
When this has passed - and it WILL pass-
you'll be happy you kept up with your crafting passion.
Plus, cash in all those "Soon, but not right now" promises of purchase. ;)

You'll see me again this week;
Don't miss it, Maties!

Have a Happy- & Safe July 4th!
Happy Blogging!!


Sunday, July 5, 2020

The Funkie Junkie Boutique Challenge #14 Cattywampus...Stars & Stripes Dreams

 
 July is here! My favorite time of year and my favorite holiday, July 4th!  I absolutly love the smell of the fireworkds, and the colors that light up the sky, followed with choruses of  "Ohhhhhhhh", "Ahhhhhhhh", and Oooooooooo",the heat of the days followed by warm nights, and swimming after midnight under a clear, starry sky. And having all the kids out playing- not worrying about school the next day...I honestly could live like that year round. My love for summer holds all the way through how I decorate- Primitive Americana- throughout our home. The Red, White, and Blue can also be Red, Taupe, and Blue- depending on where I have it displayed.
    With this current challenge ,the focus is on being a bit off kilter. The requirement is described as "Cattywampus", and while I've

probably heard the term before somewhere, the vision I get in my mind is of something being off center, crooked, or kooky- looking. "Wacky" or "Wonkey" would be my equivalent words for "Cattywampus". I wanted to keep with the July theme while fulfilling the requirements for cattywampus.It turned out to be a lot of fun, indeed!                     
   Let's see where my ArtMuse took me...


Our younger Daughter found these at a church yard sale up in Red Wing,
and thought I could use them for my crafts.
They're AWESOME!

Right away I started getting out things I could use for this project.
Another chance to make a TH Etcetera Thickboard Tag!!

My attempt to copy from the Servicemen's Hymns was thwarted by my printer not
agreeing with me on scanning. After an hour spent on it- that I could ill afford-
I finally went with a similarly antiqued version from the net.
I'll be working on fixing that for being able to use these very COOL music sheets!

I made several copies of the song and also found a front cover of the song as well.
Thought that would make a good backside.

I gave the tag pieces a good coat of TH Black Soot Distress Paint and followed that 
with a coat of DP Antique Linen. 
Later, I chose to add another shelf, so I did the same to those 2 pieces as well.
I also edged the TH Baseboard Frame with 
TH Distress Crayon in Antique Linen inside with Black Soot Distress Paint on its outer edge.

Using a 12 inch dowel rod, cut it in half, I sanded the tops and bottoms
and painted them with TH Distress Paint in Walnut Stain.
They would be used for flagpoles.

After all the edging was finished, I was ready to add the covering printouts
using Glossy Accents, then burnished everything on the edges with the TH Sanding Grip.
I dug out the Americana paper ribbon used in some previous projects to
form flags, and inked it with a bit of TH Distress Oxide in Vintage Photo.
I gave both the TH Paper Doll and the little printed add-on edgings of Distress Oxide Vintage Photo.
And also used the same Oxide on both sides of the tag
 as well as the rest of the tag pieces and the baseboard frame.


This is what I came up with:


Front Side of Tag


Back Side of Tag


Some Closeups...

Front Side of Tag 

I did color this TH Paper Doll...she had to match the occasion. ;)

Shining a pen light underneath the TH Vellum Scene shows the music background of the Tag.
The Baseboard Frame is up on double sticky pop-dots, as well as just about everything;
I wanted those layers to really stand out so that light does come under the Vellum Scene.

I matched up the papering to the shelf and Tag so the layers matched up.
A bit of baling string gives a rustic look to the TH Assemblage Word Band
-painted in Mustard Seed Distress Paint.

REQUIREMENT CATTYWAMPUS: the TH Type Chips are set in card-hand-like slants
that form USA. It also gives the impression of the letters being on their
way up into the sky...like fireworks!

REQUREMENT CATTYWAMPUS: The Americana paper ribbon 'waves' across the tag
and disappears around the edge. US Flags definitely fly 'cattywampusly" !!


Back Side of Tag

A few layers of matboard die cut with TH Alterations Die Festive Gent
were adhered with Glossy Accents, then given complete coverings of Distress Paint Black Soot.
Some hoarded TH Crinkle Ribbon lightly shaded with Regular Distress Mustard Seed Ink
makes a good "Tie a Yellow Ribbon" around his neck as he marches onward.

Yummy IdeaOlogy! And a nod to Francis Scott KEY with a TH key.
I added splatters of TH Black Soot Distress Paint all over the Back Side only.
I love the look it gave!
And I added two feet of TH IdeaOlogy Crinkle Ribbon- soaked with a touch of
Oxide Inks in Antique Linen and Vintage Photo.
A TH Wire Pin holds it all together nicely.


REQUIREMENT CATTYWAMPUS: This wiggly, wavey, oh-so-wonderful US Flag
plays up the off-center very nicely!


        And that's what I have for this Funkie Junkie Boutique Challenge #14 Cattywampus .
   If you are looking to make something in the next day or so; the deadline for this is 11pm Tuesday.
     Just follow the easy rules on the blog's post, and you could be a Winner in the Top 3 or win the 
                     Gift Certificate drawing- Sponsored by The Funkie Junkie Boutique .

     THANKS! to everyone for the nice comments! My last post ( DOCUMENTED ) was
  chosen Winner for TFJBChallenge #13, so I'll be Guest Designer in late July.  I'm looking forward
  to that! Sorry; no spoilers. lol!


         I hope you had a wonderful Fourth of July- and you were able to enjoy celebrating the freedom
   that was fought for- and won- by those who founded this great country. I've been enjoying some 
    down time in the rural Florida Panhandle. Most folks here are very kind about keeping distance      
       and being careful concerning the virus- especially distancing at the beaches and in the water. 
       We're making preparations for retiring and the place and work we'll have down here for our 
       "Golden Years" during the winter months of Indiana. It will take time before we get into the
         swing of things with a schedule for the timing, but for now, I am just enjoying the 'chill' 
                                    of 90* days with the sun shining and the surf pounding.


                                          Thanks for stopping by and until next time...

                                                                  Stay Safe & 
                                 HAPPY BLOGGING!!