Year 2013 & Year 2014 2

Year 2013 & Year 2014 2

Tuesday, February 21, 2023

The Funkie Junkie Boutique's Inspiration Ave: #5 Aren't We Lucky? ... Coming to America!


Valentine's Day was celebrated just this past week, and it was sweet to see the photos sent from our kids of all four Grandbabies opening their packages! I'm usually late in just about everything I do, but the Florida Postal Service caught me off guard by getting them up north early! (Shocking, I know!) So now we're on to the next 'thing' barreling right down on St Patrick's Day. Whilst doing my daily 5 miles one Saturday, I happened upon our city's Mardi Gras Parade- well before Valentine's Day-where they were tossing out hundreds of necklaces. Toddlers and kids walking away looked like tiny "Mr. T"s with many layers of gold, purple, and green beaded necklaces around their little necks. One little girl came up to me saying "They told us EVERYONE needed to wear the colors," and handed me 3 necklaces...all of which were black. Do I really look that old?! Must, because I was just getting over the confusion of having Thanksgiving (Canadian) before Halloween. lol! No, I am not one of those who can keep up with every "National Day of --- ", when I can barely keep track of the normal 7 days a week GOD created. I can see the draw of wanting to celebrate days that lift up others & especially ones that generate care/acknowledge a need to be met. Of all the holidays that are counted as Federal Holidays, my favorite of all would be July 4th. It's smack in the middle of summer, and celebrates the USA where we are "lucky" to live in. I use italics with the word "lucky" because while I do use the word now and then, I really mean BLESSED. My belief is that everything is planned out and happens for a reason; GOD is in control while still giving each of us free will to decide. 

    But we're talking about "the luck o' the Irish" here for this one, and my own family doesn't need to wear green for St Patrick's Day: we have green running in our Irish blood on both sides- my ChiefHubby's and my own. The way it worked out ... his (late) Mom's maiden name was Dougherty, and my own maiden name is Daugherty. From what information I could gather- both sides came from Ireland at some point. One- or even both- changed the spelling of their name since both (spelled with o or a) is acceptable and related. It's kind of cool to think that Dougherty married a Larimore, producing a son who was Larimore and married a Daughtery. We did get questions when we filed for our marriage license back in 1984, And it's really cool to think that however it worked out; from wherever, and whomever it was that came to America, chose to embrace this country as their own and become AMERICAN. They did the work, filled out the papers, met the legal requirements, paid their way and chose to make this their place to stay and make a life/future for themselves, I find myself both blessed- and yes- even "lucky"- that I may be Irish, but I can claim myself to be American descended from all that.  And even more so that here in this country... I can freely be CHRISTIAN and freely worship my LORD JESUS!


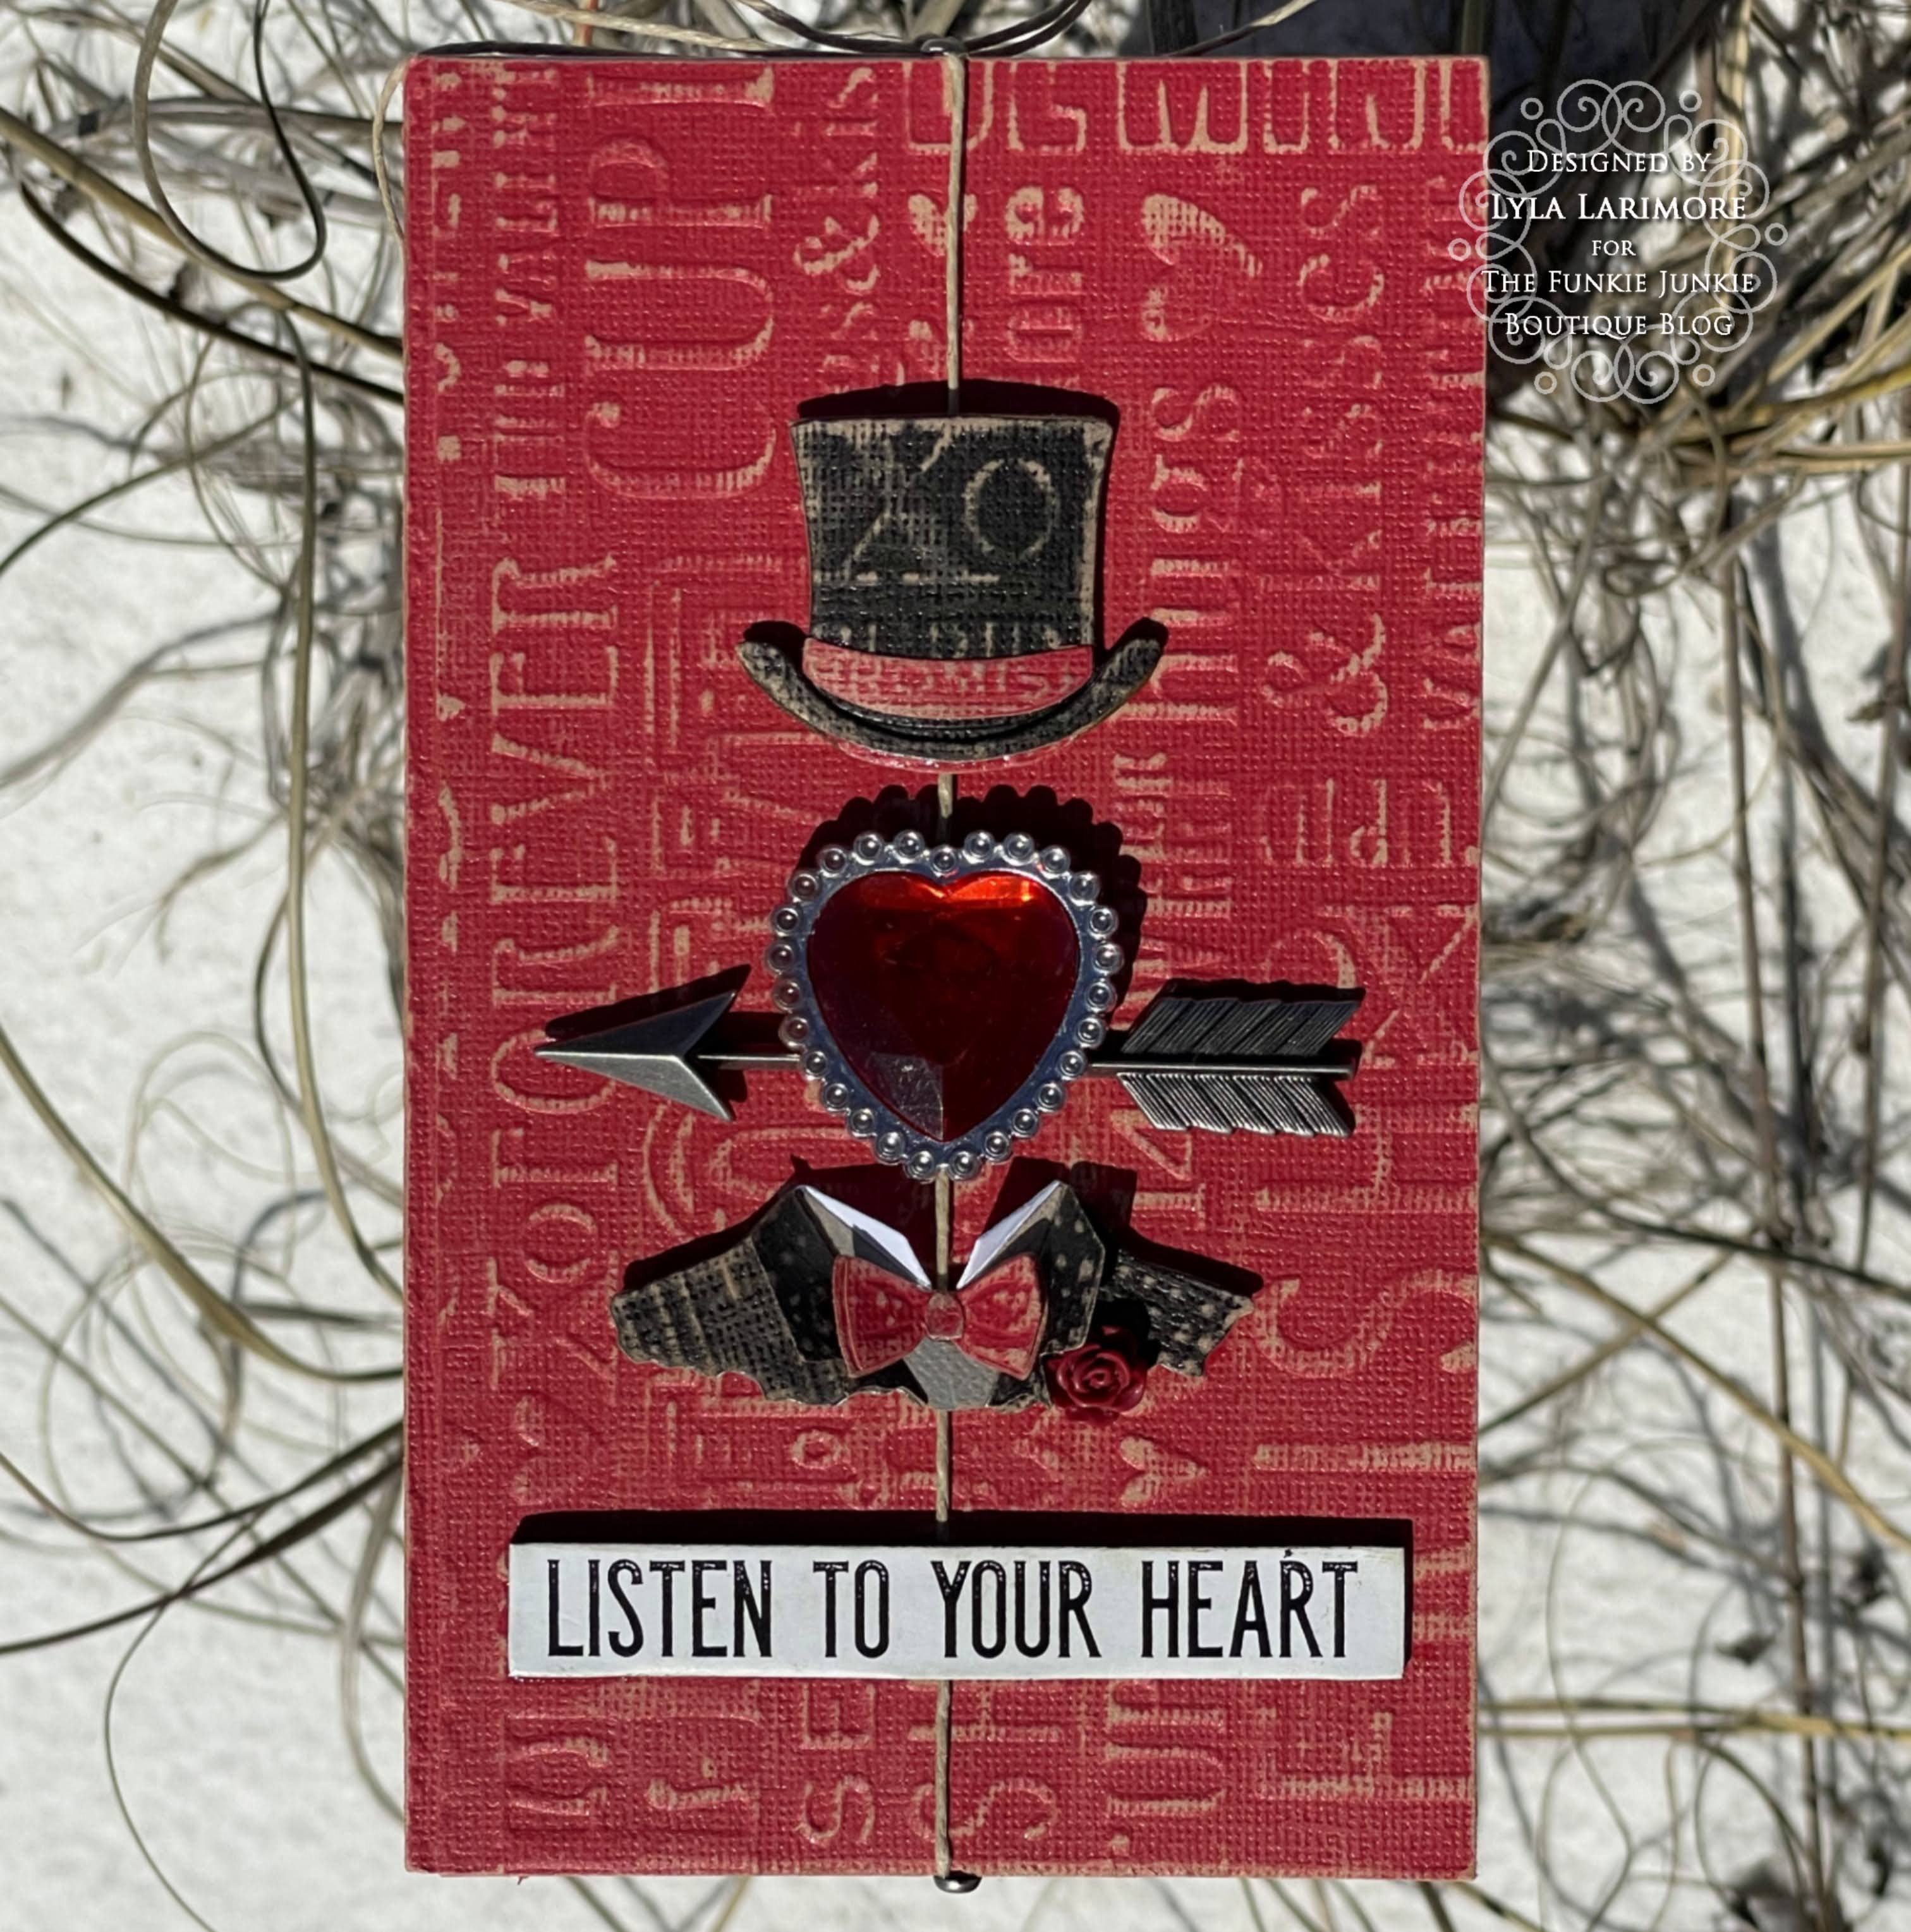
    "Aren't We Lucky?" is the theme for this round of makes at The Funkie Junkie Boutique's Inspiration Ave, and I can't wait to see what the rest of the Design Team comes up with on this one! There are so many ways to answer that in crafting! My first thoughts were of the color green, Irish folk, and cloverleaf/shamrocks. If you're game...I'll take you for a scroll and show you what I did!

You can use any favorite adhesive you'd like, but for me, I'm sticking with 
TH Multi Medium Matte, or Mod Podge Matte.
The TH Accordion Folio is SO fun and easy decorate that it's hard to stop, lol!
The Accordion Folio consists of a folder and an inside accordion fold out.
Both pieces are generous with space and folds to create your own kind of booklet,
and complete it with ribbon included for a closure.
The price is SPOT ON in VALUE, so I keep a couple on hand now.
I'll give you a list of products at the end of this tutorial, but I'm choosing an older
TH Collage Tissue roll for just the outside folio.
The Funkie Junkie Boutique has some brand-new choices coming in! 

I coated the folio with Mod Podge and then gently rolled the tissue onto it.
After smoothing it out to where I wanted it to reach, I gave it a topcoat of Mod Podge,
covering both sides for my project to look even.
After doing both the Folio folder and the Accordion page, I changed
my mind- too much world map- set this Accordion aside and got out another.
That's the advantage of always keeping more than one on hand,
as well as having another plan in mind for the one set aside. ;)

While getting out the new Accordion, 
I 'ran into' some old paper leftover from a 2021 Christmas gift make and
just knew it was perfect for what I wanted.

Again, I Mod-Podged, placed, trimmed, Mod-Podged
and came up with a totally different Accordion for the inside
that was sure to pop how I wanted it to, I used up every bit of that scrap leftover.

I left both to dry overnight before adding anything more to it.
During that time, I went ahead and finished up the other Folio 
to be used for a future project.
Only after it's completely dry, can you fold it back and forth
to help crease the paper/Folio.
Folding it up before it has completely dried may cause 
the paper to stick together and tear apart from the Folio
when you go to unfold it to finish embellishing.
So, this is a 24 hr process if you're using Mod Podge like this.
The next day, I got out my sewing machine and a new spool of 
bright green thread... and went to town sewing all around, inside,
and outside of both pieces. I left cut threads just for the green pop of color.

Here's where I finally got the chance to try out a suggestion
from Paula Cheney on her blog, One Lucky Day.
(CLICK HERE if you'd like to see her Accordion Folio.)
In fact, I tried out more than one thing:
swiping Distress Oxide Ink Pad (Vintage Photo) onto my Craft Sheet,
spritzing it with water, then swiping all my chosen
TH Ephemera items through it then heat dried all pieces.
And Paula was right- aging the ephemera in this way was EASY!

I did the swiping process to every piece I wanted to use in my book,
and also used my Blending Tool to pounce on more darker spots
onto the middle of the pieces, as well as all around edges.
I heat dried each piece and it was all ready to go!

And... another "Paula idea" I finally got to try:
using my Distress Mica Spray (Christmas Set: Fresh Balsam)
on a TH Stencil Card.
I've had my pkg of Stencil Cards for some time now,
but up to now, just haven't found the perfect thing I wanted to pair it with.
This one was just right for my booklet's front cover!

Making the inside cards, tags, and embellishments was like playing in
Tim Holtz Land: I had a good assortment in my stash of everything!
For this particular element:
I added a trimmed TH Snapshot, (all pieces 'aged' as stated previously)
then adhered it to an aged piece of cardstock, adding other little TH Ephemera 
as well as TH Clippings Sticker Book words.
I used a piece of plastic trash, trimming it to the same size
as my piece of cardstock shown here, sewed some TH Ephemera 
to the plastic and stapling it together at the top. 

No shamrocks around?
Not a problem if you've got some TH Alcohol Ink in Patina,
a pkg of Prima Flowers...

...and some green thread twisted with a touch of Glossy Accents
to keep it together, and adhered to the backside of the Prima Flower.


Here's your helpful list of links to find what you'll need to make this:


Here's the final result...

FRONT
The D is for both Dougherty and Daugherty
The TH Found Relative photos often match with my own family:
these look like they could be ancestors of my Grandbabies.

BACK

Main Inside Pages/Pockets
I've sewn in several ribbons that act as holders for elements.

Pullouts of Main Inside Pages
One of the TH Ephemera pieces acts as a pocket sewn around, but
adhered with Glossy Accents. to hold that TH Found Relative card.

The wording shows only when you lift the plastic.
The mini booklet has space for journaling.

Backsides of Pullouts
They needed a map and a calendar for those early days here in the USA.

Accordion unfolded with Pockets and Ephemera PullOuts

Each band can hold two photos, tags, etc., separately yet together on the same page.

Another Shamrock on the top of the pullout tag.

Pullout items and that precious TH Found Relative!
I can just picture her being one of my own!

Backside of Accordion foldout... looking like a stamped postcard for home.


I'm glad you scrolled down this journey with me, and hope you'll use
this Inspiration Ave theme to join us in some crafting fun of your own. 
You don't have to be Irish to be lucky!

Be sure to come back often so you can see all the awesome makes
following this one from my wonderful Design Teammates!

And don't forget to pop over to
and check out the new products you
can be sure will add color and life to your project!

Until next time...

Stay Safe &
HAPPY BLOGGING!!


Tuesday, February 7, 2023

The Funkie Junkie Boutique's Inspiration Ave: #4 All About Love... Listen to Your Heart!


    T
he month of LOVE has arrived! February means the ChiefHubby and I are halfway through our winter "snowbirding" and while Punxsutawney Phil says there's 6 more weeks of winter yet to come, I've been enjoying more warm days at my favorite place. I'll agree that I can have fun and be happy at Walt Disney World -especially if I had my Grandbabies with me- but my happiest place of all is a warm, sunny beach. I can skip the crowds, though. Just give me a deserted island, my family, friends, and supplies for life. I'd miss crafting with paper, but there's always banana and palm leaves. ;)

   It goes without saying: when it comes to my first love, it has to be The LORD. JESUS comes first in everything, and once a person puts Him as the priority; all else falls easily into its rightful place. After Him, comes my ChiefHubby, and then our kids.


  But when I became a Memaw, my kids kind of took the place behind my Grandbabies. It's a natural order that happens whenever it comes down to "parents-verses-the-children": a couple has to be "one" in order to make sure the kids come first. It sounds strange, but if you're a parent... you understand. When it comes to GRANDparenting it's the same kind of strangeness; Grandparents and Parents both put one another first in order to make sure the babies all come first. As for our FurryKids in the family, it goes without aying that GOD created everything and set Adam and Eve down here to keep care of it all: we are to take care of the creatures and creation. So there you have my awe in what LOVE is all asbout, and it's pretty simple where it began: GOD is Love itself. I am always humbled when I look around and see all HE has given us out of Love!


"All About Love" is the theme for The Funkie Junkie Boutique's Design Team.
and I'm kicking the 2 week period off with an easy make that pairs up my favorite crafting designers, Eileen Hull and Tim Holtz. I got out my Skinny Mini Book Box die (Eileen's) and started out with
a sweet surprise gift from a Bestie last fall- a retired stash of 12x12 Tim Holtz Paperie!
I know, right...goosebumps of excitement!

(THANK YOU, DEBB!! Safe travels, my Dear Bestie!!)

The Skinny Mini Book Die is really easy-peasy to put together.
The great thing about this die is how versatile it is!
Now, I know you've heard me say that about several of these XL Dies, but it's true.
This die can be either a book box, a book, or- as you'll see here: a gift box!
To understand my project better, it's best to see Eileen's video first.
(FYI: Closed Captions are available on Eileen's videos as well as Tim's!)


The first thing I did was to use the die to cut matboard, making a shell cover the size I wanted.
In this case, I trimmed off everything past the first fold on the spine creases.
(If you're into measurements, it's probably 1/4 inch.)
Then assembled the two "book cover" pieces as usual to make a book shell.
I'm using Score Tape here- it sticks VERY well without warping your project.

This photo shows the inside of the book cover shell.
The matboard gives me a firm material for my gift box.
Then set this aside for the next step.

There were 3 sheets in the 12x12 stack for Valentine's Day, in black, red, and pink.
I set aside the black for now and took both the red and pink,
cutting a full set of each to form both front and back covers,
as well as three sides of a box.

I cut each piece according to what the design had on the sheets.
Each sheet was exactly the same design and wording,
so it was easy to simply match the top and bottom of the front cover,
and then do the same matching on the top and bottom of the back cover.
As for the sides of the box, and the spine (which actually is the 4th side of the box),
I used the edges of the sheets as they had a cute curly design all around.
By dividing up the sheets this way, I ended up with a bit extra left over. ;)
I did use Score Tape here as well- even being picky to cover every area
of each cut sheet so the (planned) sanding would be even.

Here's the inside - note later on that you will see the exact same thing on
that outside top cover that you see at the top of this photo
(which is really the inside of the front cover- photo is turned).

Now it's time to move on to those box sides.
The instructions Eileen gives for making the regular Book Box
means using the full sides (about an inch high).
All I did here, was score these pieces TWICE for three sided folds.
Instead of having one flat wall, I simply folded the wall into itself 
to form a shorter, squared wall.

I repeated the same folds on the pink pieces
putting them wrong sides facing together,
and ended up with a nice little strong wall.
The spine forms the 4th wall.
Glossy Accents used in this step because it's just easier.

I then sanded the entire thing lightly- just enough to let some of the
wording and design show through. I chose not to color any of the edges
and the overall look came fully together after I added some elements....

My first chance to play around with the all new
Tailored Thinlits Set from Tim Holtz's Everyday Collection
was a bit of an adventure.
It took me a few tries until I figured out exactly how I wanted 
my ChiefHubby's heart to look.
Good thing I had that leftover paperie!

My stash of  IdeaOlogy came with me to Florida,
and I did fill my dividers with some old and more recent Valentine items.
The heart-shaped ring at the top is leftover from one of our Grandbabies.
It'd been scuffed up, loved, and used well before it found its way into the couch cushions
where I rescued it and tossed it into my stash.
It seemed to be the perfect reminder of LOVE and I decided to use it.

Tim Holtz's Paper Doll Portraits come with lots of choices 
to match oneself up with... 

... and some color added by those new Distress Watercolor Pencils
matching the swatch of Kitch Flamingo in the ribbon freebie
from The Funkie Junkie Boutique.
She's edged with some Distress Crayon in Walnut Stain rubbed on with my fingers.

Here's some links to help you find your way to some of the things used:


Now, let's see what came out of all this...

FRONT
I made a closure using hemp twine secured to the front cover
using 2 IdeOlogy Long Fasteners.
When looking at the twine as it lies underneath the hat and collar;
it gives me the memory of all those made-with-love hanging mobiles
my kids brought home... and now my Grandbabies make!

BACK

The box is the perfect size to hold just enough: 
Valentine chocolates for 2 at the beach.

(Pardon the sun shining on her.)

Last of all: the inside (retired TH) Gummy Heart belongs to me.
The point is not to listen to your own heart,
but to listen to one another's.


I hope you've enjoyed your first look at "All About Love"
and you're sure to get more Inspiration Ave
in the next 2 weeks from the rest of the Design Team from
so check back often!

I'm looking forward to more crafting and (less coughing!)
as I work back up to getting my energy back.
It's been a long "sick season" down our way, and I'm hoping the warm air
is turning northward- no matter what the groundhog says!


Until next time...

Stay safe &
HAPPY BLOGGING!!