Year 2013 & Year 2014 2

Year 2013 & Year 2014 2

Tuesday, March 21, 2023

The Funkie Junkie Boutique's Inspiration Ave; #7 "Let's Be Neutral"... Family Frame 2023


   T
he end of March is here and by next week, we'll be taking off once again for our Indiana home. Seems like four months can slip past faster than a tidal wave. It's going to be super hard to leave my Happy Place, but we're both excited to see all the Grandbabies once again and fill our arms with little hugs and feel the wet kisses    planted on our cheeks. The older set of kids have had their hands full since older Daughter is still healing from her neck surgery, and now both Peanut and Princess Pistachio have been sick. Indiana is still dealing with cold and snow, so that doesn't help out. And then we'll head up further north to New York again to see Pecan and (by then) 8-month-old Princess Rose, who now has SIX TEETH as a 7-month-old?!? She's talking up a storm (gets that from her Memaw, for sure) and is off the charts with how tall she is already! I'll be greeted by a full little person by the time I get up there, lol. She's certainly gotten a photogenic attitude- looking cute for the camera now!

   Seems like every photo, video, or Facetime call we make with the Grandbabies, they grow and change more. Those are the changes that are good. But I've been facing the fact that once we get back to Indiana, I will be making a choice I'd rather not have to make. It seemed like I cried for a week, praying that Grandpuppy Penny would live and be ok. She's made a truly miraculous recovery although she does have Addison's Disease and will need to take daily pills for the rest of her doggy life. Now, just a couple of weeks later, I am crying and praying that I'll be making the right decision for my own pup, Hunni Pi. She'll be 14 years old on April 29th, but it doesn't look like she'll make it to that. She's having a very rough time of it these past few weeks and has been on pain killers since before we left Indiana at the first of last December. It's hard because she only feels comforted when she's in my lap, and she has a rough time getting up and laying back down again. I'm torn to bits because she's been -literally- my ears for me. I simply cannot imagine my life without her, and I know The LORD understands that.


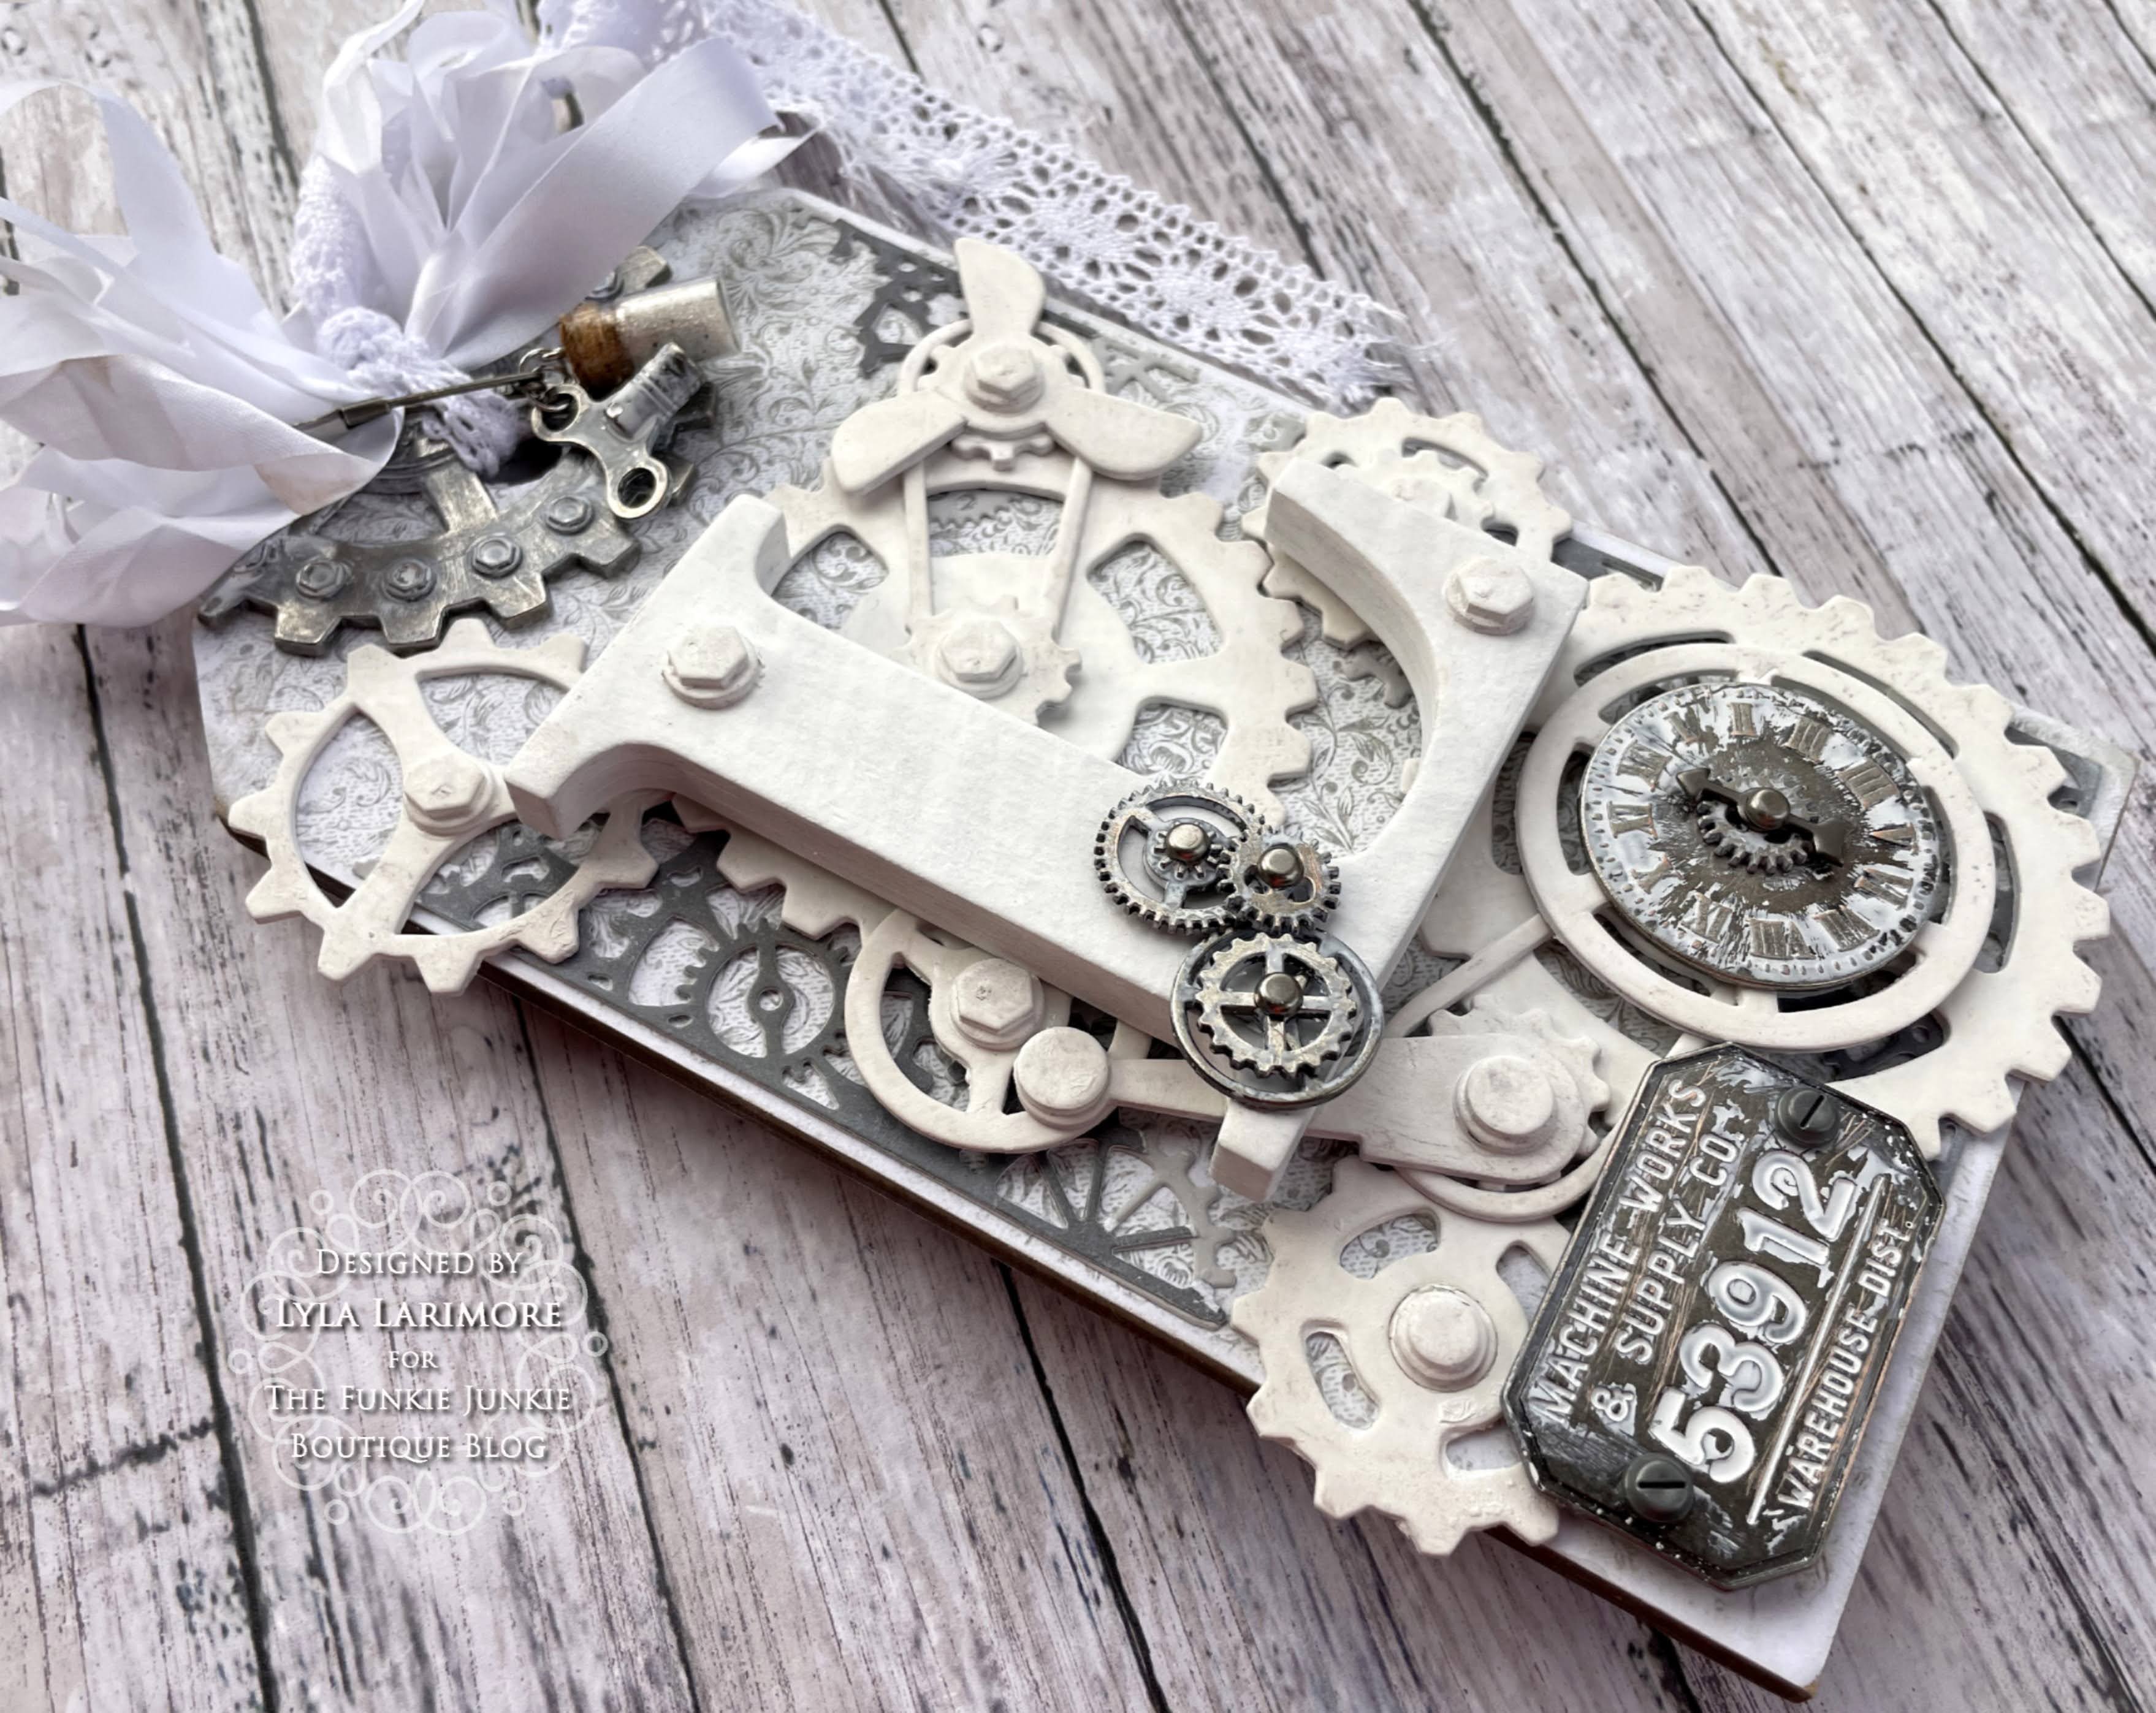
   The theme chosen for this next two weeks over at Inspiration Ave is "Let's Be Neutral!" and while it's a very good play on words that we could all adopt for a bit of peace for everyone, but the real idea is all about the latest Tim Holtz Distress color: Lost Shadow! Tim promised awhile back that the last 4 Distress colors he released would all be neutrals. I'm all in since my usual fave way to do colors is going with neutrals! Lost Shadow does not fail in any way to awe me with its subtle shading and I am sure this is one Distress Ink that I'm going to get a lot of use from. Be sure to check out the links of products near the middle of this post, so you can get this latest Distress Oxide from The Funkie Junkie Boutique! Scroll along with me and I'll show you what I did with this beautiful greyish shade!


I set out some materials and tools I knew I wanted to use.
For this project, I'm using a couple of not-so-old Tim Holtz Dies;
Gearhead Thinlits Set and Mechanical Bigz XL.

I decided to use up some leftover stash cardstock of 2 shades of grey that
closely matched the new Lost Shadow.

This new neutral shade was just the right subtle pop these edges needed!

For those who may be newer to TFJB & Inspiration Ave blog,
I do like to make out a plan by placing my items together and taking a photo.
If I get stumped on how I wanted it, I just refer to my pics.

I had some extra room on the backside, so I dug out my
TH Voltage Bigz Die to add another element there.

From the TH Mechanical Bigz Die; putting together the smaller "bolt head" pieces.

And giving everything a couple coats of TH Distress Picket Fence Paint.
 Although the matboard I used had a white inside and backing,
giving both sides those 2 coats not only sealed up the matboard,
but also allowed me to have both sides of my Tag used.

This chipboard L has been in my stash for.... years and years!
I picked it up to use it for some project back when and just never did.
It's been on my mind to use it and it fit this project perfectly for me: L for Larimore!

I coated all the IdeaOlogy items and let them sit to dry fully...

...so I could scrape and scratch at them like the paint was actually peeling from use.

These papers are from Tim Holtz Backdrops Volume 1.

I used Glossy Accents to adhere the papers (one to each side)
and after fully drying, sanded all the edges down. I also sanded more randomly around.

I layered the Gearhead die cuts with the lighter shade under the darker-
so the later top layers of white would pop from the darker underneath.
I randomly tore the lighter around the edges of each piece, and then tore the top
darker piece just slightly smaller. This makes it look like it's "shadowed". ;)
Then I did the same onto the backside of the Tag as well.

More IdeaOlogy: got out those TH Dials to add into my Voltage die cut faux gauge,
and added some Hardware Heads to the Factory Tags piece.

I used an older TH Baseboard Lace Frame and edged it with 
Hickory Smoke Distress Crayon- a nice complementing shade to the Lost Shadow.
Using some of the leftover Backdrops sheet, I made a photo holder slot on the back.

I couldn't resist a pic of how it looked without the L on top- I just LOVE Tim Holtz gears!!

Here's a helpful list of links for products I used:


Let's see the results of both sides!

FRONT and a few closeups following...


Now, the BACK and a couple more closeup photos...


Thanks so much for joining me for this project tutorial!
Be sure to pop into the Inspiration Ave blog, to see all the great things coming up from
The Funkie Junkie Boutique and TFJB Design Team:
new projects as well as new products!

Until next time...

Stay Safe &
HAPPY BLOGGING!!

Tuesday, March 7, 2023

The Funkie Junkie Boutique's Inspiration Ave; #6 Spring Frolic... Easter Blessings!


The end of February roared in like an Indiana March, here on the Florida Panhandle. And with it, came warmer air than we've had yet. My palms are reblooming fronds and the Azaelas are full of pink blooms. I say this just for those up north to take heart; Spring IS coming soon! We're staying busy these last weeks here, enjoying the time before we head back up and face the work of opening up the Indiana house and all the spring yardwork there is sure to be waiting for us. Plus, there's four little Blessings up north who are waiting for us to spend time together with them, I love the photos the kids send, and the stories that go along with. There're always shenanigans that go on, such as older Son explained how he was on his phone only 5 minutes and he found Peanut jumping on the trampoline... in his au naturel shell. Jumping along with him was Princess Pistachio- obviously shelled. Pecan learned to cook breakfast, and Princess Rose learned how to blow *raspberries*. (Great Grandpa Rush would be so very proud, lol!) Older Daughter had her 2nd shoulder surgery- after months of extreme pain from a failed 1st surgery. This time, while it's a long healing process, she seems to be finally making some progress. I'm immensely thankful, yet, still praying that she'll be pain free and able to at least not have it keep her from living daily life the way it has been. It's been quite a past year for our girls, as 2022 had some rough times for both of them. Younger Daughter not only went through pregnancy and birth, but they all moved to an entirely new community in a new state, with a new house and job to go with that move. Replacements happen more often with a new house, and they've had their share of those also. Little Pecan seemed to just bloom during all of it, taking everything in stride, and making new friends so easily. The addition of Princess Judith Rose has been the icing on the came as far as that goes; she is a sweet, very happy surprise! There's always the good, the bad, and the ugly in life... just today (of this typing) their younger pup, Penny, was taken to the vet and they were told if she makes it through tonight, they say she'll likely be alright. The older kids went through the loss of their Golden, Macie pup, just last spring at this very time from just about the same thing (suspected Addison's Disease). I'm praying for our Grandpup Penny to be ok, and not have them go through loss. It's the worst part of being a furryparent; having to choose what we wish we didn't have to. Storms blow through our lives, not to test us or torment us, but to help us grow, or bring us what we wouldn't have had otherwise.  As mere humans, it's hard for us to see the big picture. Yet, The LORD knows what is best for every living thing, and we need to trust His answer- no matter what it will be. By the time of this posting, we'll likely have one. All I can do is keep asking! 


It's time for a "Spring Frolic" at Inspiration Ave, and The Funkie Junkie Boutique has Tim Holtz IdeaOlogy that fits the theme perfectly! I couldn't wait to get my hands on a few things that are in stock and get started on this Etcetera Mini Tag which I used as my 'vehicle' to carry some Easter goodies!
Hop on & hang on; it's a scroll down this crafty rabbit hole to see how I made it!

I started with some Tim Holtz Etcetera items,
and some TH IdeaOlogy items- new just for Easter!

Here's a list of product links to help get you started:


I wanted to incorporate some of that *retired* TH paper stack...
and I found a set of unused flowers in my stash
 (probably a dollar store find at some point).
Tim's new products still go very well with any of his past products!

I did my favorite technique of Glossy Accents glue and
burnish the paperie to the Etcetera pieces with my TH Grip Sander.
The shelf is made wider by putting 2 pieces together as one
while using a third for the normal bottom shelf holder piece.
I like to do both sides of my tags, so I made another 'enforcer' for the backside
by tracing the included one made from Etcetera.
I then sanded all the front and side- gently and sparingly;
just enough to have the words show up, but enough to look aged,

After wiping all the sanded bits and dust away with a dry cloth,
I used Walnut Stain Distress Crayon on all the edges and rubbed it
into the sides with my finger. Then heat dried everything.
I scribbled some of the Crayon onto my craft sheet,
sprayed a bit of water onto it, and used a Water Brush Detailer
to get into the areas my fingers couldn't reach into.
Again: heat dried everything.

The Etcetera Cathedral Window pack has 6 cuts inside:
four this smaller size and 2 large sized. I took this pair of smaller,
to stack together making one frame with a plastic (cut piece of trash)
to go in between.

I gave both (laser cut- very clean and crisp cuts) a coat of 
Distress Paint in Picket Fence and allowed that to dry.
I heat dried both frames just to make sure the paint was dry
before I sculped on some TH Opaque Crackle Texture Paste.
This, I let dry completely on its own.
After the crackling appeared once dry, I used a Blending Tool
to rub a bit of TH Vintage Photo Distress Ink on the front bottom edges
for a bit of an aged look.
Then heat dried for the last time (to dry the Distress Ink).
*NOTE: Distressing needs to be done BEFORE adding any plastic
to keep from melting the plastic!

For the clear plastic, I simply dropped a lot of the 2 Alcohol Inks onto the plastic,
and moved it back and forth- allowing the inks to "fight" for their places.
I stood the plastic up onto the bottom end to let the excess inks drop off to the paper toweling.
Then I set the widow down to let it finish drying on its own,

Once the Alcohol Ink was dry, I used Glossy Accents to put the plastic
in between the two Etcetera Cathedral Windows, let it dry,
then shaped the wire stems on these,,, felt??...roses,
and glued them onto the sides.

Now that the entire background was finished, it was time for the cute stuff!
Those TH Tiny Eggs really ARE tiny!
They're so cute and since the package has 50 pieces,
I used 18 for this project and still have plenty leftover!
My own tip for Alcohol Inking these: rub the ink gently with
 the correct felt applicator/Alcohol Ink Tool.
I didn't have mine here with me and paper towels/napkins were
used in a pinch, but not as effective in moho.

After the AI was dry, I used my trusty old toothbrush
to flick TH Distress Paints onto the eggs: Black Soot onto the blues
and Picket Fence onto the pinks.
I heat dried them all very gently- just to keep the paint on.
I did do all sides of the eggs. It was a quick job since they're so tiny!

Next: those silly wabbits of Tim's!
These Salvaged Rabbits are the cutest things he's made yet!!
I wanted "chocolate" bunnies but did wonder about making white paws.
I stuck with my original intent: milk chocolate bunnies with nothing but
 Distress Paint Walnut Stain.

This time, I decided to try out the tip on painting IdeaOlogy figurines:
I used my tape runner to add just a tiny strip of tape to a lid (of anything, really),
then topped the Salvaged Rabbits on and it really WAS easier to paint them!!
I didn't need to do anything else to them (other than rip up some
included-in-your-order-freebie-ribbon from The Funkie Junkie Boutique
to use as little scarves to identify each bunny: as each of my Grandbabies)!

For the TH Chip Quote: A bit of color around the sides and
a little "aging"...and that's that.


Check out this adorable hanging display Tag! 


Front


This bit of old stash ribbon made the perfect hanger!

This is Princess Chloe and Big Bubby Peanut!
I did get a bit of glue stuck onto the egg here:
I used my hot glue gun for this since it held fast better.
I hate the glue strings that I always forget to get off before the photos.
A bit of moss from my walks below the Spanish Moss trees;
dried out and then stuffed into the TH IdeaOlogy Barrel,
gave the Tiny Eggs a bit of a lift.
I used some Walnut Stain Distress Crayon rubbed hard into
the grooves then heat dried it. Gave it some more depth.

And here's Princess Rose with Big Bubby Pecan!

Back

The color changed from better lighting,
but you can see how the wording all applies to SPRING!

Thanks so much for joining me on this Spring Frolic!
As always: be sure to pop back in over at
 Inspiration Ave
for more great projects & tips from the rest of the awesome Design Team from

Until next time...

Stay Safe &
HAPPY BLOGGING!!