Year 2013 & Year 2014 2

Year 2013 & Year 2014 2

Tuesday, August 24, 2021

The Funkie Junkie Boutique Challenge #11 Triple the Heat... 3 is the way we roll!


   I
'm in my 'beat the deadline' mode today; with things to get caught up on because there are more places to go and people to see- the Red Wing kids and Baby Pecan, to be exact! It's been a month since we have held that happy baby and I can't wait to enjoy being with him again! We've managed to have the older 2 Grands here and there over this month, and even went with them on a family trip to see the Children's Museum in Indy back at the first of August. Seems like every trip we make, we see a TRAIN of some kind- and the Grands all love trains! But most of this month has been just the ChiefHubby and I getting things caught up or making shorter trips on our own. In any case: this entire family ROLLS...and very OFTEN! It makes me very happy that our kids want to show their own children the good things our USA has to offer in the way of travels. There was not much travel like that in my own childhood, unless it was with my Maternal Grandparents, up until my Dad came into life when I was 7. In fact, I had very little

knowledge of the roads and places outside my own town- and even inside town was pretty roughly by map only. I just never had anyone interested in showing me where to go and how to get there. By the time I was a teenager, I loved going anywhere with my Dad or older siblings; it was exciting to go fishing, camping, or just babysit my many Nieces and Nephews at their homes. But that was about the extent of it- just here in our own county. When I met my ChiefHubby, he opened up a full-page-color version of life going places and doing things. I picked up water skiing and boating almost overnight. The site of sailboats on the water was a favorite and led to fulfilling of having my own for the past 5 years. Driving to the next county to visit his Grandparents on their Isle of Homes on Lake Shaffer was a favorite, since I was always close to my own Grandparents. I loved staying all night in Grandma's guest bed and waking up to the sunshine on the lake. Later, jet-skiing out on my own when the kids got back to school and the ChiefHubby was working all day. And like mine, they loved going places. They'd moved there when Grandpa retired from the railroad as a Yardmaster. They shared their love - and life- of both boats and trains with us, and it's passing down to our own Grandkids now.

     Some of my earliest memories of my own Grandpa involved cars, because he drove up to Detroit in 1965- the year I was born- to purchase his second Durant (1931, his first was  1929 as a teen). He spent a long time restoring that car and it became his pride and joy. I was with him in many parades, car shows, and visits to folks in that Durant, and the smell of that 'old car' remains with me to this day. It was featured in Hemmings Classic Cars magazine (click here for article) and more than one photo appeared in the local newspapers over the years. But my favorite of the 3 he restored (red Ford Galaxy 500 Convertible, the 31 Durant) was his 1955 Packard. One day, while I was visiting him in the garage and he was working on it, he asked me to get in and 'hit the brakes', so he could rig up the tail lights. I was sitting inside and looking at the newly-covered seats that had previously been an ugly green shade and asked "Grandpa, why'd you change to blue?" since he'd stuck with original coloring of the other vehicles. He stopped what he was doing and went over to the back wall, picked something off the board, then held it up to my eyes and said "Because it's the exact shade of YOUR EYES. You have your GRANDMA'S EYES." And I just about melted into the cement flooring. I had to wipe away the tears (which still happens now) because I also have my Grandma's middle name as my own middle name, and that was a lesson in learning to be proud of the name Louise.


I chose these three things- boats, cars, and trains- for the theme of my make. 
So let's see what happened!

Tim Holtz has tons of things to choose from for use on ATCs (Artist Trading Cards) of any shape.
Quite a few of my items here- especially packages of all my Paper Dolls-
were purchased from The Funkie Junkie Boutique.
I like to get out everything I MIGHT use and stack it all up. 
I also take a photo of what I have out, just in case I forget to do so later.

While I had plenty of time to choose what I wanted to add to the ATCs,
my plan for color and tools was pretty straighforward:
3 colors and 3 set of stamps on 3 ATC circles:
REQUIREMENT OF 3

I did use several layers of cardstock for the middle of each ATC shape. 
This helped keep them stiff on the inside while the two outer layers were for looks.
Using Glossy Accents also helps everything keep its shape!

Next, after all the outside layers were all put together, I snipped out some stash paper
from the TH Destination 12x12 stack I was using, for some reinforcements.
The TH IdeaOlogy Ring was my plan to hold them all together as a complete set of 2 threes.

When everything was dry, I used some TH Distress Oxide in Vintage Photo
to add some aging to all of the edges.
Heat dry is a must since the DO/RegD are 'wet' until heat set.

Now the real fun begins!
Choosing which color was to go with which stamps.

While HEAT was not a requirement for this Triple the Heat Challenge
I decided that was the perfect way to go; HEAT EMBOSSING!
Now, if you're into making details just right, like I always try to do,
here's how to separate stamp images to make them go where you want...

...1- Tape over the part of the image you DON'T want to show
2- Then add paint/ink to the stamp's un covered area
3- Remove the tape and stamp where you wish first part to be
4- Use emboss powder or glaze of choice and heat dry....

 ...Repeat the steps for each part of the stamp's image you wish to do.


As you work, the part that is heat-finished will look differently in color,
but it will all end up looking the same shade when finished.

I'm using TH Embossing Glazes for my project.
This is Fired Brick.
You can see the TH Glazes are absolutely FABULOUS looking on backgrounds!
Just the right amount to see the stamped image, yet the background shows through it!
With all my stamping and heat emboss glazing finished,
I noted that the Antique Linen was not as visible, so I lightly ran some
Distress Paint over each image in Walnut Stain, then pounced on it with a wetwipe.
Then heat dried again.
I also wanted to add some "rust" to the edges, since these little ATCs looked
like miniature metal signs (like those sold at Hobby Lobby).
So I used the same Walnut Stain Distress Paint onto my TH Glass Mat
and working one side at a time, scraped each ATC edge through it,
dragged the edges through TH Distress Powder,
heat dried, and repeated the process as needed till I was satisfied with each edge.
It took a looooong time to do both sets of 3 ATCs,
but the effect was worth it.

Here's the pic of the items I actually ended up using out of the first photo you
saw of all the choices I laid out at the start....

...and the tools I used.


Here's the CUTE results:

FRONTS:


REQUIREMENT: Set of 3 
Made from 3 sets of stamps and 3 color schemes
3 ribbons, 3 sets of 2 ppl/pet


REQUIREMENT: Set of 3 
Made from 3 sets of stamps and 3 color schemes
3 ribbons, 3 children


BACKS:


FYI: The paper I used to lay the ATCs on for photo taking was the backside
of this TH 12x12 Destinations paperie sheet. It reminds me of Grandpa's cars.

Thanks, everyone, for stopping by!!
And if you're not coming straight from the Challenge page,
you'll find this entered on


Sponsored by:

Enjoy the entries and posts from each blog, then come back to
JOIN IN ON OUR NEXT CHALLENGE!!

Until Next Time;

Stay Safe &
HAPPY BLOGGING!!


Monday, August 23, 2021

Simon Says Stamp Monday Challenge; Dry Embossing... L stands for LYLA!

 I'm back to the crafting board, even though time has been short- as usual. Seems like the older I get, the more arms and hands I need to keep up with everything. Making time for everything that needs to be done, as well as enjoying the end of the summer, seems to mesh together each day. But, I'm thankful for this busy life, humbly mundane- such as it is; when the other side of the world has more urgent need of time right now. I'm a firm believer that GOD is in total control of everything that goes on. There is a reason for everything under the sun, and nothing happens without GOD's allowance. Humans have free will and often choose to hurt others. So when it comes to Afghanistan- my prayers are constantly going up! We've personally known folks who have served overseas in that area, and we currently know others who in turn, have people they know who are trapped there as it stands right now. There will be time later, for peeling layers back to see the entire picture (which I doubt we ever really will see it all), but at this point, we need to be encouraging to all our US Military who are literally HEROES and making the difference between life and death nearly every second. The images of  Saigon's airlifts and eventual fall in early 1975 that played out on black and white tv, stayed in my mind and in my heart. No matter what the argument is: our soldiers should never have been treated so badly upon returning. My heart goes out to them all during the ending of this 20 year war, as they simply try to do the best they can to save lives and come back home safely themselves. I just feel the need to say this, hoping the chaos can be contained and we won't be reliving another September 11th- ever again.

I just missed the last Simon Says Stamp Monday Challenge (Heat Embossing), but I'm getting this entry in just before the deadline- SSS Monday Challenge: Dry Embossing. Basically, it's using your embossing folders, and mine are usually all Tim Holtz with a few stray brands tucked in. My Tim Holtz 3D Embosslit Folders are among my fave embossers, so I chose one to do this project I'd had in the back of my mind all this summer, but never got the chance to begin it. It's pretty easy and straight forward in the photos but I've typed where needed, jic. So, here's what went down...


I purchased the wooden letter at a department store, but you can find letters
of wood from Hobby Lobby, JoAnn Fabrics, or just about anyplace these days,
since they are pretty popular.
The rest of the items are what I THOUGHT I might use- later, I nixed the idea of the
TH Globe Thinlit Die, and I ended up not using the TH Distress Embossing Powder
at all. I previously thought of using it around the edges to 'rust' (distress) the wood. 

Here's what I really ended up using.

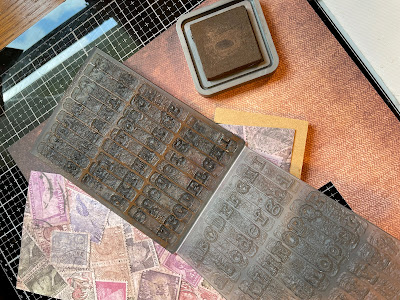
I started with my TH 3D Embossing Folder Typewriter.
While this is "dry" embossing, you actually do need to spritz a bit of water
into the folder so that the cardstock will 'stretch' without tearing.
I'm using Tim Holtz "Destinations" 12x12 cardstock.
I used TH Distress Oxide Ink- in Ground Espresso- rubbed onto the top side of the folder, to
add dimension to my letters, since I wanted to break up the paper's background a  bit.
The DO Ink adds a bit of stretch since it is 'wet' until it's heat- dried.

Here, you can see how I cut the paper apart so it would fit through the Big Shot.

I wanted to keep the sides plain, so I painted the entire letter with Black Soot.

Here; I'm rearranging the lettering- A to Z downward on the front side,
and Z to A downward on the backside.

After using Glossy Accents to adhere the embossed paper to the lettering on both sides...

...I trimmed away the excess.....

... then burnished it on all edges with the sanding grip.
I did heat dry the entire letter- so the spritz of water/DO Ink would be dry
and no tearing would happen.

I then used Distress Oxide Ink in Vintage Photo to highlight the tops of the
embossed lettering. And heat dried again.

I really AGONIZED over what IdeaOlogy to put on this thing!
I wanted it to be "me" like my other letters. (You'll see later on.)
But even though it was all sweet-looking...

I ended up doing the same thing I did in the first place:
DRY EMBOSSING my own letters!

This was the fun part!
I've SO want4ed to try this since I first saw the 3D Folder when it came out!!!
And here was finally my chance!

I accidentally added my bit of DO ink (again in Ground Espresso)
onto the bottom of the folder and ended up with it on the backside of my lettering...
OH MY!! Now THAT is YUMMY TEXTURE!!!
I'm going to need to try that backwards thing one of these days!
But for this one, I wanted the front way.
I edged each lettering in Ground Espresso, so they would blend right into the background.

And then...
these TWO NEW TIM HOLTZ PAINT COLORS 
came in a HAPPY MAIL PACKAGE from
 and I again agonized over which color to use!!!

So, of course, I had to try out BOTH
the TH colors:
Salvaged Patina and the just-released Prize Ribbon.
Guess which one I chose...it was at the very top of the page... do you remember??

Oh, YES; I DID!!
I've been keeping that ribbon since the first Fat Quarters came out from
Tim's line of Eclectic Elements... and the time is here to use it.

I did make a couple stitches all the way through and then wrapped around it,
tying several tiny knots and then adding a dot of GA to secure it- 
in case of dusting could loosen the ribbon later on.
As it stands- I haven't sealed the letter at all,
but I may give it a spray of clear seal later.


And THIS is what I ended up with...


The FRONT

Yes, that Black Soot Paint blotch was a mistake.
But I am definitely embracing it because it's still cute like this!


The BACK


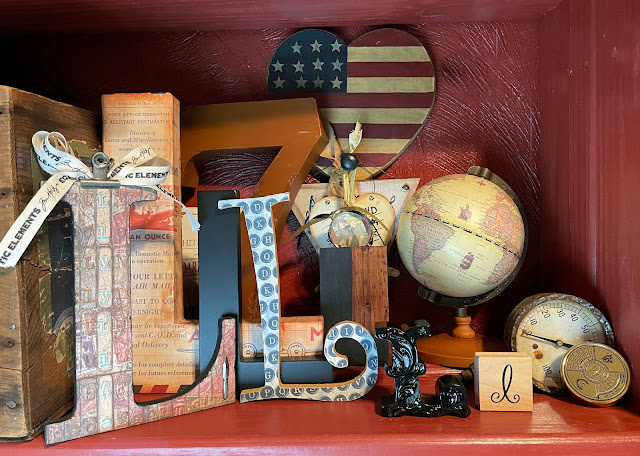
Here's how I displayed it.
Now you can see why the Tim ribbon works here- it actually mimics Tim's T letters
that decorate his studio for inspiration. I felt like this was a perfect touch
that matches the quilted items gifted to me by my Bestie (Cousin) who sewed
them using Tim's Eclectic Elements! The Fat Quarters set was an extra gift
from her that was tucked into her quilted star for me.
 I may rearrange this after next dusting.... at some point...lol!

I want to get in a quick, but hearty, THANK YOU! to those who are still stopping by!!'
I really appreciate all the views, comments, and likes, and it keeps me inspired!!


*NEWSFLASH*NEWSFLASH*NEWSFLASH*

I will be GUEST DESIGNING for Simon Says Stamp Monday Challenge Blog

for the month of OCTOBER !!

Sooooo EXCITED !!!!  And hope to have YOU join in !!!

I'm leaving you with a few pics of the ChiefHubby and I-
we visited the place where we spent a lot of our youth, and years visiting with
our Grandparents- a place called Indiana Beach on Lake Shaffer.
Most of our family own boats and we went through several different boats
skiing, fishing, boating, jetskiing, floating, paddling, and 
generally goofing off on this particular lake in Monticello, Indiana.
Some very precious memories.
The ChiefHubby won 2 tickets to the Beach so we spent the evening together-
just like we did every June 16th- our original first date.
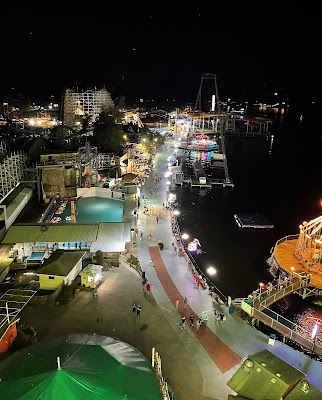
I had some fun with the iPhone 12Pro and came up with these...


The Shaffer Queen (from the SkyRide).

Missed the waves on that water!


I couldn't get enough of the Farris wheel lights...even when a few sticks were out.


Until next time...
Stay Safe &
HAPPY BLOGGING!!