Year 2013 & Year 2014 2

Year 2013 & Year 2014 2
Showing posts with label Simon Says Stamp Blog. Show all posts

Monday, August 23, 2021

Simon Says Stamp Monday Challenge; Dry Embossing... L stands for LYLA!

 I'm back to the crafting board, even though time has been short- as usual. Seems like the older I get, the more arms and hands I need to keep up with everything. Making time for everything that needs to be done, as well as enjoying the end of the summer, seems to mesh together each day. But, I'm thankful for this busy life, humbly mundane- such as it is; when the other side of the world has more urgent need of time right now. I'm a firm believer that GOD is in total control of everything that goes on. There is a reason for everything under the sun, and nothing happens without GOD's allowance. Humans have free will and often choose to hurt others. So when it comes to Afghanistan- my prayers are constantly going up! We've personally known folks who have served overseas in that area, and we currently know others who in turn, have people they know who are trapped there as it stands right now. There will be time later, for peeling layers back to see the entire picture (which I doubt we ever really will see it all), but at this point, we need to be encouraging to all our US Military who are literally HEROES and making the difference between life and death nearly every second. The images of  Saigon's airlifts and eventual fall in early 1975 that played out on black and white tv, stayed in my mind and in my heart. No matter what the argument is: our soldiers should never have been treated so badly upon returning. My heart goes out to them all during the ending of this 20 year war, as they simply try to do the best they can to save lives and come back home safely themselves. I just feel the need to say this, hoping the chaos can be contained and we won't be reliving another September 11th- ever again.

I just missed the last Simon Says Stamp Monday Challenge (Heat Embossing), but I'm getting this entry in just before the deadline- SSS Monday Challenge: Dry Embossing. Basically, it's using your embossing folders, and mine are usually all Tim Holtz with a few stray brands tucked in. My Tim Holtz 3D Embosslit Folders are among my fave embossers, so I chose one to do this project I'd had in the back of my mind all this summer, but never got the chance to begin it. It's pretty easy and straight forward in the photos but I've typed where needed, jic. So, here's what went down...


I purchased the wooden letter at a department store, but you can find letters
of wood from Hobby Lobby, JoAnn Fabrics, or just about anyplace these days,
since they are pretty popular.
The rest of the items are what I THOUGHT I might use- later, I nixed the idea of the
TH Globe Thinlit Die, and I ended up not using the TH Distress Embossing Powder
at all. I previously thought of using it around the edges to 'rust' (distress) the wood. 

Here's what I really ended up using.

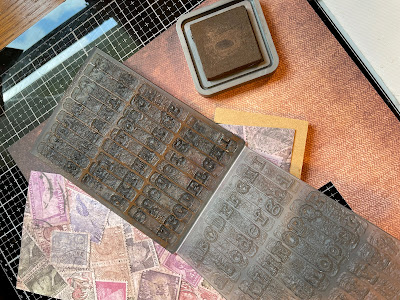
I started with my TH 3D Embossing Folder Typewriter.
While this is "dry" embossing, you actually do need to spritz a bit of water
into the folder so that the cardstock will 'stretch' without tearing.
I'm using Tim Holtz "Destinations" 12x12 cardstock.
I used TH Distress Oxide Ink- in Ground Espresso- rubbed onto the top side of the folder, to
add dimension to my letters, since I wanted to break up the paper's background a  bit.
The DO Ink adds a bit of stretch since it is 'wet' until it's heat- dried.

Here, you can see how I cut the paper apart so it would fit through the Big Shot.

I wanted to keep the sides plain, so I painted the entire letter with Black Soot.

Here; I'm rearranging the lettering- A to Z downward on the front side,
and Z to A downward on the backside.

After using Glossy Accents to adhere the embossed paper to the lettering on both sides...

...I trimmed away the excess.....

... then burnished it on all edges with the sanding grip.
I did heat dry the entire letter- so the spritz of water/DO Ink would be dry
and no tearing would happen.

I then used Distress Oxide Ink in Vintage Photo to highlight the tops of the
embossed lettering. And heat dried again.

I really AGONIZED over what IdeaOlogy to put on this thing!
I wanted it to be "me" like my other letters. (You'll see later on.)
But even though it was all sweet-looking...

I ended up doing the same thing I did in the first place:
DRY EMBOSSING my own letters!

This was the fun part!
I've SO want4ed to try this since I first saw the 3D Folder when it came out!!!
And here was finally my chance!

I accidentally added my bit of DO ink (again in Ground Espresso)
onto the bottom of the folder and ended up with it on the backside of my lettering...
OH MY!! Now THAT is YUMMY TEXTURE!!!
I'm going to need to try that backwards thing one of these days!
But for this one, I wanted the front way.
I edged each lettering in Ground Espresso, so they would blend right into the background.

And then...
these TWO NEW TIM HOLTZ PAINT COLORS 
came in a HAPPY MAIL PACKAGE from
 and I again agonized over which color to use!!!

So, of course, I had to try out BOTH
the TH colors:
Salvaged Patina and the just-released Prize Ribbon.
Guess which one I chose...it was at the very top of the page... do you remember??

Oh, YES; I DID!!
I've been keeping that ribbon since the first Fat Quarters came out from
Tim's line of Eclectic Elements... and the time is here to use it.

I did make a couple stitches all the way through and then wrapped around it,
tying several tiny knots and then adding a dot of GA to secure it- 
in case of dusting could loosen the ribbon later on.
As it stands- I haven't sealed the letter at all,
but I may give it a spray of clear seal later.


And THIS is what I ended up with...


The FRONT

Yes, that Black Soot Paint blotch was a mistake.
But I am definitely embracing it because it's still cute like this!


The BACK


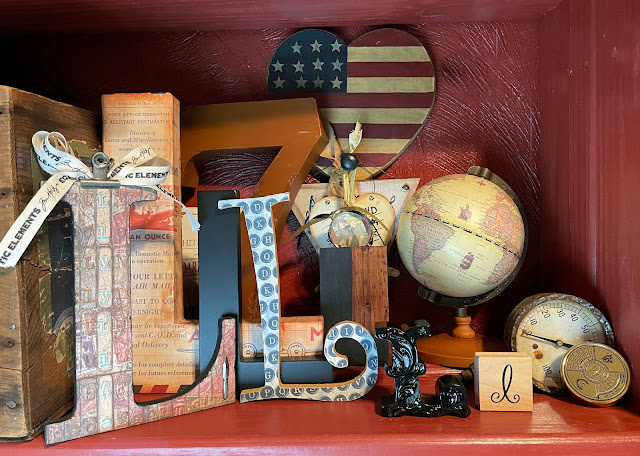
Here's how I displayed it.
Now you can see why the Tim ribbon works here- it actually mimics Tim's T letters
that decorate his studio for inspiration. I felt like this was a perfect touch
that matches the quilted items gifted to me by my Bestie (Cousin) who sewed
them using Tim's Eclectic Elements! The Fat Quarters set was an extra gift
from her that was tucked into her quilted star for me.
 I may rearrange this after next dusting.... at some point...lol!

I want to get in a quick, but hearty, THANK YOU! to those who are still stopping by!!'
I really appreciate all the views, comments, and likes, and it keeps me inspired!!


*NEWSFLASH*NEWSFLASH*NEWSFLASH*

I will be GUEST DESIGNING for Simon Says Stamp Monday Challenge Blog

for the month of OCTOBER !!

Sooooo EXCITED !!!!  And hope to have YOU join in !!!

I'm leaving you with a few pics of the ChiefHubby and I-
we visited the place where we spent a lot of our youth, and years visiting with
our Grandparents- a place called Indiana Beach on Lake Shaffer.
Most of our family own boats and we went through several different boats
skiing, fishing, boating, jetskiing, floating, paddling, and 
generally goofing off on this particular lake in Monticello, Indiana.
Some very precious memories.
The ChiefHubby won 2 tickets to the Beach so we spent the evening together-
just like we did every June 16th- our original first date.
I had some fun with the iPhone 12Pro and came up with these...


The Shaffer Queen (from the SkyRide).

Missed the waves on that water!


I couldn't get enough of the Farris wheel lights...even when a few sticks were out.


Until next time...
Stay Safe &
HAPPY BLOGGING!!


Tuesday, September 29, 2020

I MISSED IT AGAIN!! The Funkie Junkie Boutique Challenge #20 Staying In The Background... But let's do this with SIMON SAYS STAMP....BATground!


      Oh my goodness, has this month of September just flown by faster than a witch on her broom following after an ice cream truck! I'm halfway through my 5-week-long stay up in Red Wing, MN, with my younger set of kids, and I am just LOVING on this youngest Grandbaby! I can safely say that we have successfully bonded, and he KNOWS me as much as I know him now! That is very, very important to me- being close to each of our Grandbabies- since I was close to all of our Grandparents, and saw how my Dad bonded with all of his Grandbabies. He not only babysat each one, but he had no qualms with changing diapers, feeding, bathing, and especially teaching them how to stick out their tongue and blow a proper whopper of a raspberry. (Yes, I have copied this for him with the older two and am currently working on Baby Pecan. Papaw Rush would be SO PROUD!) I am extremely blessed that Jamie has chosen to save pulling himself up and crawling (not creeping, but up on all fours as of this past weekend) for my time here. Don't be fooled; NO ONE gonna take the places of Mommy and Daddy to him- he's fiercely possessive of both. And other Grandparents just won't believe the fact that this child smiles like 97% of the time! He is just so freaking HAPPY! They’re gonna have their hands full; if I thought our 2 boys were fast to catch on with a high IQ.... Oh, Lordy! Fact is, this old lady will have HER hands full since all THREE are showing that type of learning already. I be like...dead...after being with them for a few hours. LOL 
But, really, it's all I can do to keep up right now. (Check out my Instagram acct dblll to see some fun skeleton photos I did this past weekend while taking these.) The weather here in Minnesota changes like Indiana- use the AC and heater in same day- but it feels...stronger?? The sun and the moon look super huge from here, and the clouds/wind make me think a severe storm is on the way. The kids told me that the MN sky is simply "huge" and the immense, darkened clouds just roil on past.
     Trying to get a Tag done without all your usual things handy, is a real challenge. But this The Funkie Junkie Boutique Challenge #20 theme was too good to let go just after I got Tim Holtz's Ghoulish Thinlits Die! I also got a 2nd pkg of the TH Clippings Sticker Booklet (a girl can't have too much Tim...yes, sadly I am an admitted Tim Holtz Addicts proud member, lol). Tonight, I end up missing the deadline as I am feeling a bit under that weather- sore throat and runny nose- with the usual-for-me cold. That, plus I busted my butt to get this Tag done while doing everything else. It was FUN, though, because after seeing Tim's Snarky Cats light up his Christmas Tag... I just had to do this! 
    Sooo. I've been looking around for another group in which to share some of my makes, since one group I joined earlier this year seems to have just stopped in mid-stride. I don't look for competition; I look for sharing INSPIRATION! I have my iPhone Safari full of open pages following many of my fave "Tim" Makers. A lot of you chat back and forth with me on Instagram or esp on THA on Facebook- you awesome folks know who you are and how much your talents AMAZE me! And quite a few share their Faith/Hope/Love through their makes: which is what it's all about. I keep ending back up on
 Simon Says Stamp Blog page, and I am seriously blown away by the participants' craftiness!! So while I've missed out on TFJBC, I'll just wait for the next (I'll be headed back to Indiana by that next Challenge deadline) and start in with this make - that fits the bill for SSSMC: Add A Photo. You can see the details HERE: Simon Says Stamp Monday Challenge.

           Let's see where my ArtMuse took me this time...


The ChiefHubby actually FaceTimed me with "STOP spending money up there!"
This place is medium sized city, just within an hour of Minneapolis/St Paul.
But it's got GREAT stores that are AWESOME during COVID19!
They have hours for ppl like me to shop & I think I've been with 5 others- at the most-
in a store for groceries. Their JoAnn Fabrics is TOTALLY COOL- complete with most
of Tim's regular line!
Alas- I found all this out AFTER I ordered this shipped from Amazon- for a very low price.
Those TH Vellum Haunts have the gears in my brain going, going, going...*evil laughter*!

Yep, this is from the Amazon Man's delivery box. It called out to me.
And the TH Alterations Branch Tree Die (retired) already came with-
it joined a few other dies and papers, inks, tools, etc. that I brought to do a specific couple
of makes. No spoilers here, though, so watch for it in October!

The trick was to cut SEVERAL trees out- and after layering the finished cuts,
turn one set of layers around so that the tree looked fuller... and SPOOKIER!

I inked up the TH 3D Impresslit Lumber with Distress Ink in Regular Black Soot.

Then I wiped the DI off the grid lines (they show 'boards' put together)
so that only the wood shows up on the tree.
A tree with boards going across it would look a bit off, yes?

Then I cut the heck out of shades of paper (the same Farmhouse Stack I've been using lately)
that closely resembled the photo on the front of the TH Thinlits Die Ghoulish.
Afterall, the front photo was what got me wanting that set.


Our younger Daughter is getting back into quilting. Holli's Mom enjoys it and shared
her craft with her back during Holli and Brett's Sr Year in High School- Holli 
quilted her Senior Project (a beautiful bed quilt) made from all her Legion of Gold
Marching Band shirts.
So, although I didn't have my big paper cutter here, I was able to use her cutting mat
to make several layers for a larger sized Tag. I tossed in a couple of smaller tag cuts
which you'll see at the end. 
PS: I also have yet another post to make; on a "quilted" PAPER make!!
I've been busy crafting, but not had much time to blog it all !

Another problem I had to tackle:
a reinforcer for the larger tag that would look about the same size as the Etcetera Small Tag.
And I needed a circle, which I am not that great fussy cutting.
To the rescue; Tim's Mini Tool Blender foam!
I simply cut it INSIDE the mark and it ended up smaller, as I wished.
Finding a plain circle office paper hand punch was darned near exhausting.
I get soooo tired of Walmart changing their shelfs and departments around.
I am OLD, ppl! I have Brain Fog on a daily basis.
But I found one... and my 'made up reinforcer' ended up pretty nicely done.

Again- I made sure I had enough cuts to really build my larger Tag up,
plus have a few cuts for the smaller, flat Tags.

Then I needed some tombstones.
But no one around here has any of Tim's HALLOWEEN items.
So I picked up some regular oven-bake Poly Clay, and fashioned my own.

Tim Tools to the rescue again;
the rectangle Blending Tool foam replacement (I brought along a few, jic)
not only made the front faces of the stones look pock-marked,
but the TH (Tonic Studios) Craft Pick worked great at making designs on the stones.

Now you can see I have THREE sets of stones.
Hmm....no spoilers.
You'll see those extra two sets later on my blog.

And after baking, sanding a bit (with TH Sanding Block, of course),
I shaded a bit of Distress Ink (Regular Pumice Stone & Iced Spruce Oxide) for some
depth, wear, and tear on the stones.
Note that they look a bit crooked- because they ARE.
The ground changes over the years and we have a cemetary in back of us
where the little settlement down the way used to bury their dead up on top of our ridgeline.
The Wabash River flows past and often rose up. washing lower graves out.
We had a great time taking our boys and tons of friends back to see those.
We'd leave 'em there and run. (The boys loved the shenanigans and parties we went all out with- especially for Boy Scouts! Spider cakes, apple bobbing,... you name it and we likely 
helped a ton of kids have fun with Halloween. I was a Room Mother every year,
and a few years- both boys' class at the same time. WHERE did we get the ENERGY?!)

Here is the best part- these little photos and the masks in the TH Halloween Clippings 
Sticker Book are SO COOL!! Those photos made awesome miniture cabinet cards
by placing the photos onto some black Mat Board and then fussy cut around them just slightly
leaving the black board edging. Sand the edges JUST SLIGHTLY- for that rugged, worn look.

Then I added some TH Distress Crayon in Black Soot and Walnut Stain;
shading the edges, and then using both Crayons to dot a few spots and lines.

The Results:

I have one larger double-sided (as usual) Tag
and two smaller Bookmark (also double-sided) Tags for the younger couple set of Kids.
(They are voracious readers and can always use more Bookmarks.)

REQUIREMENT for SSS Monday Challenge: Add A Photo

SIDE 1 of 2

Would YOU trust a tree that looked a bit too EVEN??
Creepy!
They are all out of the same family- while the 2 old crabby ladies don't wish to be seen
with everyone else. So they take refuge behind the masks and try to hide behind branches.
the Patriarch father is in the middle. His 2 daughters have failed him in playing nice.
The only Son is a cool dude who doesn't care about what Dad leaves him for an inheritance;
he's more able to get out on his own in life- an adventurer for sure.
Uncle, up there in the left corner, was the first to go. 
He's wistfully still waiting for some 3rd generation babies to come along,
while never having married, nor having any kids of his own.
These folks are buried under those tombstones...MAYBE.
MmWhahahahahahaaaa!

The layers worked nicely!

This has to be my fave of the Clippings photos!
Hey, waitaminute! Wasn't this guy seen somewhere in France??
(He's the same character photo used in Tim Holtz's French Industrial Paper, lol!)

I fashioned a few ghosts in there, using a TH Craft Pick to make a clean hole
across the back inside of this ghost so I could run some satin ribbon
(not TH Crinkle Ribbon, but I did use some Reg Distress Pumice Stone on it anyway)
through it to hang at the top.
Funny; I ended up covering up this side's reinforcement.
*sigh*

This was the side that was going to be used for
TFJB Challenge, Staying in the Background.
The slits were made with the rolling blade and each of the Ghoulish characters
made to 'come out of the wood'.
You'll notice that there are 5 characters in that main area:
Dracula, Frankie, Bones, and two Old Bats- the same ppl on the other side of the Tag.
Of course, there needed to be more bats...girls gotta have friends around- always!


A bit of Halloween “webbing” home decor as some corner-of-the-room cobwebbing.


The younger set of kids- Witch's Brew is a cook book of COFFEE,
and Zombie Hood is basically about never getting enough SLEEP.
Hence why the need for coffee.
It basically sums up life as new parents. 

Now you can understand the Side 2 meanings:
middle of the night wakey-wakies & Baby is boss of the schedule!

SIDE 1 of 2

The thickness of the Tag was so a
TINY LIGHTSET
could be run through BOTH SIDES!
I'm stuck doing my pics by iPhone and editing them on same,
so I hope this can be seen ok.
BTW; The shirt I used for a backdrop
just happens to be Baby Jamie’s first Halloween T-shirt- purchased last weekend by his huge-fan-of-Halloween Mommy. Memaw is pleased that it’s Mickey Mouse under there; my fave character since... forever??

SIDE 2 of 2

The GHOULISH come out of the woodwork- AT NIGHT!
I chose to call this Tag "BATground" just to go along with the Bats.


Later, dead dudes!


And that's all she wrote for this make.
Hopefully, I'll see you , and perhaps YOUR CRAFT,
at either Simon Says Stamp Monday Challenge Blog,
or at The Funkie Junkie Boutique Challenge Blog.
A big SHOUTOUT of "THANKS!" for all the lovely comments on my recent items!
And especially "THANKS!" for everyone who keeps popping back in!
LOVE you guys!!!

Until next time...

Stay SAFE, Wear the MASK, Wash the HANDS,
and
HAPPY BLOGGING!