Year 2013 & Year 2014 2

Year 2013 & Year 2014 2

Tuesday, April 18, 2023

The Funkie Junkie Boutique's Inspiration Ave #9, It's In the Details... Card File 2 from Brand New Tim Holtz IdeaOlogy!


     We've had such beautiful weather in the last week, and I knew it was too good to be true. The Indiana freeze came back to visit April 17th and 18th. After being in the 80s in Florida, coming back to chilled Indiana, then enjoying the 80s-get-your-air-conditioner-going of teasing Spring, my joints are protesting loudly. I think it was a gift, though, because on April 6th, we laid our Hunni Pi to rest in her own backyard. It was a very tough promise to keep, but once the Dr saw her and measured her heartbeats, his face said it all. She'd had a painful heart murmur and irregular beat (much like my own), but the pain medication was no longer helping her. Fluid was gathering around her heart and once the Dr gave her a relaxer, my poor Hunni Pi was able to lay down and actually give a huge sigh- as if in relief- for the first time in months. The 'choice' was really hers, and she'd been trying to tell us for some time now. Everyone was surprised she'd made it back alive to Indiana. We think she did just so she could come back to her first home where she'd spent her life. I held her tight and sang her song to her as she slipped quietly away when we gave the nod. It's been a tough couple of weeks for us here, and we both catch ourselves- calling to let her out.... pat her head on the way to bed, wake up to sing her song, or swear we feel her fur run past our legs while walking through the house. Easter was a bit subdued for us, but we did celebrate and gladly worship our risen LORD. If not, what's the point of having hope in those treasures laid up in Heaven? Here's a shoutout of "THANK YOU!" to all those who knew Hunni Pi and sent their sweet condolences. One woman who saw our hurt while waiting on Hunni's body, came out to hug us and walked away in their own tears- no words exchanged. Ditto at the Shelter where I dropped off so many worldly belongings she was blessed to be able to have and now share with others who don't have. It felt good to remember we always have her in our hearts!

   April 14th has some famous evenings in history; the assassination of Abraham Lincoln and the sinking of the Titanic to name a couple. But the most important evening on that date-to our family- is the birth of our younger Son, Brett. He's accomplished more than most Nuclear Engineers have at 31 years old, but we're simply proud of being a wonderful Husband and Father. Nothing makes a parent feel they've done well at raising their children than seeing them raise their own. We've been blessed twice over in that! Brett was a character & life of the party from 1 year old. He had a rough start with severe asthma (which is no longer an issue as of last year), but by year 5, he was blossoming into a little star. He followed his Big Bubby, Brian, as "Teddy Bear #2" as a gentle giant of the class. And now, it's clear that his own two babies are following that same path: gentle giants who are definitely entertaining! I'll be heading up to NY in just a couple weeks and I can't wait to squeeze the younger 2 Grandbabies & catch them up to the older 2 here, and we've got Easter to finish with them, too.


    I'm getting back into the crafting mood and making some plans to go along with all the new Tim Holtz stuff coming out. The product releases are trickling out over time, but I find that easier to not only keep up with creatively, but it also helps the budget juggle the "I want!"s. The product theme for the next two weeks is Tim's latest IdeaOlogy release, and The Funkie Junkie Boutique was my first stop in getting hold of a few items that seemed to form their own plan in my mind. Let's get to it!

My Happy Mail came from The Funkie Junkie Boutique
to our Florida house and we left just days later.
Love those little wax envelopes of freebies!

These were the main IdeaOlogy products calling out to me.
(List of products used will come near the middle of this tutorial.)

The first thing was a pull towards my older IdeaOlogy since 
the new looked like it was going to marry very well with the old!
I'll give you a rundown on each new product as we go.
I even brought out a couple of new TH Dies;
(Thinlits Sets Postal and Specimen) in case I wanted to add any
die cut elements to my Card File.
I dug through one drawer because "I just KNOW I have some feet that
would look great on the bottom of these and I KNOW they
will match the new Large Word Plaques!"
I was right: I did and they do.

This was last but I'm showing it first because you'll see how the new fits in with this.
I needed a new Vignette Card File for this new project, because I took the old one to
keep in the Florida house. I got out some OLD TH Backdrops Volume 1 (but just ordered
the new Backdrops Vol 4 for more to go along with this later).

I needed to match the Backdrops- no worries for me with either old or new:
Tim keeps "vintage" in vogue with the newer shades matching this older tape
and blending everything perfectly!
Here, I am showing how I make sure to clip the corners of the (older) Tissue Tape
so it will fold down completely flat. I wanted to show that because 
on my first Vignette Card File, I painted the inside and all the edges.

I did the Paula Cheney 'thing' to age everything by smashing my 
Ground Espresso Oxide Pad onto my TH Glass Craft Mat,
spritzing the ink with water, and then dragging all the measured-twice-cut-once
pieces through the droplets on the glass mat. I heat dried everything,
and then gave all the edges a workout of the same Ground Espresso,
but with a Blending Tool all around the edges only, then heat dried again.

I'm not sure how "dry" others do, but I like to dry BOTH sides of 
the papers I ink. My reasoning is that it not only gets the edges, but also
dries any Distress Ink/Oxide that may have been on the glass mat and
transferred to the backside unknowingly.
Then I adhere all the papers to all the faces of the wood.
I actually heat dry again, just in case any of it came into contact with water,
since the Distress Inks and Oxides are water reactant.

The last touch on my now-decorated Vignette Card File
was to add a brand new IdeaOlogy element to it: Large Word Plaque,
by using my finger to add TH Distress Paint in Salvaged Patina
to make that cool font pop with color!
Now it was ready to hold a few new IdeaOlogy makes.

After getting home and unpacking all my craft bags, I found a nice
stack of Tags I'd die cut but didn't put to use yet.
I like to double up my Tags as it gives a stiffer Tag to work with,
so I used some score tape to put 2 (cut edges facing in towards each other) together.
Since I always cut the reinforcers at the same time I cut Tags,
I already had everything I needed- just to do the "Paula Cheney smoosh thing"
again and Ink up the edges with a Blending Tool. 
Heat drying after each step, of course.
I found some pieces of ribbon and lace I'd hurriedly stuck into that bag,
and the light neutral coloring of the IdeaOlogy items matched with them.

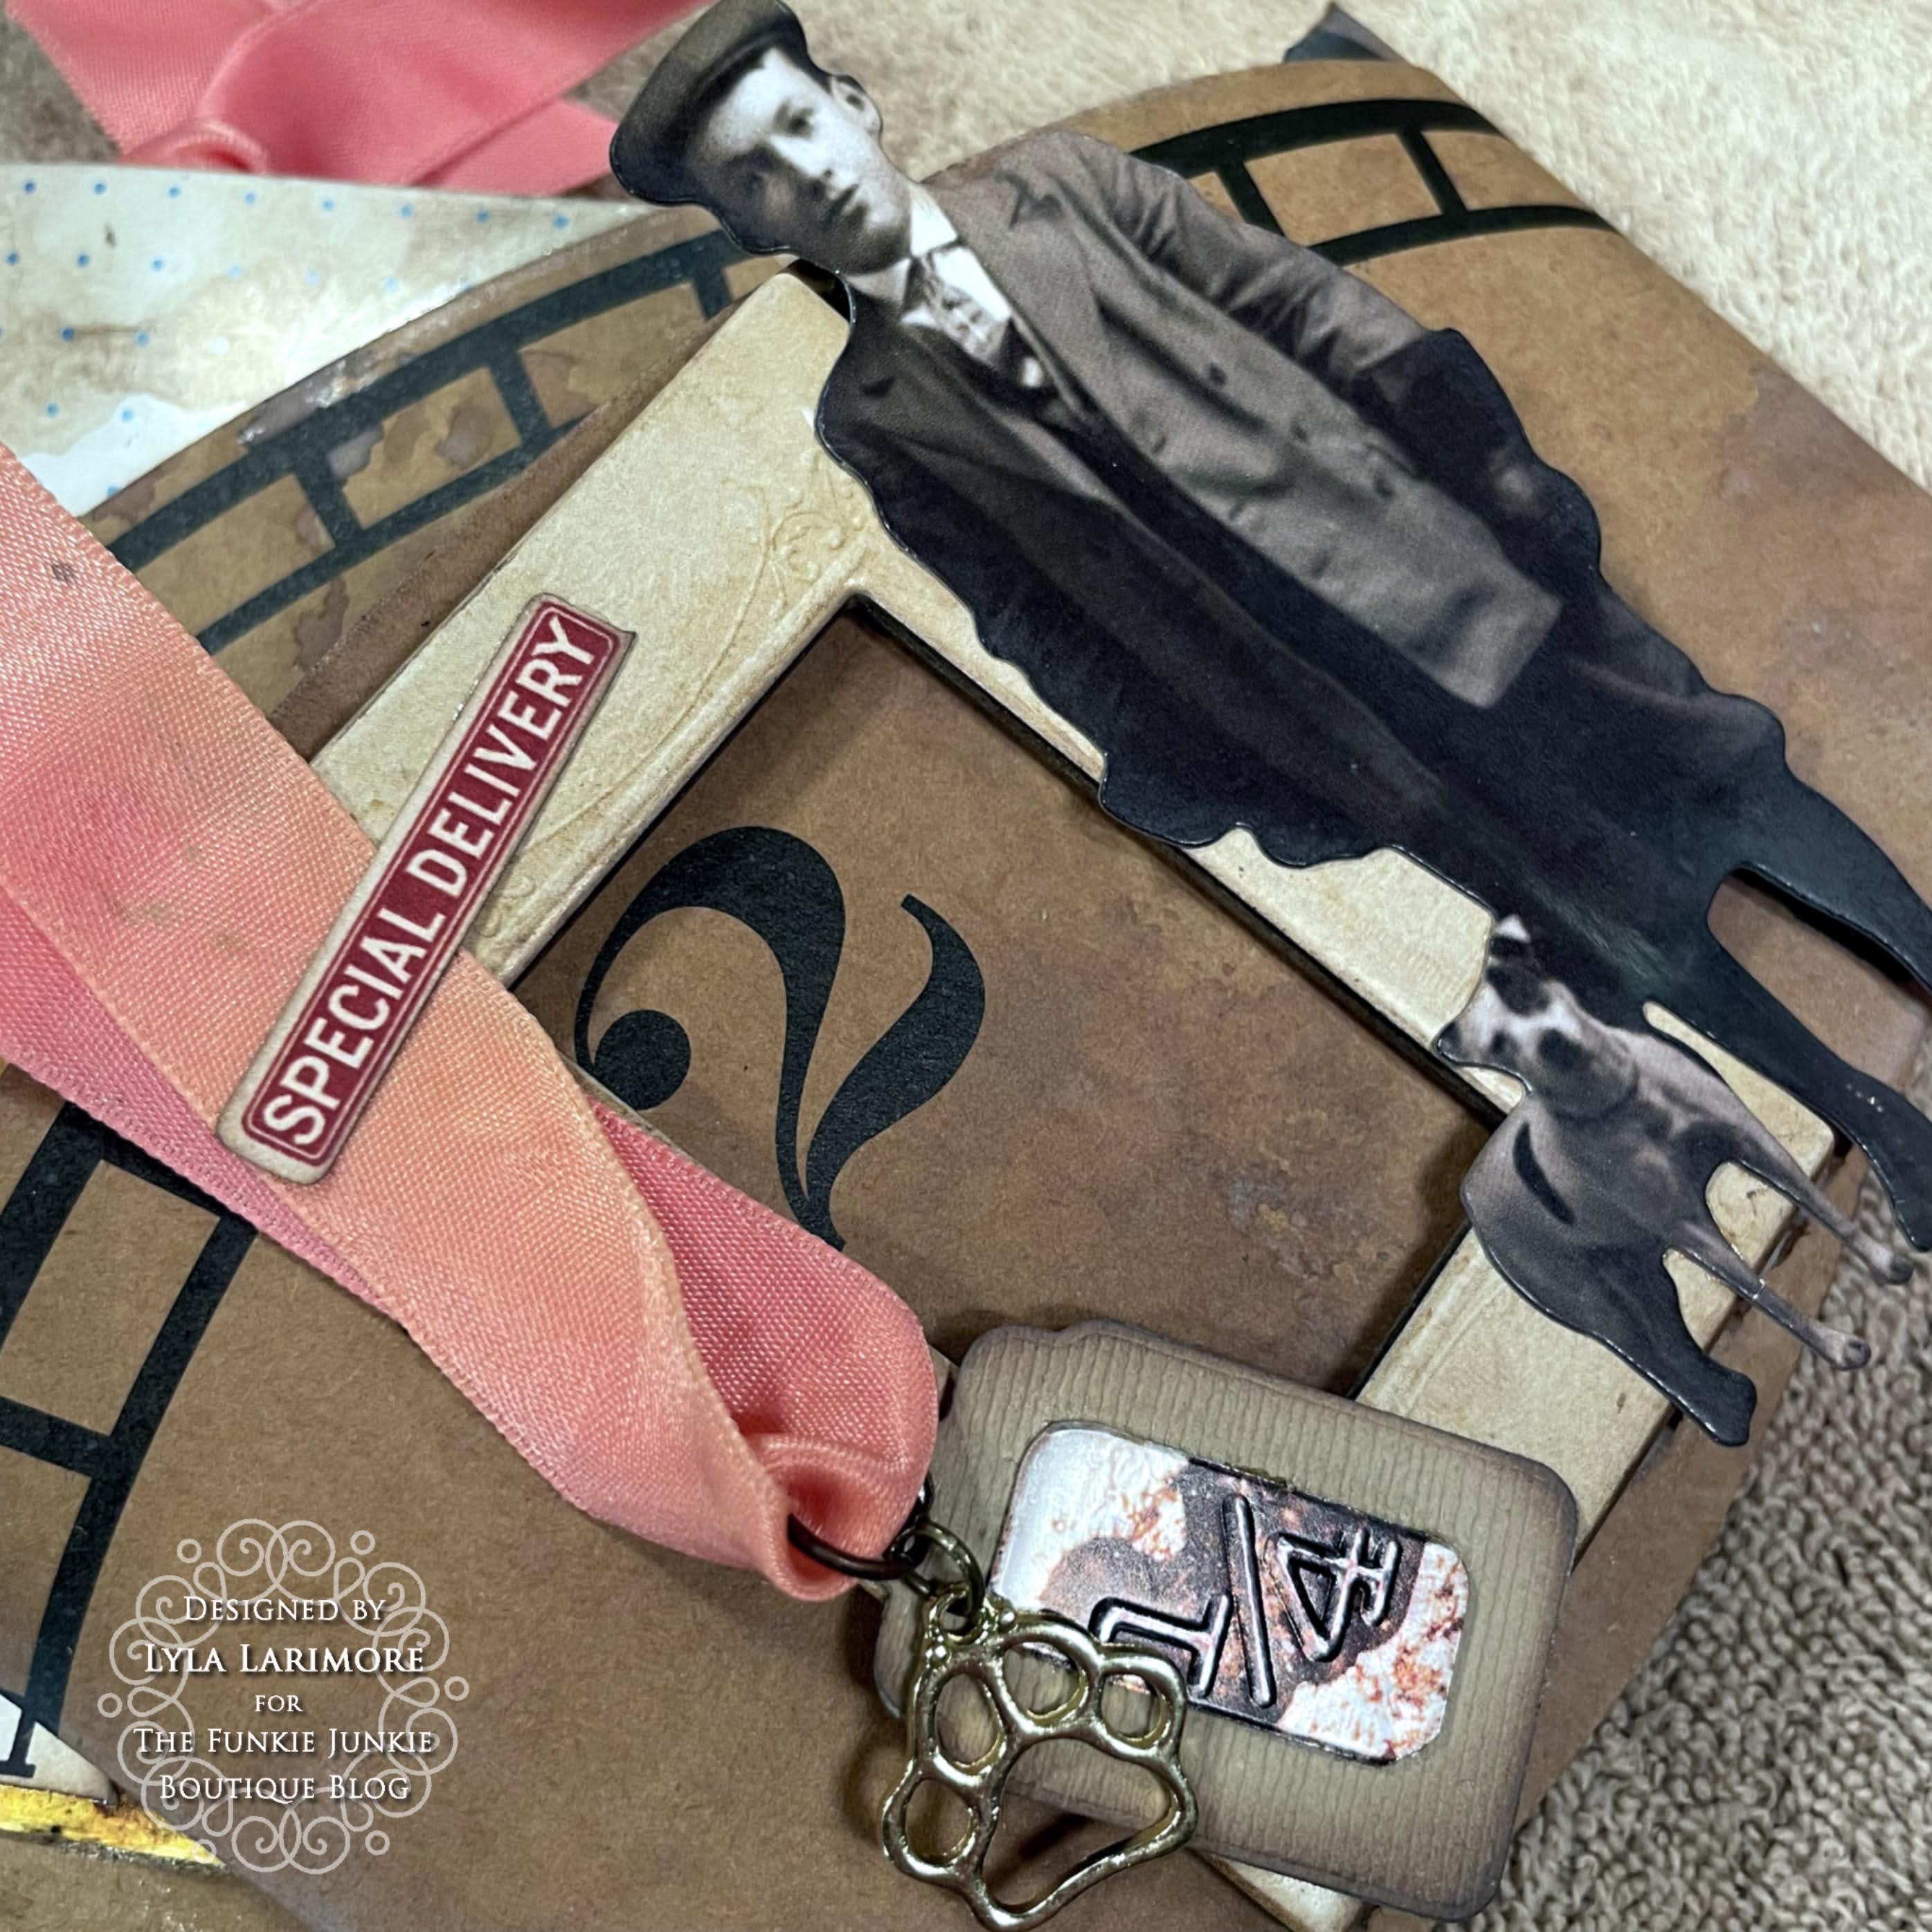
The fun began: tearing up and smoosh/blending tool inking up photos
from the TH Snapshots 2 pack, and picking through 
TH Ephemera Snippets Number Strips.
 and TH Clipping Stickers for sayings to match the Snapshots 2.
I had some TH Tiny Clips that looked great on the new Snapshots!
There's more to choose from in the Snapshots 2 that are more
geared towards vacation, which I really like.
I got extra lucky here: Snapshots 2 has a boy with a dog!

Next up was the new Collage Paper Photgraphic.
My thoughts on this?
AWESOME!
There are several new "photos" printed on this tissue roll
and they can mix/match/go alone or all together.
The printing is so CLEAR and the photos look realistic.
I especially a huge fan of the near-the-water pics!
You still get a pretty good sized roll that will be enough for many projects-
a great value during a time we need it!
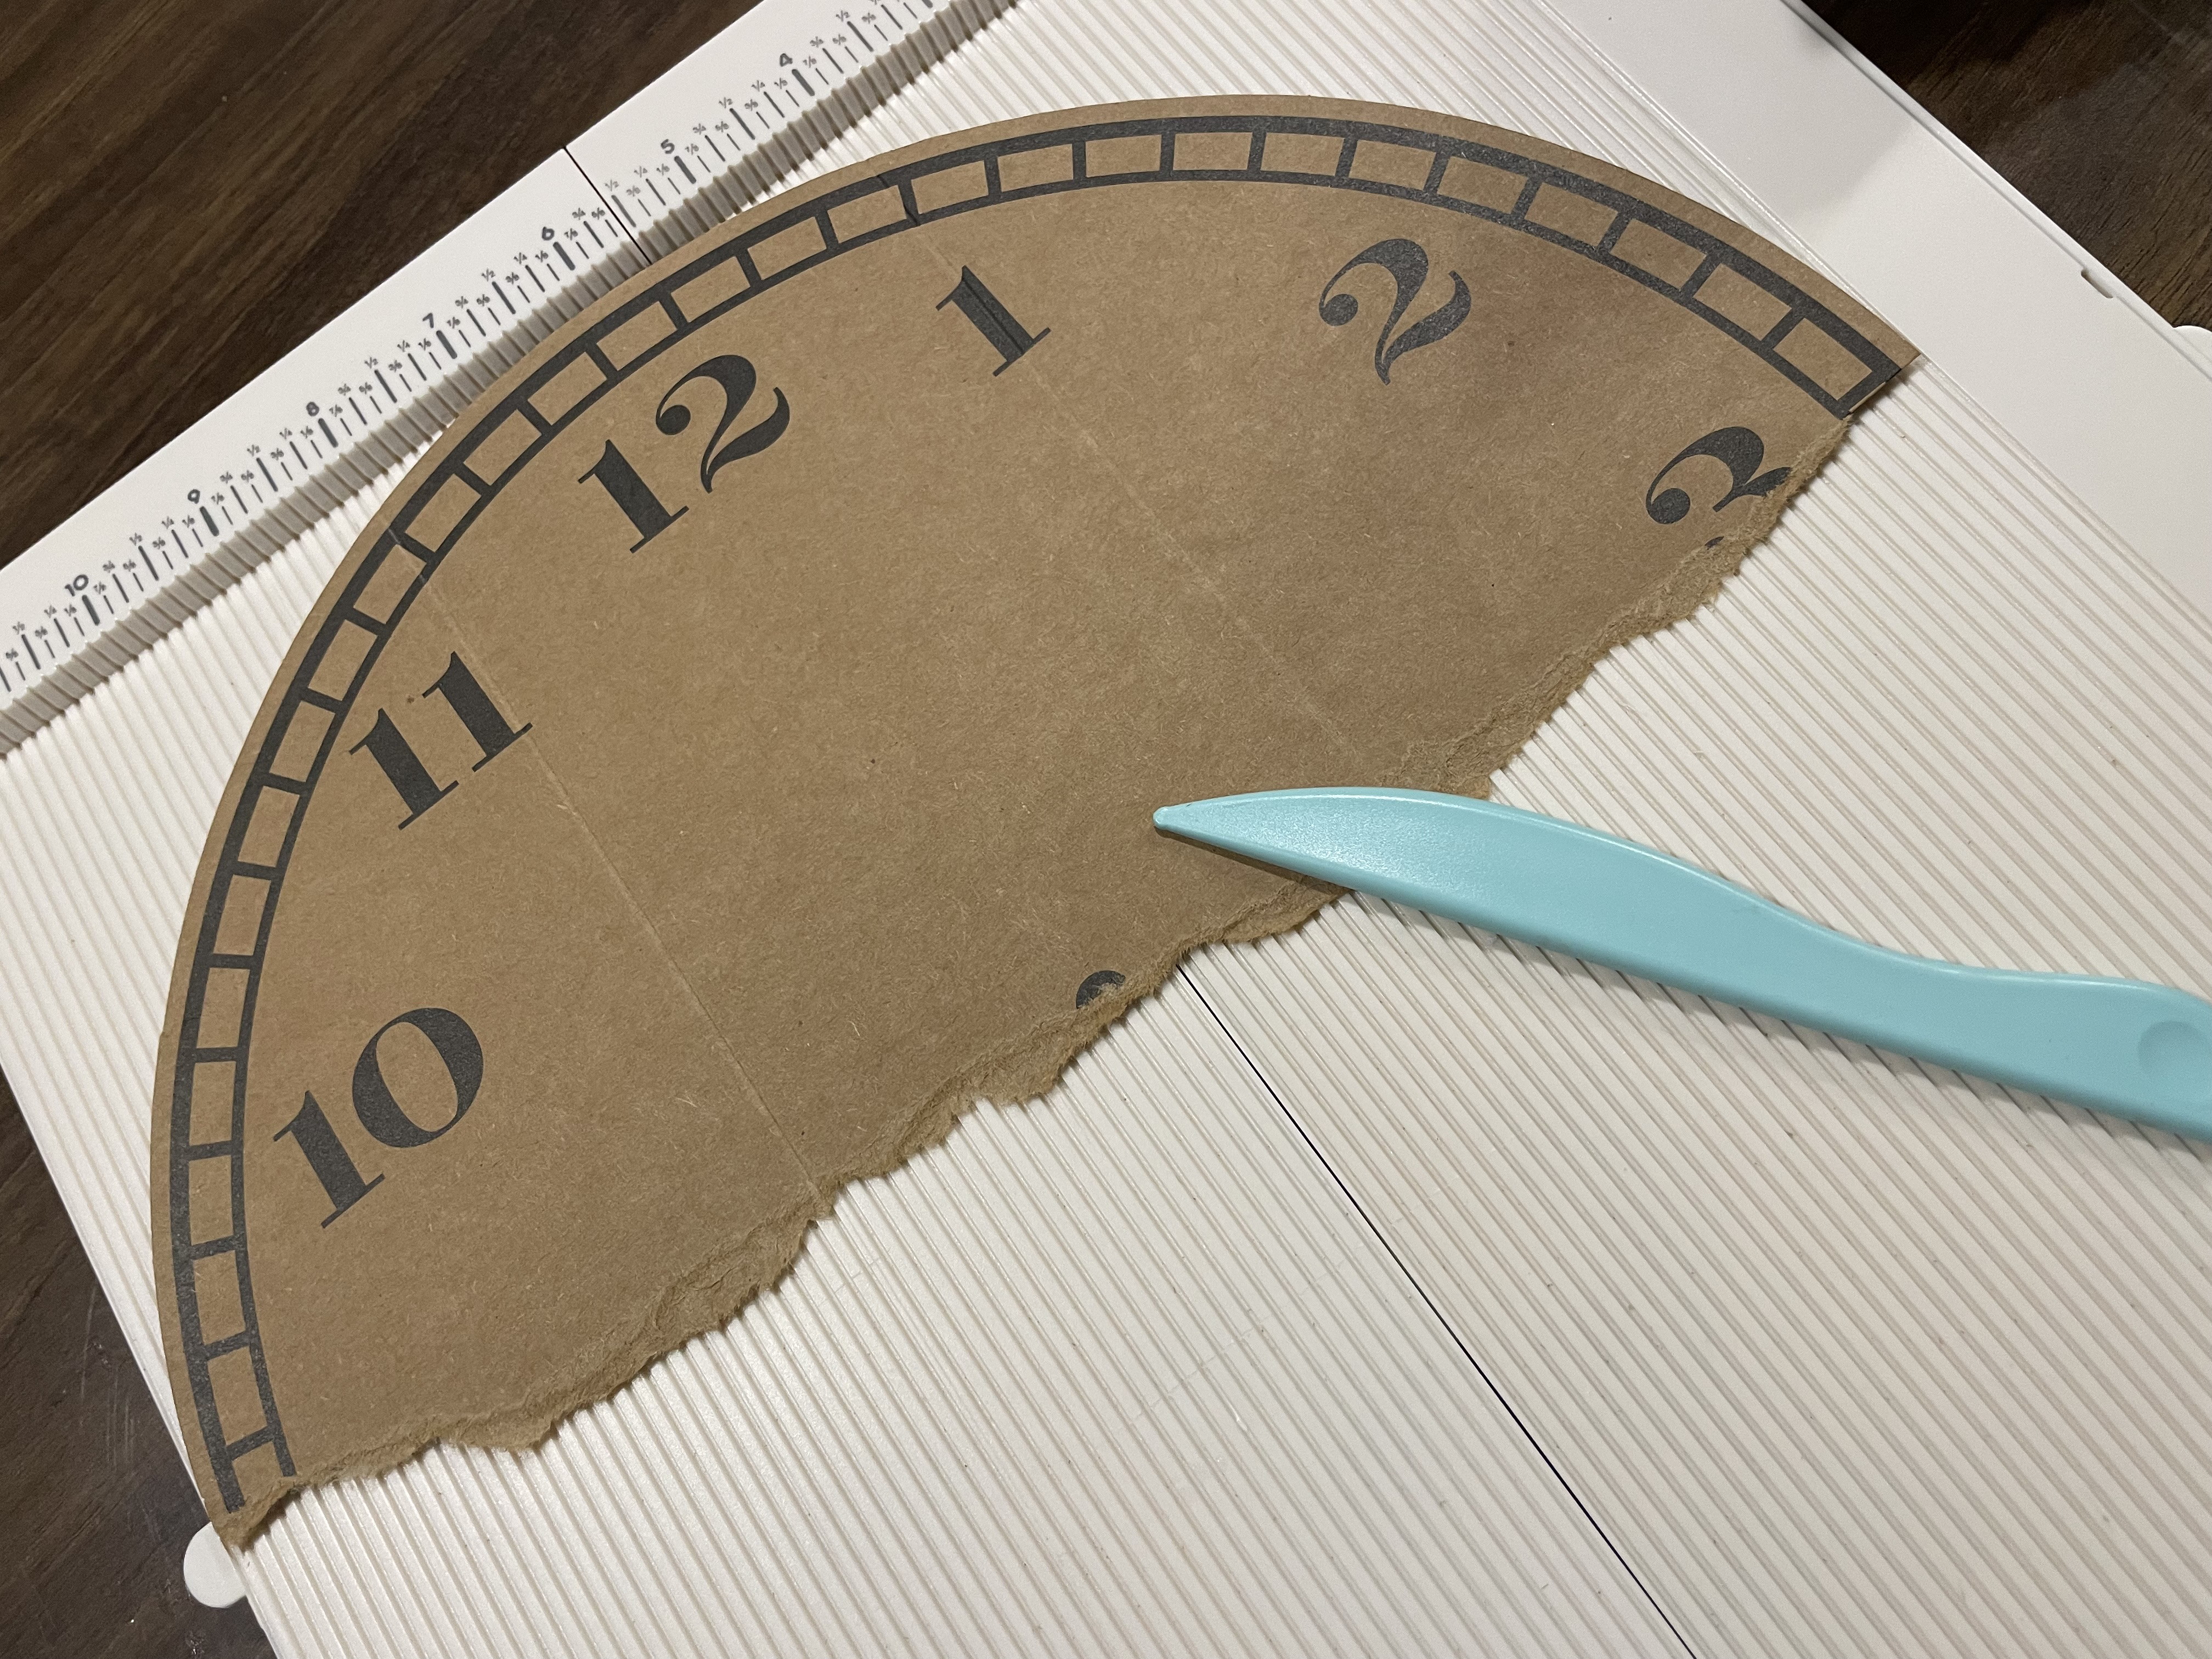
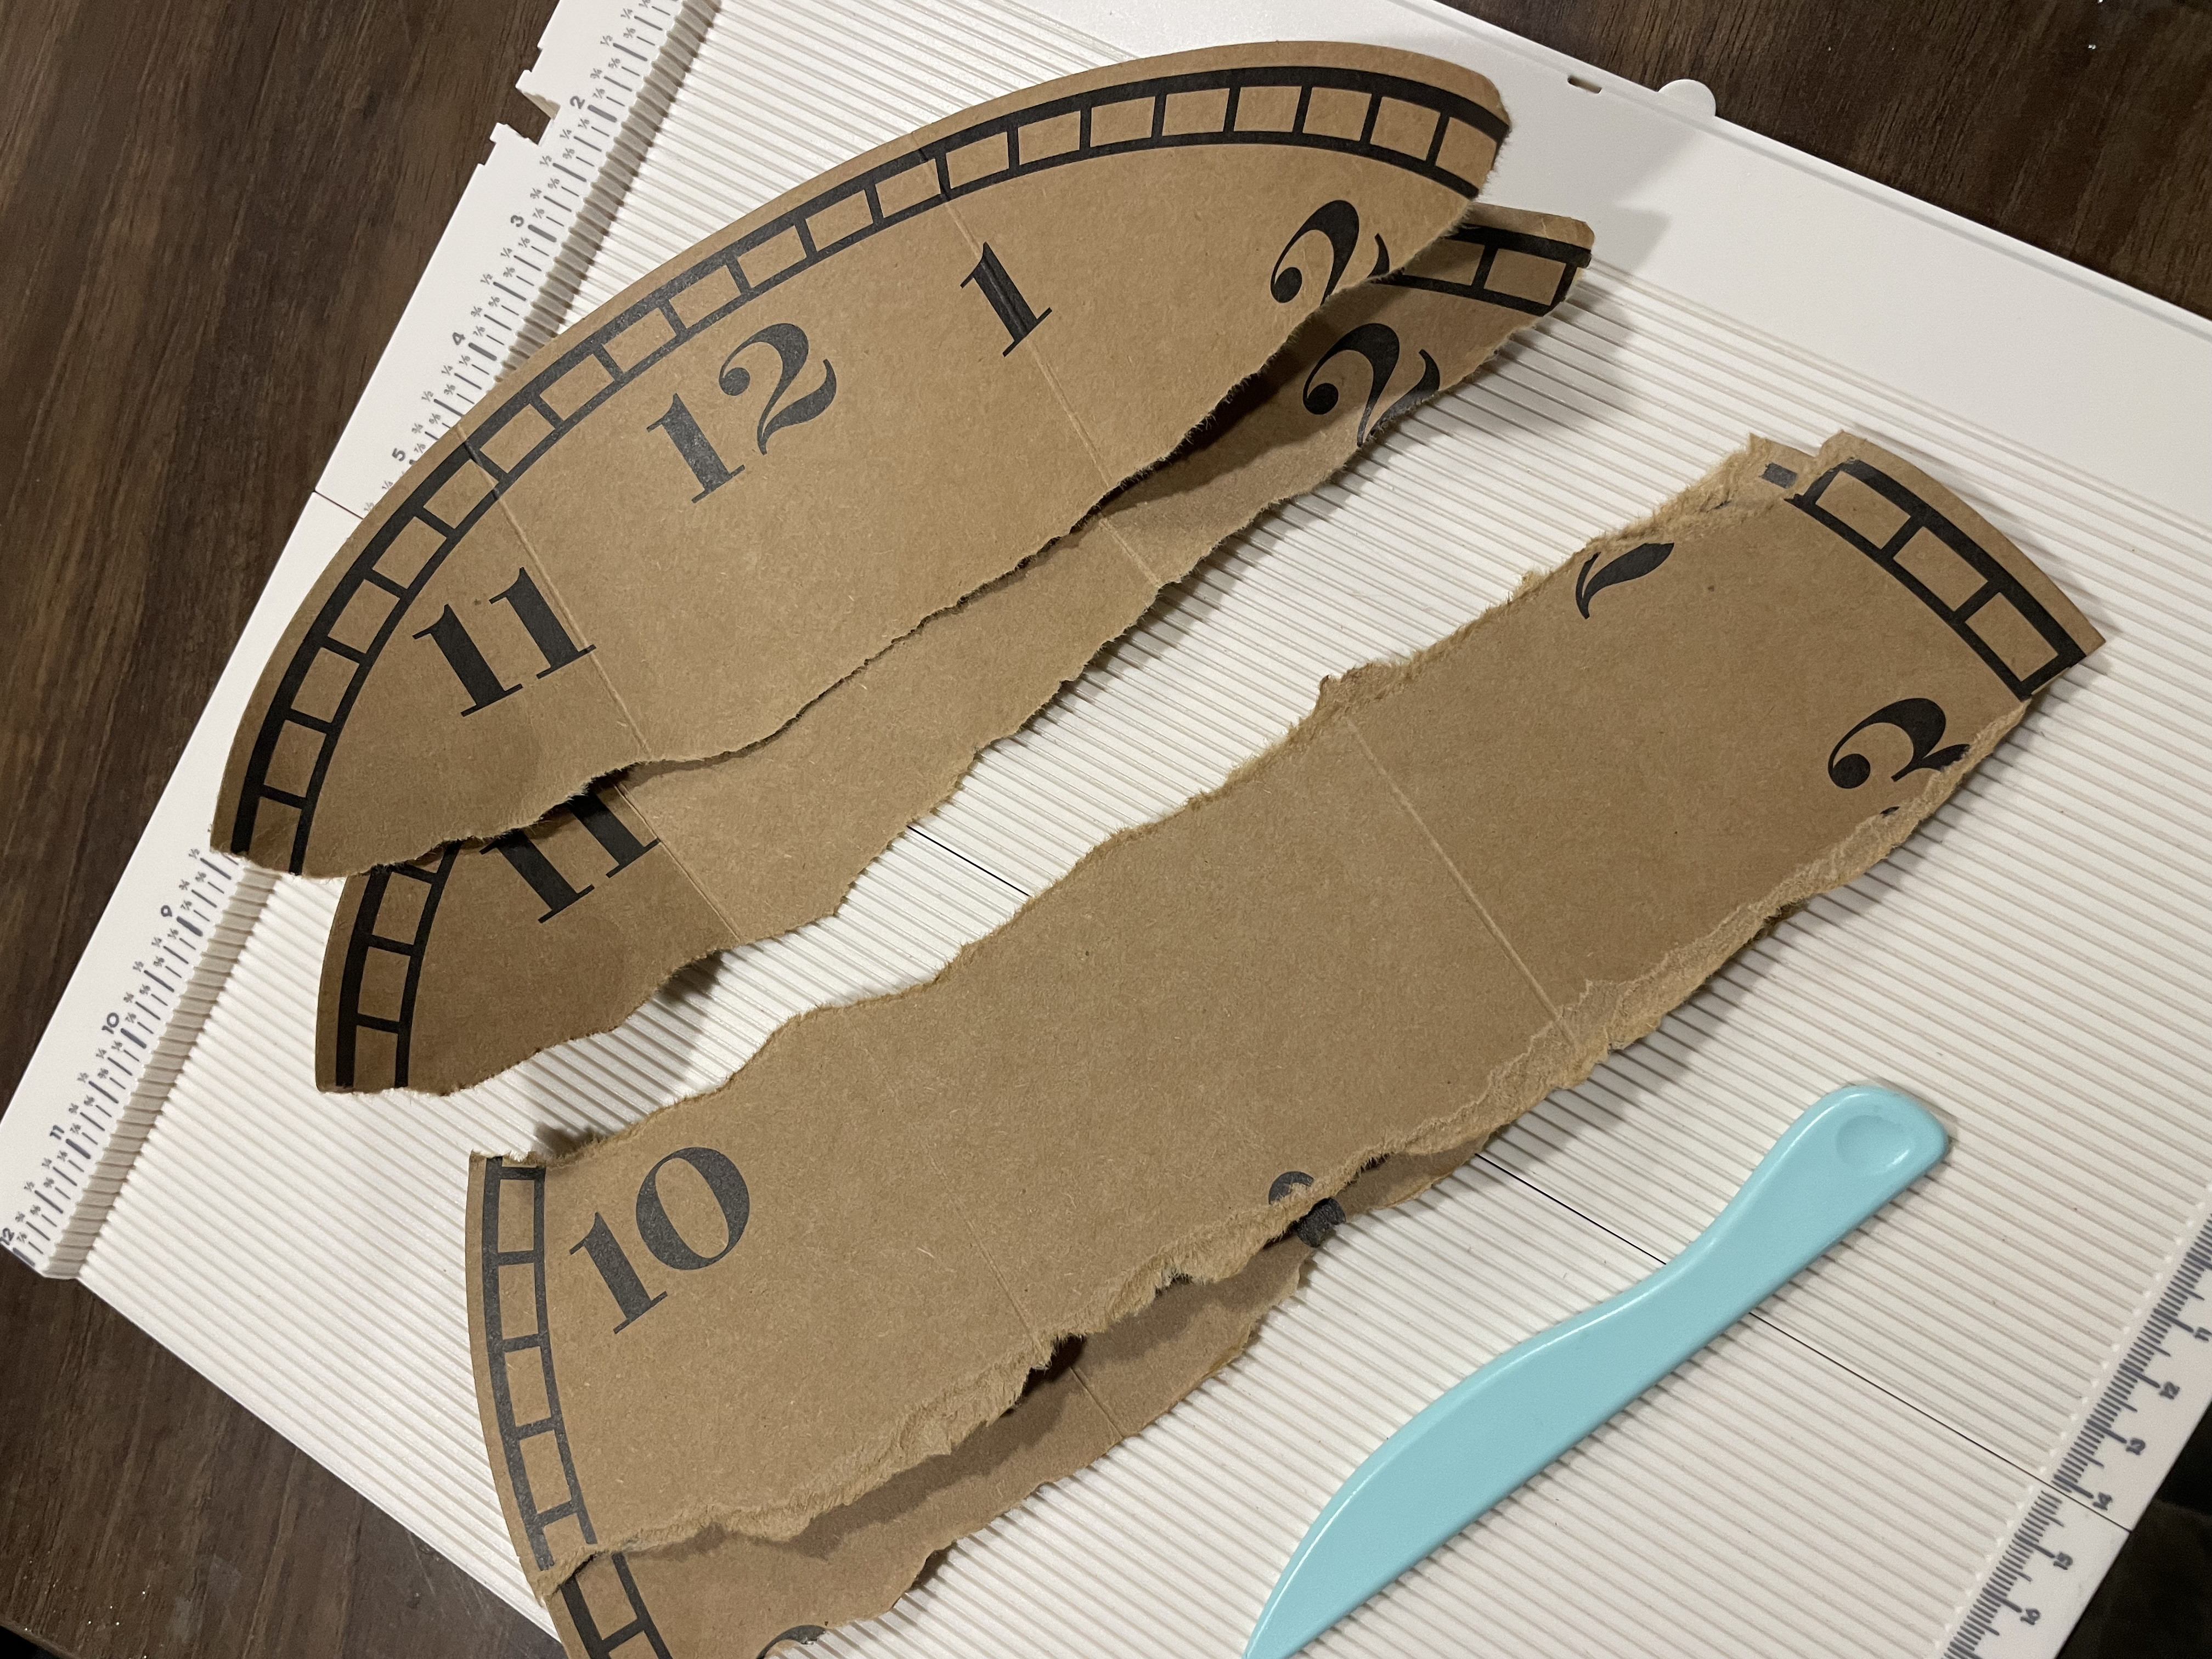
I took another idea from what Paula Cheney did earlier in the winter;
using a Water Detailer Brush to draw a line of water
around my chosen scene, then allowing the water to 'cut' the tissue for me.
This actually works VERY WELL and I find myself doing it
as my go-to way to 'cut' TH Collage Papers since it gives a perfectly torn edge.

I decided to add a detail of my own, since I find that
personalizing a lot of my projects just makes me happy!
I finally purchased a thermal printer and was able to simply add
my own touch to the backsides of my Tags.
It acted like a journal photo instead of writing as journaling.


Here's a helpful list of product links:


And this is what it all looks like put together:


Those little Freebie envelopes just happen to fit inside the
TH Vignette Card File, so I chose not to put a title into the front handle.


Fronts of Tags with Closeups...

LOVE the new shapes and sizes on the Quote Chip Labels!


Backs of Tags with Closeups...


The photo I described in my last post (My Puppi Pi, Hunni Pi)
matched in with the Snapshots 2 pic on the front of this Tag.

I added a bit of Distress Watercolor Pencil in Salty Ocean with a Detailer Brush
just ever so slightly on top of this sealed Tag.

I did use the TH Thinlits Set Specimen to die cut a few plain file folders
that fit inside the Card File, and set them into the middle compartment,
with some leftover Tag bases into the back compartment.


That's a wrap... for the just the first posting on Tim Holtz's newest IdeaOlogy.
The rest of The Funkie Junkie Boutique's awesome Design Team
has much more to come in the next two weeks!
Be sure to stop back in for more Inspiration Ave,
and click the links in every post to help you find great deals for 
the just-released IdeaOlogy!


Until next time...

Stay Safe &
HAPPY BLOGGING!!

Tuesday, April 4, 2023

The Funkie Junkie Boutique's Inspiration Ave... #8 Tag Team... My Puppi Pi: Hunni Pi


Warning: This is a longer start than usual, but most of it does pertain to my project. If you're here only for the "how-to", simply scroll down past till you're where you want to be. :)

   We're Back Home Again in Indiana (for those who know the song) and it's warming up, but not nearly as warm as Florida was. Almost as soon as we got home, it was time to see the older Grandbabies because Princess Pistachio was having her 4th Birthday and it was definitely a fete fit for a Princess! This no-longer-toddler is a full-fledged fashion diva who was stuck on the color pink before she walked. She loaded up on Barbies, Barbie Accessories, and Paw Patrol. This Memaw enjoyed 2 sets of hugs, squeezes and kisses... 2 more sets to go! 


   Getting home was easy. Unpacking is always the hardest part of any trip, but this time, I'd unpack 20 times if I didn't have to face what we're facing right now. My Helper Dog, Hunni Pi, will be 14 years old on April 29th, and of course, she's slower than she was a year ago, but this past winter has been rough on her. Each month, she's gotten slower and is hurting more in her hips- barely being able to move at times without falling. She made the trip back to Indiana better than we thought she would, but during the last week in Florida, she began to really cling to me. She hasn't let me out of her sight and needs to be next to me or in my lap constantly now. I've thought of this time coming for the past 4 years, since one of her siblings was the first of her litter of 7 to die (from cancer, sadly). 

   Hunni Pi was born in 2009 from parents who weren't supposed to have been bred together. Her sire was a full bred Chesapeake Bay Retriever and her dam was a mix. The dam was surrendered to a local Veterinarian (for whom one of my Besties works for) and was delivered of 7 pups. They named each after the Vet and his siblings (one of whom was also our Vet for a long time) and the smaller, weakest pup was bumped up against the cage causing her a hematoma that needed to be drained many times. Our Bestie had helped deliver each pup and brought a few of them camping with us one weekend that fall. My Helper Dog at the time, Nikki B. Claws, had once been a stray and she was a good barker whenever anyone came around, but she was getting older and I dreaded losing her. When we walked over to see the new pups, they ran back and forth- all except one. This little blonde girl toddled slowly


and unevenly over to us and plopped herself down for a nap...smack on both my feet. The "No!"s my ChiefHubby said were turning into "Pray about it,"s and later that night, trickled into what we might name her. Before the weekend was over, I was her Momma. She's the only pet we've ever had who didn't go through anything bad in her life; she may still have started out unwelcome and unwanted, but GOD had a good plan for her and that plan included helping me. I am forever grateful for the gift she has been to me these 13 and 1/2 years, but now it's my turn to keep my promise to her and help her. How do you 'plan' this kind of thing? It goes against every fiber of my being. I am a
nurturer and a grower. anything opposite of that feels totally wrong to me. Yet, how can I make her keep going- when the pain medicine no longer helps her? In a perfect world, she would simply fall asleep like Buster did; he made it through the week at the Vet (a victim of one of the first-ever bad treat recalls causing renal failure- the same of which 1 Grandpup died from in 2022 and one recently came too close to death). He was released acting like his old self.... happy to just come home and let go in the night. But perfect endings rarely happen, and I cannot let my puppi pi down. With The LORD's help, I can bear this- only if she can. I know my prayers will be answered and I will One Day be able to see her again because I believe that nothing is impossible if we ask! I can only hope I am worthy of the accounting of her life with me will be good to The LORD's ears. We'll know the outcome by Wednesday night.

   As sad as this is for me, I took the time Hunni Pi rested next to me to make this "Tag Team" project for The Funkie Junkie Boutique's newest assignment for the Inspiration Ave blog. My tears flowed, but it was helpful to think of something that will hold photos of all the good memories I will have of Hunni and I together. That kind of thinking fueled my work and I'm pleased with how it turned out. 

I was very happy that Linda was able to restock Eileen Hull's Library Pocket Thinlit Die set
to use along with my Tim Holtz Tag Collection Thinlits.
I had several "dog papers" in my stash for some time now.
But while still in Florida, this 'clock paper' caught my eye- with good reason.
I felt it would make a good backing to tie my Tags into a booklet.


Before we get started, here's a handy list of links to tools and materials I used:


I began by tearing my TH File Card into two halves for my front and back covers.
Then I started die cutting all my papers into Tags as well as heavier cardstock
to use as my middle for the Tag pages to stiffen it up.
I also die cut smaller Tags -enough to make 6 fronts & 6 backs.
Don't forget reinforcers for the Tags for looks.

I used Glossy Accents to adhere all the reinforcers to the Tags on both sides,
then set them all aside for now.

I die cut 3 Library Pockets and 3 double-sided Cards to go inside.
There are smaller 'tab' dies, so I made 3 of those (and a spare),
as well as 3 Bookplates, then set those aside, too.

I wanted to create a couple of my own kind of Tags- Americana,
to show off my "All American Helper Hero" Hunni Pi.
So I dug up some favorite stash papers (I must've gotten a ton of this years ago)
and cut down the larger pieces into smaller ones that fit into a Tag die.

You can see how I adhered the top blue first.

To get the 'tear' on both edges: start by tearing off a bit from the bottom on the right side.
You'll want your right hand to pull the paper UP,
while your left hand pulls the other half DOWN.

Then turn the paper 180* and do the same thing:
right side goes up with the right hand and left side goes down with the left hand.

Begin another tear off the bottom (scrap it away) to begin another "Stripe's" edge.

Once you've adhered all the pieces, simply die cut the entire piece into a Tag.

Before I tore my clocks up, I took another scrap 12x12 like-sized
to make a plan of how many strips I would need for the number of Tags I wanted.

This actually worked out pretty well for me by just using the TH Mini File Folder
as my guide for width. It measured 4 inches, so that gave me 3 folds from 1 strip.
At 12x12, this meant I needed just over 7 strips.


Then I did a Paula Cheney kind of thing to 'splotch' up my clock papers
by smooshing some TH Ground Espresso Oxide onto my Craft Sheet and 
spraying some water onto it, then just dragging all my papers through the mess,
then heat dry all of it.

Next was to edge everything with the same Ground Espresso Oxide,
but with a Blending Tool.
Getting some into those creases helps give the aged look.
Remember to heat dry once again.
It was during this, I happened to find some pink ribbon
that just happened to match Hunni Pi's lead and her washed-out collar.

I gave the same aging treatment to all the papers
and started putting it all together.
TH Long Fasteners helped make the Bookplates look real.

I started layering the front cover to the first Tag...
there are TWO papers here: one under and one on top.

Keep layering as you add another Tag... until you
can add the back cover to close up like a book.
 I actually had one more Tag set than I needed
but didn't have a set of papers for the front and back.
You'll see in the end photos where I added another element instead!

Here, you can see all the middle parts of each Tag.
Each will be covered up- except for that one extra.
This is showing the backside of the foldout.
Here, the front side of teh foldout is shown.
I did purposefully place some of the clock paper upside down in order to keep
both sides the same direction.
My thinking is how we cannot control time itself.

At this point, we were still in Florida
and Hunni Pi was just starting to become 'clingy'.
She was just dropping wherever I was standing in order to stay near me.

By the time I was able to work on this again- we were back home in Indiana
and the clinging was increasing. She sleeps a lot now & it gave me time to finish this.

I added some IdeaOlogy items and printed out her name onto plain cardstock.
Can you spot the element that is going to be on that extra Tag?
It's from an older TH Movers and Shapers Bigz XL Pocket Envelope Die.
But you can find the newer Th Thinlits Collector Die Set (link is included up above).


Here's the finished project:


Front with belly band on.
And if you haven't guessed: this is one of Hunni Pi's blankies
 I am using for displaying this project.

The boy reminds me of how our younger Son was getting ready
to graduate high school and head off to Purdue-
officially making us "Empty Nesters".
This pup helped me while I was alone a lot after that
when ChiefHubby was still on the VFD and working full time as well.
The 1/4 is half of an older TH Type Chip, for the 14 years she'll be.
The paw charm and the paw print brads used on the inside Tags are from stash.


Front of Tag Booklet without belly band.

I used my TH Tiny Attatcher on these TH Stencil Chips to add Hunni's name.
Hunni comes from a dear friend in Alabama who had a Golden Retriever 
she named Hunni. I named mine after hers. 
Pi comes from actual 3.14 pi because our Sons were both Honors Math students.
(Click here to see related photo from previous post.)

This can be opened like a book, or spread out as in the following photos.

The Pocket holds the small Tags, which I added TH Jump Rings to, 
for adding notes or details on a photo.


The back of the extra Tag is a good place to keep her papers....

The loss of a Helper Dog is like getting an arm ripped away from your own body. 
The bond is a special kind of thing that happens once in a lifetime- if you're BLESSED.
And we were... VERY much so.
Hopefully, this will help me get through and remember the good times.
My concern now is for Hunni Pi to get through this time.

The backside with belly band on.

I think she approves.


Thanks so very much for joining me on this journey of puppi love
in handcrafting a Tag booklet for tucking away happy memories.

Remember to pop back in for more of our Design Team as we play
Tag Team for the next 2 weeks here on Inspiration Ave.
Don't forget to grab what you need from our Sponsor;
before you head off to create your own.

And now it's your turn: TAG, YOU'RE IT!

Until next time...

Stay Safe &
HAPPY BLOGGING!!