

This particular Challenge is one I have been looking forward to, though. I have several Besties who like creating gifts every year for others, and there are 6 of us who have done this for many years now together in our own little group. So while I do make more than just those 5, sometimes I make something for just them that all the others don't get. And I was really looking forward to posting it because it's such a cool idea!! I was soooooo excited about it, up until I figured out that the timing was off. Our little gathering is not until December 11th, and the deadline for this Challenge is tonight (December 4th). Unless I wanted to spoil the surprise of these little things....I had to come up with another idea for FF#23. Well, it's not really a problem, since I took all last year "off" from blogging, but I still kept step by step photos of whatever I was making, in the hope that I would be able to blog it sooner or later. I was able to use 2 things for entering into this year's Challenges at the FF Blog. They came in handy when it was crunch time for being Guest Designer! And this 3rd time comes in as a part-helper since I had to make more of these ornaments for this year, and it worked out really well. Especially since I had another RA flareup last week. I can say, though, that I am officially caught up for all the things I have going on at Christmastime: jam/jelly gifts, almost 400 peanut butter buckeyes, 6x recipe of my chocolate chip cookies, shaped sugar cookies, and several other things aside from the paper crafts and other gifts I cannot mention here. I was able to get the house cleaned up and all lit up- the hardest part with RA. I really detest being 'down' since I am normally a very active person. As they say; "Use it, or lose it!" and I really give it my best. So here's not just 24 sets of these ornament gifts from last year, but 3 more sets for a couple people to add to the ones from last year. (Plus one pink set for myself as the Grandma of the first GIRL in 54 years on our side!!)
While these are extremely simple to figure out how to make, I am putting up step-by-step for those who consider themselves "craft-challenged", or for the ones who always exclaim "HOW did you DO that?!", and I just smile and say "YOU can do it, TOO! It's EASY!".
So let's glide on here...

You can use any supplies you like for this- the sky's the limit!
But, the main thing you must have to make this set: Tim Holtz Alterations Die; Ice Skates.
The other die is his TH Thinlits Set Holiday Greens #658759

The Ice Skates Die is heavy duty- steel ruled. These dies that can cut thicker, harder materials such as thick cardstocks or special woods and metals, but be sure to check with the instructions before you try out the material. I usually like to work with "mat board' which is used for framing photos inside the glass.

This is mat board- can be found on Amazon or Hobby Lobby, Joann Fabrics, or just about any professional framing store. Hobby Lobby often sells the cut inside portion (where the photo is) and bags a huge pile of different colors odds and ends into a clearance package for a tiny price!! I bought this bundle of 50 all white 8x10 mat boards from Amazon- came directly to my door for about $10 and will last me a good while! Mat board is thick and strong to stand up to a lot of handling & use.

If you're going to do like I did, and make enough sets for say....30 people... you'd better get a head start near Thanksgiving, as there is quite a bit of cutting if you want to do like I did and make each individual skate have SEVEN LAYERS! I wanted mine to last for years to come!
Then, you'll have more cutting with the greenery. But, hey, these are NICE GIFTS!

I make my own foil cardstock for this project: heavy duty Reynolds Wrap foil adhered to regular white cardstock with Modpodge. You can use whatever glue or adhesive you like.

Getting these sets to look good both front and back for a tree decoration means you will need to reverse your materials to cut one for each side of each skate.
Foil side UP for the BACK sides....

...and foil side down for the FRONT sides.

Trim off the foil so it fits only onto the "blade" of the skate for a realistic look.

Here, you can see how the foil faces both ways so that both sides of both Left Skate and Right Skate are completely covered to look real from any direction as it hangs on the tree.

I used Glossy Accents and I am always a bit heavy-handed with it, but in this area- it makes it look like ice/wet on the skate. I LOVED that!! I did notice, however, that the Glossy Accents will prevent any Distress Inks from coloring it over. For ME; it only added a more vintage look, in moho!
But you can do the Distress Inks FIRST, if you prefer, and THEN do the gluing.
The red you see is the un-wanted side of the cardstock used. The PINK was the side I wanted. So this view of the stack is all put together to keep each set from getting mixed up. In the photos above, the white sets show a baggie with the words "LONG" and "SHORT" to keep each skate separate until I put the sets together. One Skate is slightly shorter than the other. But you can make sets in identical pieces or however you choose.

This year; there was one special set...because he was born & raised in Hawaii.
I happened to have some cool papers in my stash that I thought would make this a one-of-a-kind.

Lacing up the skates.

Take your pick of lacings, but if you want thick sets like these; use some pliers to make it easier on your hands! I also like to use either a Sailing Needle (thicker and longer) or a Curved Heavy Duty Needle. The holes in the skates are already there, and easily to pop into with the needles.

I do all my shading and distressing AFTER I put the laces in.
It just makes sense to me that the laces also need to look "old" and "used".
The TH Oxides are YUMMY !!!
And the TH Distress Markers and Crayons come in very handy here!

You can shade in any colors you want. Or just leave them, if you want.

Again, lots of cutting, sanding, and Distress coloring;
but it's all well worth the look !!

I cheated here: I used the Glossy Accents for a double-duty:
I wanted the leaves to last, so I thought of coating them with TH Ranger GlueNSeal, but thought the Glossy Accents would look cuter on the Holly leaves... so I coated all of it and when I got out my Skates Ornaments from LAST YEAR (2017)… it stood the test of storage VERY NICELY!!

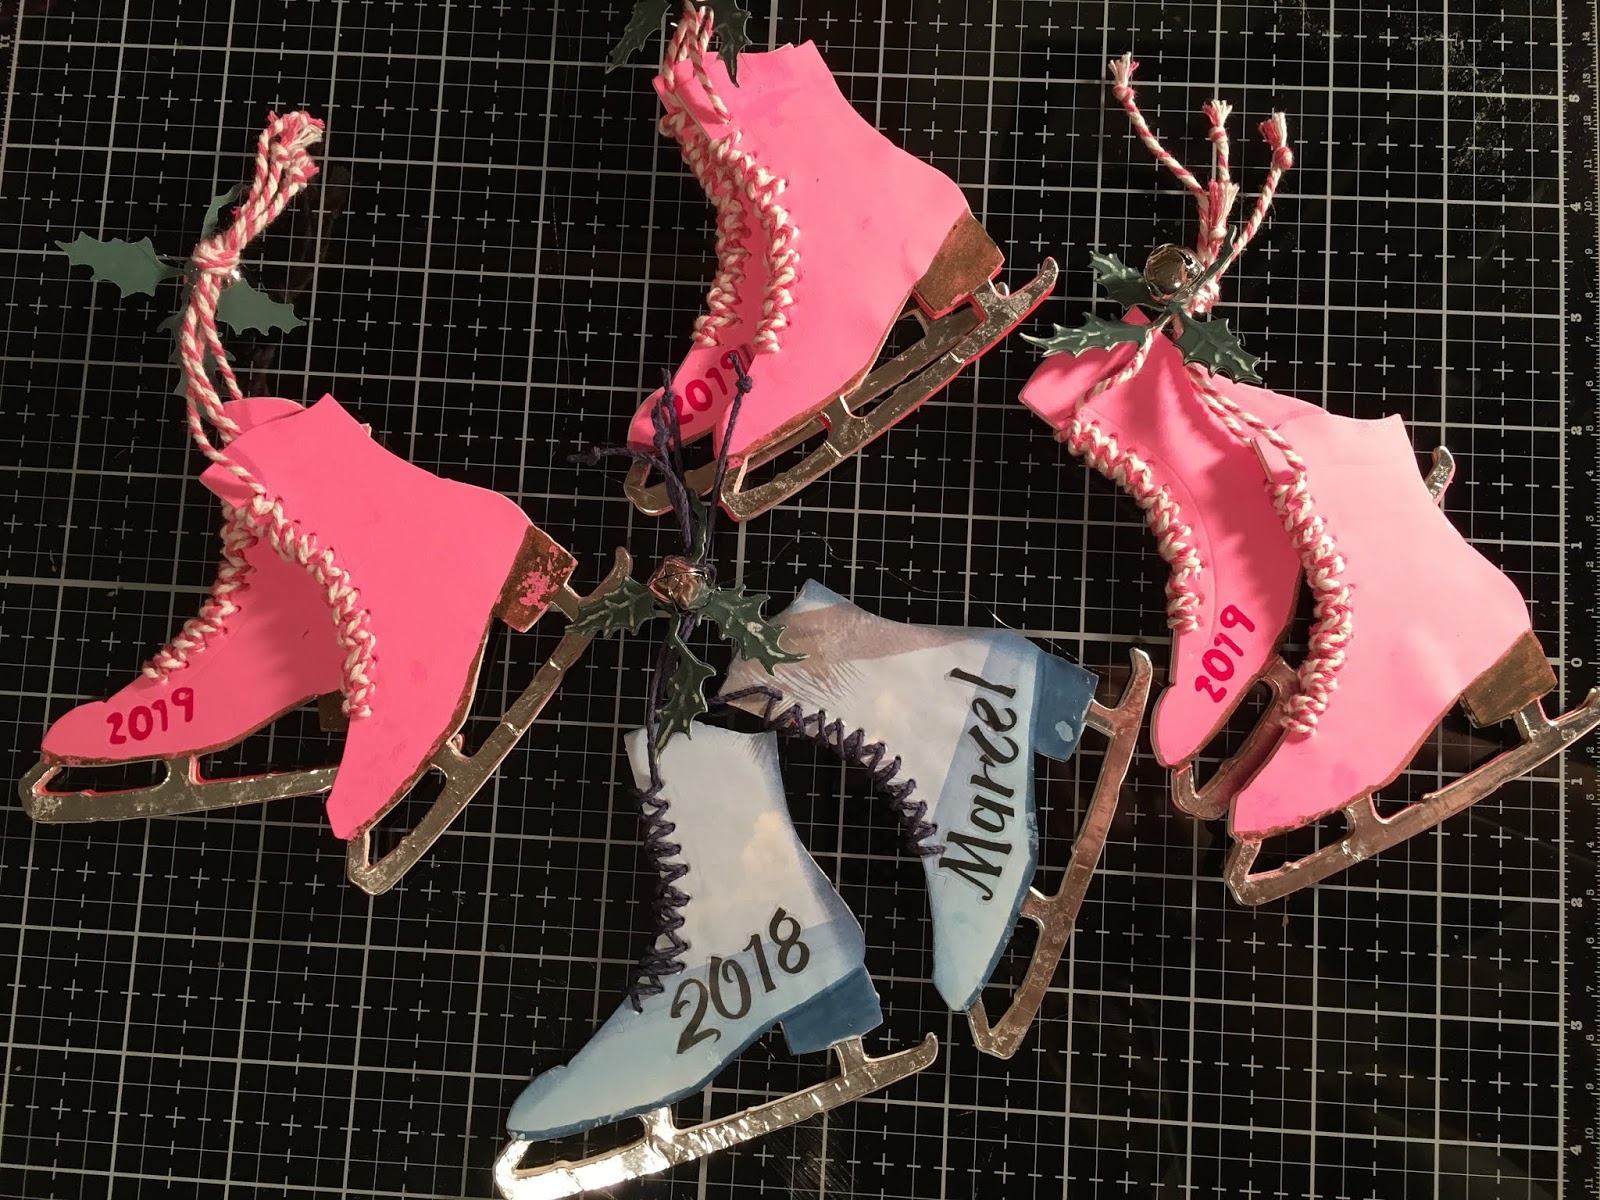
The pink ones are left blank... until the Older Set of kids pick out a name for their
Baby Girl due in March 2019. First girl out of 10 chances in 54 years of my ChiefHubby's mostly all-boy side of Larimore Family! As it was, All my older siblings have boy/girl or girl/girl,
and I am the only one with 2 boys. Yeah, we're ready for a girl...
and more of BOTH, if GOD so wills to Bless us with !!

Both sets of kids got a Husband/Wife set.
All the Besties got a Vintage White Set (I even got out my own real ice skates to
copy where the markings should look worn.)

The Wittle Peanut Grandson's set... he helped hang them this year!!!
Yep- these are THAT durable !!
I hope you've enjoyed these posts from 2018, and even more so:
I hope you'll feel up to getting in on the fun at
I need to give a huge shoutout of THNAKS! to
for sponsoring all this fun I've had throughout 2018.
I chose my "wants" this year from my ChiefHubby and lookie what came in the mail...

This was just TODAY from The Funkie Junkie Boutique!
I split my $$ into two orders where I found every single item I was hoping to add/replenish
to my stash of goodies in my Studio. I swear I saw my Studio floor SMILE at me!!
*wink-wink*
Every store I went to. that Merry Moose has been RUNNING OFF WITH PEOPLE!!!
I was SO HAPPY to get one from TFJB!!
I can see lots of things to create and 'pay it forward' to some unsuspecting reviever with these items!!

The other half of my $$ was from JoAnn Fabric's Black Friday
(items pictured on the right side) online sales.
I'm looking forward to what 2019 has in store for my studio and my stash!
I never get bored when I think of something to create.
I think 2019 will bring us all new challenges, and I hope: new friends,
But, the "vintage" friends will keep on creating with!
I hope to be back on here for a year end post, but just in case:
MERRY CHRISTMAS!
Be Safe &
HAPPY BLOGGING!!
6 comments:
Lyla, I always enjoy coming to your blog, and this post is super sweet! Wow, what a labor of love to make all those skates! My wrist hurts just thinking of all that die cutting and lace threading. (Yep, I have the Big Kick.) Your skates really look like the real deal and my favorites are those sweet couples sets, so they can do their couples dancing. Ice skating was a favorite activity for me when I was younger and lived up north. I could be found on the pond every spare minute I had, even into my late 20's. Thank you for a wonderful trip down memory lane with your post today, and of course, for sharing it with us a Frilly and Funkie! Sending hugs and Merry Christmas!
Wowsers! That was a LOT of die cutting! Your attention to detail shines once again. These are so fun and so beautifully made. Thanks so much for sharing with us at the Frilly and Funkie "Tis the Season" Challenge! Merry Christmas!
Wow! Those skate ornaments are gorgeous! I have laced those skates before and that is not an easy thing to do and you did it for all those beautiful pairs! Wonderful gifts and they are sure to appreciate the lovely ornaments! Thanks for sharing your gifts with us at Frilly and Funkie Challenge!
Your skate ornaments are fabulous. Love the different finishes and colours to suit the recipient. Thanks for joining us at Frilly and Funkie.
Hugs!
Cec
These are really fabulous, Lyla!!!!!!!!!! Merry Christmas to you!!!!!!!
These look so fun to make and give!!! Love the all of your creativity in choosing special papers for special people! And the pink ones are of course my fav!!!
Post a Comment