It's last minute again. But there's always good reasons why I run so late! (LOL) Actually, this time is not exactly a good reason; it's simply that Mother's Day is my very least favorite holiday/day out of the year. Coming from me- the ultimate Mrs. Mommy- that sounds strange, but I do have my reasons for the dislike, and while they're not really interesting enough to go into, suffice to say that I finally came up with an idea that I could not only live with, but it actually made new memories for me and it's one I hope I can keep doing. Not to put my late Mom-in-law down, because someone will read this and end up having a cow. Oh well; we hashed it out years ago, not long after it happened. After I finally became a Mom in 1989 (we'd been married for 5 years by then, remember, so it was a pretty big deal to me), the ChiefHubby and I always tried to make a point of making sure our Mothers heard from us on Mother's Day, or as close to it we could get. And after all the hoopla on that particular visit, when things quieted down and it was just she and I out on the front porch for a minute. After some funny thing said, I mentioned that this was MY first Mother's Day as well. It came fast- before she could think about it, as she said later; "But you are not MY Mother." I wondered aloud what she meant and she answered that she didn't have to wish me a Happy Mother's Day, because I was not HER Mother. Now, part of me understands that now. But at the time, it hurt... a lot. Years later, we were able to talk that out, but it kind of added to my already-dampened joy of declaring one day out of the year "Mother's Day". Especially when REAL Moms do NOT have 'a day off' like paying jobs. Oh yeah; we don't get paid either.
 So when it came to be MY turn to be a Mother-In-Law, I was determined that I WON'T BE ONE AT ALL. I don't want to be an "In-Law" Mom, because I am just MOM. Of course, I have no intention of taking any place of my Girls' Moms!! In fact, I am so very HAPPY they have Moms- especially that their Moms and Dads are also a second set of parents for our 2 boys as well!! Besides, a girl still needs her Mom now and then, and her Daddy, too...and it'd be really nice to have mine, truth be known. He died 4 years ago today (April 28, 2016), and I miss him every day. He was my Step Father, who was not "Step" to me at all, and had to play the "I'll pay you to keep her" game with my ChiefHubby. Our kids were his Grandkids, and I miss being able to show him my own Grandbabies now. My three older Sisters are dealing with the same- having Grandbabies the same years as me.
In any case- blood doesn't prove you are FAMILY. To be part of a family takes LOVE. So when A Mother's Love- The Funkie Junkie Boutique Challenge #9 was announced, my thoughts started running this way right off. And that's what led to my memory of that conversation. I am determined that MY DAUGHTERS will know how important they are, & how important this day is to them as Moms, as well as to me: for the gifts of LOVE they have presented me with- first, by loving my Sons, and secondly by birthing such beautiful Grandbabies... and especially; for allowing us to ENJOY those babies!!
The younger Daughter up in Minnesota is having her first Mother's Day with their 6-months-old-that-very-week Baby, and the Older Daughter celebrates her 3rd with 2 Babies. How could you go wrong when you powerwash the house and the very next week find 2 birds with nests on the house's outer lamps?
I'll cut the chatter and show the matter...
Starting ideas came from the TH Stencil I've wanted for ages...Thanks, Amazon Man!
The oldest Grandson calls our UPS man (& probably all UPS men) "Amazon Man",
so we started saying "The Amazon Man left another package!", lol.
TH Paperie Memoranda is the PERFECT Spring go-to paper!
The Mat Board leftovers from a previous project made good filler for the main Tag's birdhouse.
After I got the idea stuck in my head, it got easier to imagine it taking shape.
I'm missing the TH Stencil Bricks.
Seeing all those bricks being crafted by Tim's new Bricks 3D Embosslit;
add another "WANT!" to my list. I didn't notice one during my last shopping.
His stencil was the next best thing.
The TH 3D Embosser shown here is Lumber.
I used the Paper Studio Farm Stack again, and that stack is getting slimmer by the month.
I've got the green shades left.
Here is where I did the sanding on the greyish Farm Stack paper,
and some branch pieces from the TH Alterations Die Branch Tree (an oldie but goodie!)
to start "stacking the wood to cover the main Tag's birdhouse,
and make 'nesting' for the inside.
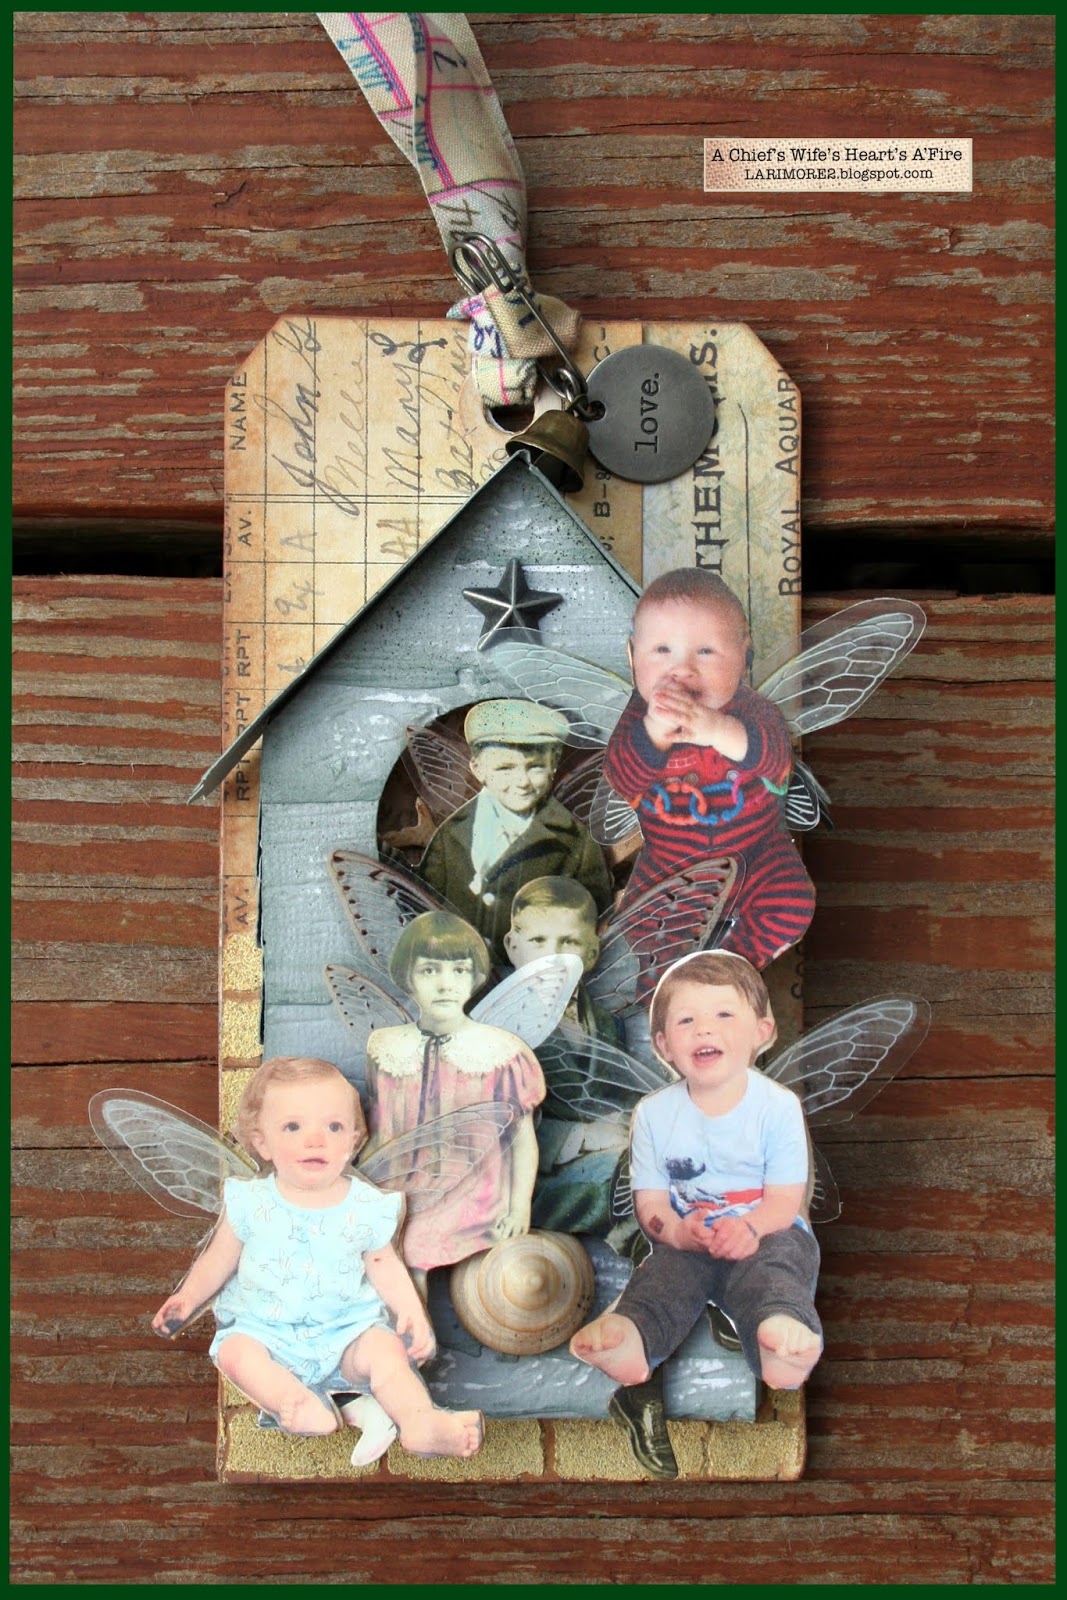
The Main Tag was planned to be mine, and is 3D and thick,
while the two other Tags would be flat.
I've been warned before not to add 'do-dads' to BOOKMARKS as gifts to my kids.
And believe me; all my kids -and now the Grandkids, too- LOVE books.
So that's always a safe gift from me.
Stacking the cut and emboss-foldered wood onto the front.
I used Tape Glider to adhere the pieces together-
but waited to add it to the front AFTER making a matching hole.
Doubling it like this just adds to the effect in details.
I even cut and stacked the thinner sides, since they were visible.
Making the hole again- by just tracing the first.
And using the new Crackle Stencil !!!
Yep, I knew it: I'm a fan!!
Not having any TH Distress Embossing Glaze yet,
I chose another out of my stash for the two Bookmarks- a Glossy White.
So NOW you see why I didn't have the TH Bricks Stencil in the photo above;
it hit me over the head that I DID have some TH Distress Embossing POWDER,
(in Antique Linen- one of my FAVE go-to colors)
and the fact that the stuff does make a really nice bricking...
I couldn't resist.
Er….my MUSE couldn't resist. lol
Heating the now dried TH Distress Embossing Powder.
I did cut a firmer inside set of pieces...from the Amazon Man's boxes.
Here's the laugh of the day: this trash is definitely related with Mother's Day...
I had to order my feminine hygiene items online.
How embarrassing! Yet, fitting in some honorable way, for this.
My first time at using the TH Distress Crayon technique to colorize the TH Paper Dolls.
(Thanks to Paula Cheney for her helpful videos that help Tim out!)
An older Sizzix Strip Die was perfect for the lettering on the Girls' Tags.
And here's another 'RUN-DON'T-WALK-TO-ORDER-THIS-STUFF!'
because that TH Fabric Tape is the bees knees !!!!
It's strong, it's sturdy, and it's tape the way tape should be!!
And since one of the rolls looks like the TH Memoranda Paper... :)
I chose to use this as I would my TH Tissue Tape; fold it in half to itself for my ribbon.
The trick is: pull out just over HALF of the tape cover, clipping off most of it but leaving
just a bit for your fingers to hold onto for pulling.
Then using the rest of your fingers on that same hand- gently lay down the tape to
its other half as you glide the tape protector cover off.
I practiced on one after I opened up the tape and found it to be
EXTREMELY GOOD TAPE!
My RA hands did much better using only half of the tape opened at a time
instead of the whole thing at once.
And then...you know me... I hadda get it personal and up close.
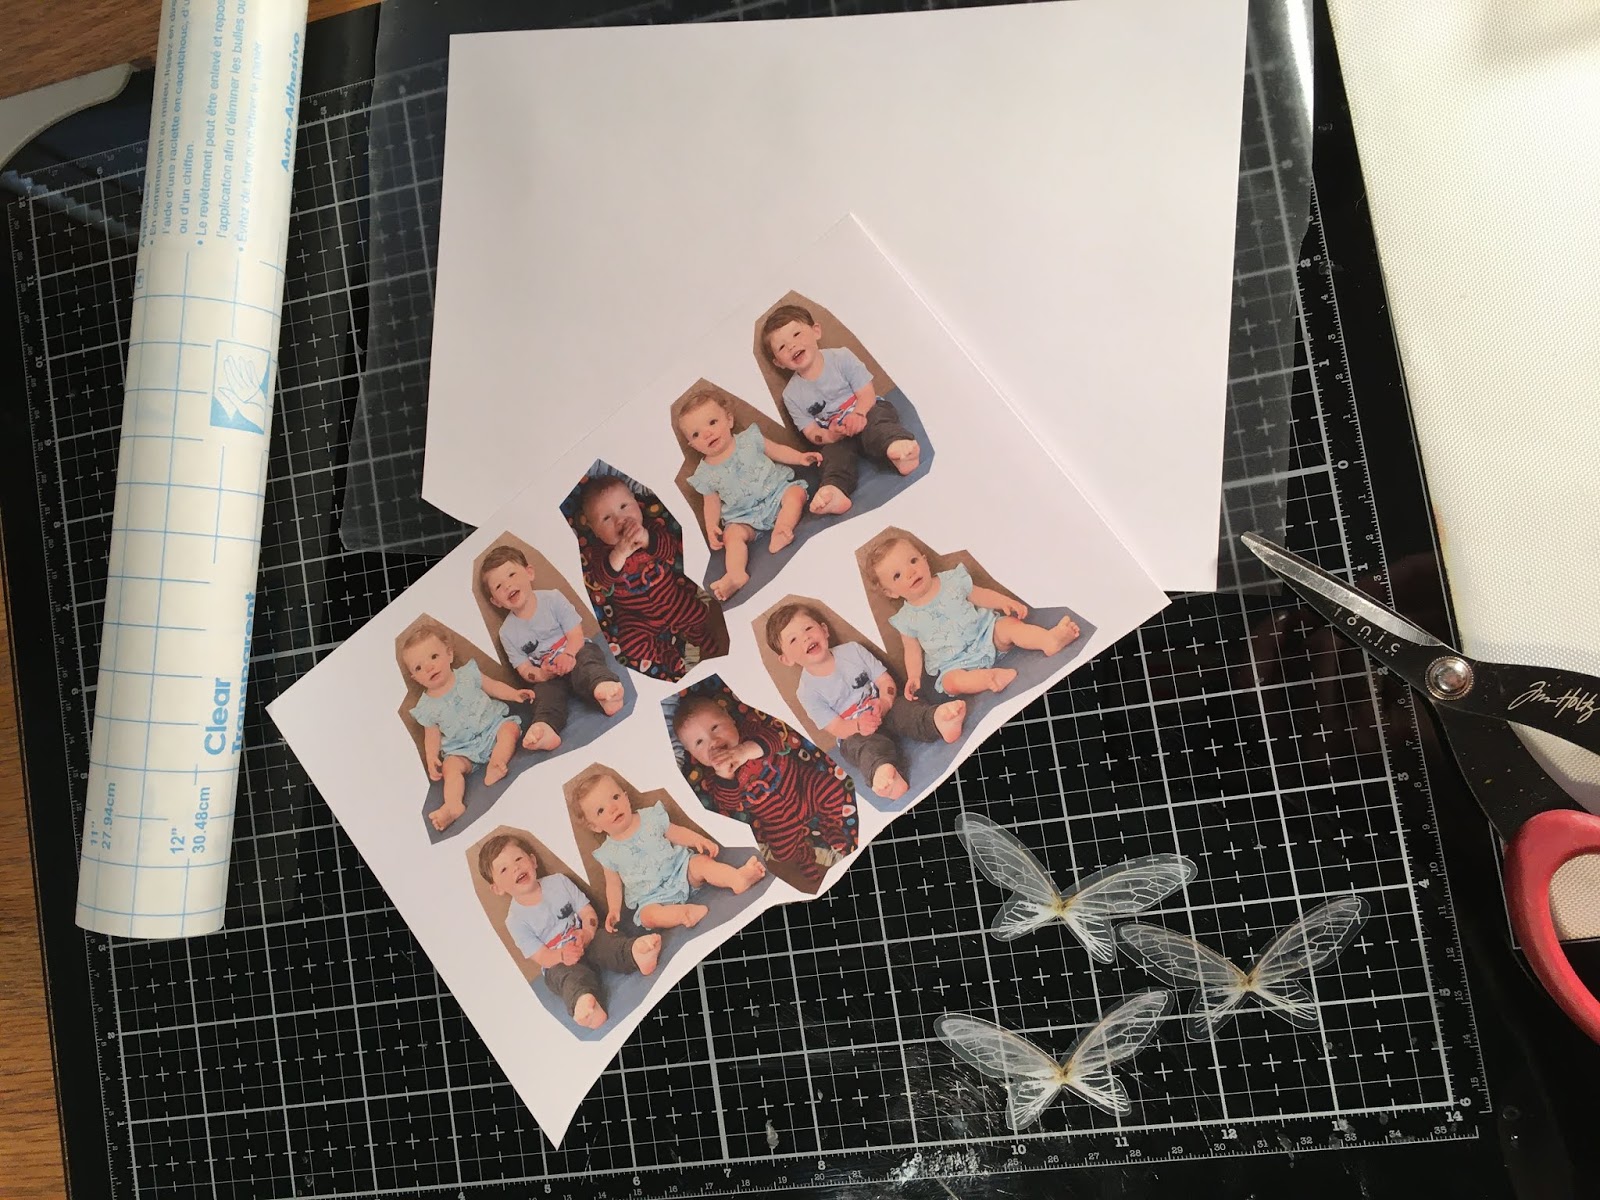
So off to my computer I went for the latest, cutest pics of my
BEAUTIFUL GRANDBABIES...
and turn them into GrandDolls!
Making the crops, then copying a mirrored set of each
(the 2 older babies were taken together, so I made 2 sets extra since they overlap
a bit in the photo),
and save these for another day- and another thing for their "Time Boxes".
A little fussy cutting, a little Glider Tape...
and some awesome TH Transparent Wings!
And here's the Happy Mother's Day results...
Yes; the GrandDolls do come out of the pocket/birdholes !
They'll get a kick out of it...some day.
I just HAD to add the GrandDolls to my Tag- so they could see how I matched them up.
Does any other Mom/Grandma out there "see" a child as what they will look like or
be like when they are older??
With my own 2 boys, it helped me guide them to what I just knew they could do.
I tried my very best to always follow that 'sight' I had of them- even as babies.
And now; as Memaw, I'm just THERE.
I'm not Mom to these babies. But I can still help my own kids be the best
Parents they can be. Although...none of them seem to need any of our help
because all four of them are AWESOME PARENTS & my heart bursts with LOVE!
The Backsides.
Actually, the flowers of mine were supposed to be on the front.
Embracing your adhering mistakes means that sometimes the "mistake" knows
a better look than you did... I LOVE IT!!
(Pardon my PopDots- Little Girly, pull your dress hem down!)
Some closeup pics:
Check out the BRICKS...
And all that yummy TH IdeaOlogy !!
Here's the "LOVE" on the main Tag.
The TH Fabric Tape
More IdeaOlogy!
The "LOVE" on this 'peeling white paint' is so adorable to me.
Oh. Wait...that must be that BABY I am staring at! ;)
Here's the double-sided of Peanut- just to show they are double-sided.
At the very last minute...I decided to add the date of Mother's Day- May 10, 2020
to all the Tags with Black Perm Archival Ink.
Wrapped and ready... for the stack of gifts to go out!!
Right now- our county is on total lockdown.
So when things are better...
I wish to THANK YOU all for the comments and for checking in to my Blog!!
I'm hoping to not be so late ALL the time, but....
the woods are calling me!
If only they'd be as LARGE as past years. But, it's just begun!
I have a lot of time to think while I am out there, and my thoughts go from
missing my Dad- I always took him some when he couldn't go out to find his own-
to the fact that Cass County, Indiana- (home to the Chief and I) is right now
the WORST in the country with COvid19.
I've been home since March 1st without going out, and it's weird to say the least.
My heart breaks during this time, and all I can do is KEEP PRAYING,
and KEEP TRUSTING THE LORD.
Until next time...
Stay Safe, Stay HOME, & Stay Connected!
HAPPY BLOGGING!!